|

I'm sending this guitar using FedEx who have given me more than a decade of reliable and safe shipping. I did read that it's wise however to protect contents with plastic if the weather is unusually wet (which it is) The whole thing is now sealed in plastic just in case.
|
Left: We are having some rainy wet weather here so although it's a remote risk, I wrapped the instrument in plastic for additional protection in transit. Right: The wrapped instrument has now been packed into a shipping box with a lot of additional padding and protection. I will now seal it up and weigh and measure! |

The waterproof package has now been packed in a shipping box with plenty of padding added. This should be a very safe instrument. It may be exposed to cold-ish temperatures but should not affect the instrument inside. It will be delivered straight to my customer's door.
|
|

Getting the instrument settled securely in its Protec case. Should be safe for its travels. I will be packing the actual shipping box very carefully!
|
Left: Getting ready to ship - firstly, strings are loosened a bit to minimize travel stress on neck. I used packing to fill any spaces that could allow internal movement. Right: Protec case is sealed up and ready to travel. The accessories are packed in the front pocket. This case is very good protection for the full instrument! |

The guitar is now securely contained in its Protec case. I will now collect all my other shipping supplies and get the case safely in its shipping box for its upcoming journey.
|
|

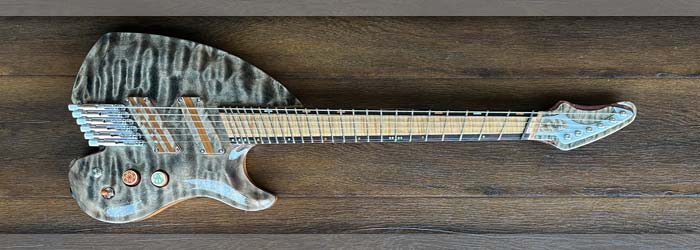
Very cool and unusual headstock based on my customer's concept. Everything on this guitar is different which is a good thing!!!.
|
Left: I'm posting a few photos of the finished monster so that I have them here on the site. This is the headstock area which is based on customer design. Right: Quick photo here of the fanned fret fingerboard using two different woods and incorporating Morse Code inlay fret markers and LED powered side dots. |

The fingerboard is very unique the curly maple is a nice feature!
|
|

Removed the excess filler from the little voids I filled and I will now add a little finish to the insert before I attach it to the back of the neck.
|
Left: OK - filled the voids and will now it it with a light coat of sealer/varnish. After that it gets installed and becomes part of the guitar and I think we're done. Right: The very unique nameplate is now installed in the back of the headstock. I think we can call this guitar pretty much complete now. Looks very nice. |

The nameplate is now part of the headstock of the guitar. It's raised up just a little bit from the headstock surface which gived it a nice 3D effect. Will do a final tune up/test tomorrow.
|
|

I bought a few more inlay colors and we decided that we would do gold in the nameplate. The color is beautiful so it should yield good results. This will take all night to fully cure but should have some images to share tomorrow!.
|
Left: Last minute change - we're going for GOLD in the nameplate so I have mixed up the formula and filled the engraved areas in the piece of mahogany. Need to wait till it cures. Right: This is the insert with the excess filler scraped off. I have a few small (and expected) air pocket voids which I will now fill to finish. |

I scraped the extra filler off the top surface this morning and this is the insert about 90% cleaned up. I need to add a little filler in a few spots that were caused by inevitable small air pockts. Once I do that I will do a final scrape and sand and add a wood finish which will increase the contrast and colors even more!!!!.
|
|

Machining the recess using very small cuts to avoid compromising the finish. I will post a photo of the finished results soon.
|
Left: Busy machining the recess in the back of the headstock. Taking a lot of care to avoid chipping the existing finish so only taking very small cuts! Right: Recess has been machined without any collateral damage and the insert fits in there nicely. I need to get the filler mixed and aadded into the engraved areas now. |

The recess has been successfully machined into the back of the headstock and I am now ready to fill the insert with the powder mix and get that part finished.
|
|

This is the filler I had in mind. It's white pearlescent which should create a nice silvery inlay similar the artwork on the back of the neck.
|
Left: While other things are going on I looked out my Silver/White pearlescent pigment powder which looks like it will be a good color match to the Crop Circle artwork on the back of the neck!!! Right: OK the guitar is now up on the CNC - I HATE machining anything on a finished instrument so I am being turbo-careful. Stay tuned!!! |

In order to accurately cut the recess for the insert I HAVE to set this guitar up on the CNC. Not easy clamping a finished piece of artwork on the machine. I'm being VERY careful to avoid any clamping issues and will be relieved when it's done!.
|
|

I now have the insert blank ready for engraving. I will have it slightly raised from the back headstock surface to make it a feature - also aware that there are string retainer screws behind it although they should not be aan issue. Next is laser engraving.
|
Left: The insert is ready for laser. I'm planning to have it just slightly proud of the headstock surface when it's installed. Should look good that way! Right: Just finished on the laser and I am happy with the quality of the engraving. Ebony is hard stuff but I was able to get a good clean result and can now move to the next step. |

It was a tricky set up and I had to be very careful with alignment of the artwork and selectingthe best power settings but the end result is very nice. I'll probably fine sand it and then work on getting the filler mixed, embedded and set.
|
|

Got a couple of quick programs written. First one will complete the machining of the ebony blank piece. The second one will cut out a matching recess on the back of the headstock.
|
Left: Now writing a couple of programs - first one is to cut out the Ebony blank, the other is to cut a recess in the back of the headstock. Right: Got the perimeter of the logo insert machined and I will now sand it to finished thickness and get it ready for engraving on the laser. Also will set up CNC to cut the recess in the headstock! |

Going as fast as time permits - ran the program on the CNC for the insert outer perimeter which I will now set up on the laser to engrave.
|
|

We are adding a Watson Guitars plate on the back of the headstock - I'm currently working on this and will have real photos of the addition very soon!.
|
Left: Last minute addition before I ship - we are going to add a plate on the back of the headstock to identify this guitar as a Watson! This is an artist impression but will have real photos soon! Right: I machined a piece of Ebony close to the required thickness. Will now cut and drum sand it to get it ready for the laser engrave. |

Preparing a piece of nice dense Ebony for the nameplate. Will update as I go through the machining, sanding and engraving processes.
|
|

Guitar is ready to make its journey so I'm being very careful about making sure it can tolerate the bumps and changing temperatures on its journey to the customer.
|
Left: Busy packing everything! The case is very protective of the instrument but I put a few pieces of extra padding in there just in case! Right: Guitar and associated parts are now safely secured inside the Protec case and my next task is to get it carefully fitted into the shipping box and get the whole thing weighed and measured. |

Instrument now sealed up in its Protec case and I am now working on getting it boxed with plent of protective packing around it.
|
|

Did a good long list of final adjustments and I think it's ready for some final photos and then careful packing for its journey to my customer.
|
Left: I'm now ready to get this instrument packed and prepped for shipping. I'm trying to get some good glamor shots of it before I box it up! Right: Quick shot of the back of the guitar with the crop circles and various inlay areas. This one was not just a guitar but an art project as well!! Will post a couple more pics. |

Back of the instrument is very unusual. Have a lot of personalized inlay work on there for my customer.
|
|

Replaced the 9v batteries with new ones although it doesn't really use much power at all. Did a bumper to bumper check to make sure it was ready to ship. Now I have to get it safely packaged in a shipping box!
|
Left: Got new 9v batteries installed, also selected custom strap buttons and checked everything on the instrument. I'm going to take some glamor photos and then get it packed up! Right: We've been under possible fire evacuation and now enduring power cuts so I'm catching up on final adjustments! More pics coming! |

Recent local wildfires have cause the power supply companies to shut down neighborhood power so it's been a bit crazy trying to get what's needed done in daylight without electricity!!! Looking good though!
|
|

My most important remaining tasks are to make sure we have new batteries installed, that nut, neck are set for comfortable playing, and all being well I will need to safely pack the instrument and case in a strong well-padded box. Once that's done I have to weigh and measure it and get a quote from FedEx to transport it to its destination!!
|
Left: Final details, some truss rod adjustment, checking 9v batteries, gathering up all the adjustment tools & keys, making sure everything functions electronically. Right: Final tweaks on the truss rod and the bridge adjustments and I will tune everything back up to pitch and test things out. I will then get everything packed up!!!! |

I de-tuned to adjust truss rod and make a couple of other final adjustments. Will get it all tuned back up and see how it all performs. All being well I can get it packed up. Will de-tune a little for transport purposes probably!
|
|

Almost done with this beautiful guitar, just getting the strings back on for final testing!
|
Left: Frets have been leveled and polished up and strings and truss rod cover are back on. I'm now tensioning strings back up to required pitch and doing some testing to make sure action is good. Right: This guitar has some really unique stuff on it - I added a matching wood top to the 3-way pickup switch to make it even more custom! |

I added a custom top to the 3-way switch using the same wood as in the pickup inlays, made it myself with wood I had in my shop. Quite a tricky job when you don't have a little lathe to work with, but end result looks very good! I tried finding something on the internet but the quality wasn't great and I had to make it fit a 6-23 thread, not an 8-32 thread.
|
|

I took the strings off, used the truss rod to adjust the unstrung neck totally straight - then worked on the fret leveling to make sure all frets are on an even plane. With that done I will re-assemble everything and re-test playabiliy!
|
Left: Time for final fret leveling and fingerbord cleanup after which I will re-assemble with the strings and test the final truss rod and nut slot settings! Right: Did some minor fret leveling (didn't need much) so that we are ready to re-string the guitar, plus a clean and conditioner application on the fingerboard. |

I did a fret level to make sure there were no high spots and reconditioned the fingerboard so that I could get the strings back on the instrument!
|
|

Cutting the string slots in the nut to their final depths.
|
Left: I'm working on the finer details of the nut slot depths for the strings. Once they are all finalized I will make adjustments at the bridge end. Right: Working on the fine details of nut slot depth, fret leveling and truss rod adjustment. As soon as I finish that I'll replace the truss rod cover do some more testing! |

Nut slots are tricky because you can't go too deep or you'll mess things up - I'm adjusting a few thousandths at a time until everything is set right. Smaller strings can be closer to the frets than larger strings because the bigger strings have a bigger resonant amplitude - they vibrate more up and down near the nut!
|
|

I re-assembled all of the tuners and got them installed back on the guitar. One more task out of the way.
|
Left: I modified all of the tuners so that I could get a little more linear travel out of them and got them installed back on the guitar. Was able to achieve pitch requirements! Right: I'm working on the finer setup adjustments - string height, nut slots, truss rod adjustment, fret level just to make sure playability is comfortable. |

Working on the general setup and playability of the guitar.
|
|

After some careful planning we were able to add the 3-way pickup selection into the circuit that incorporated the coil tapping features. Seems to test just fine so moving on!.
|
Left: Got the internal wiring done to include the 3-way toggle switch for pickup selection. We were able to maintain wiring for the coil splitting in same circuit. Right: One rather tricky thing I had to do was increase the travel of the tuning saddles by removing a little material from the back end of the insert! It seems to work though! |

Because of the unique tuning requirements for this guitar I had to give the tuners a little more linear travel by grinding off some of the saddle material at the back of each unit. After dong this I was able to achieve the required string pitches.
|
|

Another delicate job done - you have to be pretty careful with the finish when drilling through in situations like this!
|
Left: I established a hole and got the on/off switch for the LED lights installed in the body. I'm going to try and make a slightly custom end for the 3-way switch!! Right: After some discussion with my electronics guru we established a wiring plan that will allow the 3-way selector switch to work along with the coil tapping pots! |

This is the updated wiring digram that wil allow us to add the 3-way pickup selector to the existing circuit we currently are using.
|
|

Re-sizing the hole to accomodate the pickup selector switch. Next I will install a flush on/off button for the LEDs.
|
Left: I'm busy changing the LED switch to a 3 way pickup seletor switch which requires working on the hole size and recess depth. Also adding a low profile LED switch. Right: I had to get the guitar up on the CNC to machine out a couple of areas of relief in the control cavity since we are moving/adding switches! |

I have to do some minor machining in the control cavity to make the new switches fit properly - being very careful on handling the guitar!!
|
|

I have to do some minor machining in the control cavity to make the new switches fit properly - being very careful on handling the guitar!!.
|
Left: I have parts on the way to allow me to convert the existing LED on/off switch to a 3-way pickup selector and re-assign the LED on/off elsewhere on guitar body. Stay tuned!! Right: I received the 3-way switch and the switch unit for the LED on/off circuitry so I am going to get started on making the electronic changes!! |

The electronic hardware I needed has come in so I am going to get started on making the conversions and moving things around. I don't think it will be a super hard job.
|
|

Working on the string heights both at the nut and at the bridge saddle area.
|
Left: Working on nut slots and several other adjustments to get the string heights set and make sure neck/frets are ready for playing. Will be done soon! Right: Last minute changes required - going to put a pickup selector switch where the LED switch is and move LED switch to another location. Will post updates on this very soon!!!!! |

We're going to replace the existing switch (currently for LEDs on/off) with a 3-position pickup selector switch. Looking at relocating the LED on/off with a discrete push/push button in one of these two locations.
|
|

Adjusting truss tod as I tension up the strings, then will finish up the string slots in the nut and get the bridge saddles adjusted for optimum playing comfort.
|
Left: With the strings back on I am now working on neck, nut and bridge saddles to achieve a nice comfortable playing set up. Knobs going on also! Right: Quick shot of the guitar with knobs on. I had to get the hole size on each just the right size to allow the knobs to press on comfortably! Finally got them just right! |

The holes in the knobs needed to be very carefully sized so that they press onto the pot shafts with just the right pressure. Not easy to do but nailed it!
|
|

Removed saddle from the tuner and have it up on the CNC to get machined a little bit wider so that it fits the string winding. Should be back on the instrument very soon!!
|
Left: I ended up holding the saddle of the ABM bridge in a vice on the CNC and using a very small end mill to carefilly machine the string clearance slot just a tiny bit wider. Right: I was able to cut the slot on the low saddle wider so that the string binding would fit in there. Re-assembled everything and now back to final adjustments. |

Looks like everything worked out fine. Low tuner is now able to accommodate the string binding on the heavier string.
|
|

We're good on knobs, I'm now putting on the real set of strings for this guitar and will be tuning it up to its specific pitches. I'll do some testing and physical adjustments and see what we end up with!!!!
|
Left: I'm getting the knobs polished so they look as awesome as possible, also putting strings on the guitar so that I can get the hardware set up!! Right: While putting the final strings on I discovered that the ABM saddle retainer was too narrow for the string winding on the string gage my customer wants. I can fix though :-) |

The bottom string is slightly bigger than a standard low E and the winding was just a tiny bit too thick to fit in the adddle slot of the AMB tuner - I will dis-assemble the tuner and fix - should not be a big task!
|
|

Not bad! I think these will work very well on the guitar. I still need to apply the appropriate amount of finishing compound but most of the hard work is now done!!!!
|
Left: Got the machined recesses filled! I neeed to deal with a couple of small areas that have voids but otherwise all good. I need to re-apply the finishing compound and then they should be ready to use! Right: This is just a quick pic to show the two knobs on the guitar - I still have to finally fit them but they are cool and different!!! |

Quick test fit on the two knobs, I forgot that on the front they match the fingerboard inlay colors and the inserts on the pickups. Also setting up strings, saddles, nut etc...
|
|

I will make the colors on the knobs match those if the inlays on the back of the guitar.
|
Left: Now getting everything mixed and ready to do the specific colored inlay areas on the tops of the knobs. They should look pretty cool when they are done and mounted onto the guitar! Right: I want to get the colors on the knobs to be as close as I can get to the colors on the back. I think it's pretty close, will update! |

Mixing reflective colors to match the inlay on the back of the guitar. Using the screw on knobs as guinea pigs!!.
|
|

Managed to get all four knobs engraved on the CNC. I will now get them sealed, filled and finished so that I can attach 2 of them to the instrument.
|
Left: Very careful and intricate job but I got all 4 knob tops machined on the CNC. I will do some cleanup and then apply some sealer. After that I will fill the artwork with color. Right: The knobs have been cleaned up and given a coat of sealer. They are now ready for the inlay material to be applied. Should end up looking nice!! |

Got the knobs sealed and now ready for filling the engraved recesses with the inlay material!.
|
|

I had to create an unusual way to lock down the tapered knobs so that I could still accurately set the engraced artwork on center. I'm taking a lot of care to make sure this works out right!
|
Left: I tried engraving the two pieces of artwork using the laser but it was hard to guarantee position, so I am defaulting to the CNC using a tiny .025" cutter! Right: Did a little test run before actually cutting the top of a knob - came out looking pretty good so moving on to the real parts! Wish me luck!! |

Just wanted to see if the artwork looked ok before I committed to an actual knob. Looks like it should work fine so moving on.
|
|

These are still rough and have not yet been sanded and plished but glad they are done so far. Nexrt step is to get them sanded smooth and cut the inlay art on the laser!!
|
Left: Drilling and tapping the sides of the regular knobs just incase we need them. After sanding they will all be ready now to get the fancy artwork inlaid in the tops. Right: Time to get some strings on this instrument and get the bridge saddles, nut slots and overall action adjusted to a nice comfortable place. Almost there!!!! |

Right now I am using spare strings just to establish the locations for small indents in the bridge saddles. Once that's done I will put the REAL set of strings on and set up all the action related parameters.
|
|

I managed to get the inserts to fit all the way into the knob holes - I still have to reduce them in height to match the knobs but will have that done very soon and will then glue them in.
|
Left: I'm modifying the plastic inserts so that I can get them securely glued into the holes in the knobs. Once that glue has set I will sand the knobs and apply finishing!! Right: Reduced the insert length to match the available depth in the knobs. Next op will be to sand them all nice and smooth then set up for artwork. |

These are the knobs with the set screws but I wanted to show them in place - this is bare wood so when they have finish applied they will be darker, and blend with the same colors on the guitar itself!.
|
|

Machined the backs of the first pair of knobs and got them separated from the main blick and sanded down to finished height. Now have to repeat that with the other two.
|
Left: I got the first two machined on the bottoms - they just need to be cleaned up and then I have to engrave the tops!!!! The second two now need to go back on CNC. Right: Knobs are now drilled, recessed and machined to finished height. I'll sand/polish them next and then get then probably insert the sleeves on two of them. |

After some more machining I have these knobs in a more complete stage. They need sanded and two of them need the plastic sleeves inserted in the larger holes I machined.
|
|

Goal here is to machine holes, clearance and overall knob height in one setting. I'm going to make two knobs for each position - one with insert and one with set screw since I don't know which will perform better in the pots which operate as push/pull.
|
Left: I am machining the under sides of each of the knobs so that I can achieve the best overall height, hole size and relief on the bottom areas. Right: Working on the bottoms of the two sets of knobs. tricky stuff but I should be able to yield two successful sets. Next operation is to create counterbores and a recess in one of them. |

Not easy making knobs without a lathe because you have to work on both sides of these to make them work and it all has to be concentric.
|
|

Tricky work to make sure these things come out right. I have some more gluing, drilling and machining to do so will keep posting progress.
|
Left: I'm carefully working on some knobs with my pre-glued wood. If all goes well it should give me a couple of useable options for the custom knobs. I will then use laser to engrave tops. Right: I have created knobs from the top side and I'm now figuring out a setup so that I can machine the recesses in the backs for inserts. |

Managed to get some knob blanks completed but now have to machine the back recesses and try to fit the inserts in at least one set. Inserts are a little tight but I think I can make them do their job, It's just all a little time consuming but will continue to post progress photos.
|
|

Doing the first cut on the laminated blank to create one of the custom knobs. Doing my best to make this work out on the CNC.
|
Left: Cutting the knob with the double maple layers - hopefully this will give me some good results. Right now it's just roughed out but more pics coming. Right: The knob looks pretty good - I need to find a good way to hold it to clean it up - this one was a test case so I will use it to experiment and resolve a few things.... |

So far so good but I need to find ways to hold it and allow me to clean up the base and if possible, open up the recess for the inserts.
|
|

I'm going to have to machine the under side of that knob first and use the center hole as a positioning reference so that I can perform the outer roughing and finishing. Slightly involved but I will get there!!.
|
Left: Last knob was ok but I need to machine them in a way that gives me a concentric hole for the pot shaft (or insert) so this drawing illustrates what I will have to do. Right: The press-on inserts were actually a little small and did not fit pot shafts. Was able to enlarge them a tiny bit to fit so will try this on the machined knobs. |

To be safe - if I can - I am going to make a set of knobs with the press-on inserts and a set with set screws. Just not sure of the predictability of the end result so playing it safe.
|
|

I cut a test knob to see what kind of finish I yielded. Decided to add a roughing cycle first so that the finish cut only takes of a small amount of material. That should help avoid surface discoloration due to heat generated and also improve machined finish.
|
Left: Test run on cutting knob shape was pretty good. I need to revise the program to rough and then finish the shape to improve finish and avoid burning. Right: I am trying a slightly larger knob using a roughing cut followed by a finishing cut. I'll clean this one up and see if it will work for the instrument. |

Trying to make the CNC mill be a lathe - I sould be able to get something nice out of this.
|
|

This material is ready to run in the CNC to create the two custom knobs.
|
Left: These are the blanks from which I am getting ready to machine the custom control knobs. I have a program written now which I will be testing! Right: Testing the program to cut a tapered wooden knob that will fit this guitar. If it works on spare wood I will go ahead and run it on the wood I laminated. Fingers crossed. |

I rarely need to run and 3-axis jobs but due to the fact that I do not have a lathe and I need to generate a tapered cylindrical shape for these knobs, this is the best way.
|
|

I have a couple of gluing projects going on to create the blanks for the two custom knobs on this guitar.
|
Left: Gluing some of the decorative laminates for one of the knobs right now. Working on a program to generate the taper and artwork for the two tops. Will update. Right: Just a quick update to say that I received the knob sleeves that I hope to use to allow the new knobs tp press on in place. Have to test them but will update! |

These plastic inserts are designed to allow knobs to be pressed onto the potentiometer posts so I am going to test them on the ones installed in the guitar and see if they might work.
|
|

I'm going to try to make the two knobs as close to this artwork as possible. Forst job will be creating a layered block from which I can cut the shapes.
|
Left: This is a drawing of the plan for the two knobs on the instrument. I don't want to make them too tapered since they need to operate the push-pull pots. Right: I sawed up and sanded the material that I will be using to create the custom knobs on this guitar. I will post more pics of the progress on this very soon. |

I sawed up the wood for the creation of the two custom knobs. I also got all the pieces sanded flat so that I have good clean surfaces to work with. I will now glue them together to create the blanks for the two individual knobs.
|
|

I'm working on the bridge saddles and at the same time planning the machhining process to create the custom knobs!.
|
Left: I am replacing these chrome knobs with custom machined and engraved/inlaid ones. The wood on the right will work well and allow me to experiment to get them done correctly! Right: I got the holes for the recessed strap locks cut into the body today - not an easy job as you do not want to chip the finish! Moving on.... |

I got the two recesses for the strap lock hardware cut into the body - glad that is done.
|
|

To keep everything streamlined we're looking for the best way to make the strap lock components connected to the guitar, flush as possible with the mounting surface. I think we have a good option to make this happen. Picture shows a Dunlop flushmount as an example. Also we are going to fit the guitar with custom wooden knobs rather than the chrome finish. More on that very soon.
|
Left: Couple of modifications in the works - want to make the straplocks on the body flush, plus we're going to manufacture custom wooden knobs rather than standard chrome. Right: We agreed on a black insert and a chrome strap assembly. I will work on the two strap locations to create suitable counterbores for these. |

We are going to use a black flush insert with chrome strap assembly. I have to create a couple of accurate counterbores for the two flush inserts - will update!.
|
|

Locking strap button at the back end of the body. Instrument looks much more complete with these on!!!
|
Left: The strap buttons have been added to the body of the instrument. This is the rear one where I had some good solid material to bolt into. Right: The is the strap button at the neck end. They are both locking strap buttons so they should do a great job. I'm continuing to work on the fine details on the guitar to finish and ship asap! |

Front strap lock installed. Now I need to get back to attaching truss rod cover, finishing saddle indents and getting this monster strung up!!!.
|
|

Just indenting enough to hold the srings in the correct place relative to neck and pickups, otherwise they would slide right off the saddles!
|
Left: The AMB saddles do not have indents to hold and position the strings so I am aligning strings and carefully adding very small string notches. Right: Fingerboard woods are a nice color after the conditioner was applied. Probably will have one more cleanup application after all the work is done setting up the guitar! |

This is the fingerboard after the conditioner was applied. I'll do another coat and cleanup before shipping.
|
|

Working on the surface of the fingerboard o make sure there's no traces of overspray from finishing and also to prep the surface for the application of wood conditioner.
|
Left: Doing a quick surface cleanup on the fingerboard after which I will add a couple of coats of wood conditioner to make it all look awesome. Right: Just for reference, I wanted to post the locations for the front and back strap lock buttons. It's a lightweight guitar anyway so these locations should work pretty well. |

This image shows the individual locations of the front and back strap lock buttons. Always good to illustrate before we make the final commitment!
|
|

Schaller S-Lock strap buttons were requested so I got hold of a set of those. I'll get them attached as soon as possible.
|
Left: Got the chrome control knobs I wanted for the push/pull pots AND the Schaller locking strap buttons!! Now I can get this thing finished up!!! Right: Change of plan - locking strap buttons are going to be Dunlop instead. I was able to get hold of a set and will now plan on the best locations on the body for these to be installed. |

We made a last minute change from Schaller to Dunlop on the locking strap buttons. I'll get these attached to the instrument body as soon as possible.
|
|

Keeping things moving forward, now going to add a little string detent into each of the ABM saddles.
|
Left: Spent the day with my electronics guy and resolved a lot of things! Got LED power supply taken care of and I am now moving on to establishing string detents in the ABM saddles. Right: This photo shows the modified control cavity with the discrete fiber optic system at the far left. I'm moving on to bridge saddle set up. |

The wiring and mechanics of the fiber optic LED lighting system is now fully installed.
|
|

Ready to do some installation and wiring to get the LED system up and running.
|
Left: Instrument is on the bench having several LED related components installed. I will be very glad to see this done and look forward to the results! Right: Had some measure of success with the LEDs, but ran into grounding and reverse-current issues that I could not resolve myself. Driving to see my Electronics Guru tomorrow morning. |

It's a bit of a drive, but it's the only way I can get a guaranteed successful solution so going to see Mark in the morning!
|
|

I received my resistors and some additional LEDs in the mail so I am now getting things ready to finish up this area of the guitar!
|
Left: I got my resistors and a few spare LEDs from Lighthouse so I'm working on getting the rest of the electronic work done asap!! Can't wait to get all these things finshed!! Right: Have a revised drawing for the LED circuitry so I'm going to get the lighting all hooked up so I can do some final testing! |

I verified this drawing with my electronics guru and now I'm anxoius to get everything hooked up!
|
|

Did a quick test on the side dot illumination using a random Amber LED - seems to work so far - going to get hold of some Purple LEDs and get this all set up!. F19 was slightly suspect but will hopefully resolve.
|
Left: In the process of setting up LED light source for the illuminated side dots. Customer asked if Purple color was a possibility - looks like it will be just a change in resistor ratings - will update!!! Right: To optimize these LEDs I apparently need 300 ohm resistors, Ordered some along with more LEDs for asap delivery. |

Further to consultation with my electronics guru and several sources on the internet, I need 300 ohm resistors to match the forward voltage ratings of these LEDs. They are on ther way while I work with other stuff!!!
|
|

Got the 18v power supply set up through from the battery cavity. Now need to locate resistors and organize the fiber optic cables in groups so that I can add the LED light sources!.
|
Left: Battery power is now connected both to the on/off LED switch and to a common ground I established inside the control cavity. Now I need to add resistors and set up the actual LED connections. Right: Was able to get the Protec case for this guitar today. Great solid protection, nice & compact, looks good and doesn't weigh too much!! |

Good to now have the case for this instrument in my hands. Have been using these cases since 2004 and I love them.
|
|

Very busy day but managed to get the split pots to talk to the pckups and output jack and split the coil circuitry successfully.
|
Left: Making progress - I got the two push/pull coil tapping pots wired up successfully and doing their job. Next will probably be the power supply switching and grounding for the LED power. Right: I have to get myself over to Protec Sound to get a case for this instrument - it's about an hour drive. More news on that very soon! |

Love Protec cases - they are th perfect combination of solid instrument protection, compact physical design and minimal weight.
|
|

Gettig some of the basics done for the electronics inside the control cavity. Will probably have to string the instrument up for testing. Will update.
|
Left: Getting some of the electronics established in the control cavity. Probably doing the magnetic pickup wiring first followed by the fiber Optic/LED work. Right: In order to properly test electronics I need strings on this guitar - I put on some spare ones for testing so that I can keep the custom set for the final setup. |

Nice to be able to test the ABM tuners and string retainers. Put some strings on the guitar so that I can get some sound out of the pickups and test the resulting output and coil splitting.
|
|

I re-installed the bridge saddles into the tuner assemblies. Things are coming together!
|
Left: Got the saddles re-assembled back into the ABM tuner units and I should be able to get some strings onto this guitar and finish up the electronics inside! Right: Two tasks going on here - one is cleaning the fingerboard surface so that I can apply wood conditioner. The other is adding magnets to secure the Truss Rod cover. |

Cleaning the fingerboard surface so that I can apply wood conditioner and bring out the beautiful colors and grains, also adding neo magnets in headstock for securing the Senchant truss rod cover
|
|

I'm individually fitting the six ABM string retainers in their little recesses in the headstock. Once I feel they are all seated properly I will get them secure in there.
|
Left: Getting the string retainers installed in the headstock - this is going to end up being a super-unusual design and quite a conversation piece when complete!!! Right: Had to monkey a bit with the height of the string retainers but got that done and istalled them with nothing less than gold screws to match the metal flake in the finish! |

Had to raise the 6 string retainers about .040 so that the string entry hole was just above the surface of the silver headstock panel. All good and got them all installed with gold screws - looking pretty cool!.
|
|

Using a laser-cut template to establish placement of the string slots in the nut.
|
Left: I used the laser to cut a very accurate string spacing template which I will now use to establish the string slots in the nut. I'll install the string retainers after that! Right: Got the string slots cut into the nut and now I am moving on to installing the ABM string retainer blocks into the recesses in the headstock. |

Slots have been established in the nut although I have to wait till the strings are actually on the guitar to finish the individual slot depths. Also started work on installing the headstock string retainers.
|
|

All 6 tuners are now attached and grounded to the instrument.
|
Left: All the bridge units are now grounded and attached to the body of the guitar. I'll now get the nut and string retainers installed and so that I can get a set of strings on this beast! Right: Working on shaping the nut and getting it securely fitted into the nut slot. Will also establish the nut slots for the strings. |

Installing the nut blank. Once it's in place I will carefully establish the string slots.
|
|

Got the two outer tuner assemblies installed. Will how fit the remaining four.
|
Left: Got the two outer bridge/tuners located and mounted. now moving on to install the remaining four. I will use sets of spacers to make sure they are positioned correctly. Right: Got the front ends of the tuner assemblies aligned and attached, now working on the spacing of the screws at the back of each of the units. |

Working on the last 4 screw positions so that all 6 of the tuner assemblies are in place!.
|
|

I'm carefully setting up the 6 ABM tuner/bridges so that they will all be correctly placed and securely attached to the guitar.
|
Left: Next task is to align and attach the six ABM tuners onto the top of the instrument body. Each of these will need a grounding wire running through to common ground in control cavity. Right: Marking out the two outside tuners and I will then attach them to the body allowing me to equally space the remaining four. |

Getting the two outside units attached first. Spacing is critical since tey follow the taper angle of the neck.
|
|

Getting started on the work in the control cavity. Need to run ground wires from bridge unit locations and run power supply through from battery cavity.
|
Left: I'm now working on the installation of the potentiometers and getting the fiber optic cables and the other wiring routed through and tidied up. Will also be running grounding and power wiring. Right: Since I have space for 2 batteries I'm wiring for 2 to power LEDs. This will yield longer life between battery changes. |

Connecting up terminals for battery power to the LED system for the fiber optic side dots.
|
|

Cutting little recesses on the CNC on the backs of the cavity covers for neo magnets that will hold them in place.
|
Left: Needed to cut fairly accurate recesses for the magnets that will be set flush into the backs of the cavity covers. Got them all cut and just need to glues them in. Right: My electronics guy gave me the best push/pull knobs, very well made just a little bigger than I expected. No worries - still plenty room in cavity! |

These push/pull knobs are the ones Mark recommended so I will go ahead and get them fitted into the instrument.
|
|

Pickups fitted - just need to add the height adjustment screws etc and they will be installed as a permanent part of the instrument!
|
Left: Installing pickups - this guitar is getting pretty scary - it has many features that I think are totally unique to this build! It's gonna be a very unique instrument!!! Right: The two pickups have now been installed into the guitar body. I am now looking at the layout of the tuner/saddle assemblies so that we can get these attached. |

I spent a good chunk of the afternoon working on these until I had them cleanly and comfortably installed in place. Moving on to getting th ebridge pieces positioned and grounded so they can also be attached.
|
|

Quick shot of the finished copper shielding before the electronic hardware wnd wiring all goes in there!.
|
Left: The control cavity has been fully shielded and I am now in the process of setting up and installing the two dual coil pickups into their respective cavities on the front of the instrument. Right: Now working on the final fitting of the two humbucker pickup assemblies. Once these are in and set I will add the ABM bridge/tuners. |

I am working on getting the best possible fit for the pickup assembles including the 4 wires that are connected to each unit.
|
|

Got started on the copper shielding of the control cavity. Once I get this task done I will be able to install the pickups and get their related wiring into the control cavity.
|
Left: Started on the lining of the control cavity with copper film. I'll cover the entire inside and the bottom of the control cavity lid for maximum shielding. Right: Before completing the copper shielding I had to fit the locking jack socket into the back of the instrument body. One more small step towards completion! |

Copper shielding almost done but had to fit the jack socket assembly before getting the last area shielded.
|
|

Very happy to get the pickup bobbins installed into the pickup covers. I will try to get these installed into the body as soon as possible.
|
Left: Got the pickup bobbins installed and fixed into the two pickup covers! Slightly tricky job as they have to be aligned and flush with the inner cover surface plus wires have to all exit together! Right: Right now making sure wiring channels are working and setting up fiber optic cables so that I can add the light sources. More info soon!!! |

I need to get these two cavities sealed and shielded but I'm making sure the wiring channels are good and setting up fiber optic cables for cutting and adding LEDs.
|
|

I applied copper shielding to the insides of the two pickup cavities.
|
Left: Pickup cavities now have their coating of copper shielding applied. I now have to fit the bobbins into the pickup covers and then we can get it all assembled. Right: Doing some dremel work so that I can fit the truss rod cover and the six string retainers into their rspective recesses. Fancy stuff! |

I have to carefully remove finish buildup on almost all the recesses. Right now getting the truss rod cover and string retainers to fit in place. Then I will probably add the nut.
|
|

Now that the covers fit nicely in the cavities I am applying copper shielding to the inside surfaces. I will have to do this also to the rear cavities.
|
Left: I sanded out most of the overpray to achieve a good fit and now the guitar is getting the copper shielding installed inside the two pickup cavities. Right: Next task is to fit the pickup bobbins carefully into the two pickup covers. Holes for exposed poles will need slight cleaning out as finish compound bleeds in there a little. |

Working on getting the four pickup bobbins to fit comfortably in the two pickup covers.
|
|

I'm testing the respective fit of the two pickup covers inside the recesses in the body. Typically after finishing they can be a little tight due to buildup of the poly-resin coating but I can use a dremel to remove that from cavities, test the fit and then add the copper shielding.
|
Left: Next task is to get the pickup bobbins to fit into the covers and also make sure the pickup covers fit into the body with copper shielding in the two cavities! Right: I ground out the overspray on the pickup cavities to the point where I was able to fit the two pickup covers in place! Now need to add the copper shielding. |

Spent some time removing the poly resin buildup in the pickup cavities so that the pickup covers would fit in their respective recesses. I may do some hand sanding to make sure that the addition of the copper shielding doesn't make everything too tight but so far so good!!!.
|
|

This guitar is truly unique in this planet, even galaxy! It's not done yet and it looks like no other instrument I have ever seen. The curly maple came out very 3D which is what I was hoping for when I chose the wood!!!.
|
Left: I endured horrific weather conditions to pick this instrument up from my finisher. It's a lot to take in - mind-boggling and beautiful. Right: Both the front and the back of this instrument are pretty amazing in terms of artwork and detail. I need to set up the cavities with magnets and shielding probably next! |

Lots os detail on the back of the guitar - the crop circle art looks very impressive! Colors, woodgrain and gold flake also very cool..
|
|

The fine gold flake in the body finish looked really good. Just as I had imagined it. Catches the light when you move the instrument!.
|
Left: Visited my finisher as he was not initially sure how a fine gold flake would interact with the finishing process. To me it looked just like my vision if a reflective dusting that didn't interfere with woodgrain! Right: I thought he did an awesome job on the crop circle - he told me however he thought he could improve on it by redoing!!!! |

I really did think this came out perfect, but my finisher wanted to do it a second time to make it even better.
|
|

This was the first stage of several applications on this guitar. We now have the black dye applied, then rubbed down to expose the white of the wood, then finished with Epoxy Resin. It will then be buffed and as far as I know the gold flake can be applied at that stage - then another clear coat over that!
|
Left: My finisher was kind enough to send me a couple of photos of the status of the finishing process. We can see here that he is creating the 3D look on the maple with the black trans treatment. Right: This is the guitar at the same stage but seen from the back. The black trans looks great even at this stage. More to come! |

Back is also starting to look awesome! I am in touch with him and will hopefully get more photos as we wrap up the finishing process.
|
|

Took the guitar to my finisher up north today. Spent a while explaining all the finishing details and promised to emails with photos highlighting wjat finish/color/masking/fill treatments are required on each area!
|
Left: Major step forward today - took the instrument to my trusted finisher. I laid out all the finishing requirements and will follow up by emailing all the details so that we all understand the requirements! Right: I communicated with my finisher and he's OK - making progress although I have asked him to do a LOT on this instrument!!!!!! |

TMy trusted finisher indicated that this big project should be finished in the next few days - can't wait to see it - trying to see if he can send me a photo. He's testing the gold flake over the black trans!
|
|

I'm cutting up the adhesive masking material and getting it all ready to be cut in the laser. I will of course test the cut on other material first, if that holds together I will create the two templates.
|
Left: I am now getting the adhesive masking material ready for cutting in the laser. If things go well I will get two templates which I can pass on to my finisher with the guitar! Right: I did a test cut of the crop circle mask on heavy paper to see how its integrity would be. Not too bad - need a few small adjustments. |

Tried cutting the entire template at full scale to see if it would hold together. Not bad - some elements are a little too close together so I'm going to do some editing on a couple of features but nothing drastic.
|
|

Trying to find a way to create this artwork on an adhesive mask - NOT an easy task.
|
Left: I have this artwork that I am trying to convert to an adhesive mask that can be used in the finishing process. May have to simplify a little to make it work - we'll see. Right: I'm maybe 3/4 done with the crop circle artwork - VERY hard to design it so that the mask I cut will not fall apart! I think I am getting close. |

This is pretty tricky to create - I want to hold on to the fundamentals of the design but at the same time create enough integrity so that the mask I end up cutting will not fall apart. Next challenge will be actually cutting the mask. Wish me luck!!!!!.
|
|

Sanding this guitar from bumper to bumper to get it 100% ready for taking to my finisher.
|
Left: There's a lot of sanding going on right now as I prepare the body for finishing. Even though we're looking at making an "industrialized" finish I want to give my finisher a good quality surface to work with. Right: Just about done with sanding but I have to verify some of the finishing details with my cutomer - stay tuned! |

I'm refining the fairly complex set of finishing requirements and at the same time working on a mask for some artwork my customer wanted on the back of the neck.
|
|

Doing a quick fill on the engraving on the back. If my finisher can comply we'll also try the "burn' effect but depends on what he can do. Will update.
|
Left: We decided to fill the engraving on the back so that it looks better and cleaner after finishing. I'll do it in pretty much the same color. Just sprayed some sealer on there to prevent possible bleed into wood. Right: Sealing up the back engraving with a clear filler. This will yield a flat surface which will work well with finishing. |

We talked about ways to make this area work artistically and figured the pre-finishing surface should be flat for best results. Filling the engraving with clear resin.
|
|

Getting the last piece fitted into a very nice looking headstock assembly. Talk about a one-of-a-kind guitar! Wait till you see it post-finishing!.
|
Left: Almost done with what is now a very cool looking headstock assembly. Just wait till you see if after finishing is done!! Moving ahead! Right: Doing a lot of fine sanding all over this instrument. I'm checking every area to make sure all surfaces are ready and properly sanded and prepped for the finishing process. |

Final sanding in process - needs to be sanded very smooth because we are applying colored trans finishing. No doubt it will look spectacular!.
|
|

Still working on the headstock assembly but now getting all these parts finally glued together. Will update more as we progress.
|
Left: I am now gluing the slightly recessed darker wood into the outer machined areas of the headstock. When this is set and sanded flush I will install the plate with the string retainer slots. Right: Perimeter inlay completed and now I have to carefully fit and attach the center section. A little tricky and not much room for error! |

Moving on through the headstock work - sides are in and sanded and now I'm working on center inlay to get it to fit perfectly before gluing into place.
|
|

Headstock recess being mechined on the CNC. I'll have to decide visually what the best depth will be.
|
Left: Work is under way on getting the headstock completed. Right now carefully cutting the recess for the plate we made. Will do the outer recesses after this is done. Right: There are several machining operations involved with this headstock design - right now I am creating inserts for the outer inlay. |

I have to machine inlay material for the top and bottom of the headstock perimeter. This will be the piece I will inlay on the top area.
|
|

Ready to set this little sub-assembly into the headstock. I'm inventing it all as I go!.
|
Left: I will recess this plate slightly into the headstock surface. Just trying to think of a way to make the truss rod cover easily removable if I do all that. Right: Setting the instrument up on the CNC so that I can machine a little recess for the new plate and also taking the truss rod cover thickness into account. |

I'm going to machine a recess the same shape as the new plate and if I do it right the truss rod cover will remain just a little higher making its removal easier when necessary.
|
|

We now have a plan for the headstock plate so moving ahead with that!.
|
Left: I selected a very nice piece of maple for the headplate we are going to create. I'll double check alignment, size and string spacing and then get it cut out!! Right: The headplate insert is now cut and looks pretty good so far. I plan to machine a corresponding recess in the headstock and inlay this piece. |

Tricky work but so far so good - it should look quite impressive when complete.
|
|

Testing the drawing I made onto the real-life guitar headstock. I'll make a few careful adjustments before I consider it complete then I will choose a suitable piece of material and get it cut. Not yet sure of the string retainer plan (back or front) but will be illustrating that too!
|
Left: I am doing testing with paper to make sure the shape we are creating fits the top of the headstock and the truss rod cover accurately. Right: I will make the headstock plate silver but right now establishing the exact shape based on string pacement and fit with the truss rod cover. Want to get this done so I can send to finishing! |

I will probably recess and permanently affix this plate into the headstock. It will be made of wood but will have a metallic silver finish applied. It will probably cost me extra due to the masking required but it seems the most stable way to get this done! I also favor the ABM chrome string clamps being on the front side - less chance of broken strings and quicker and easier to change strings.
|
|

My two challenges here are finding a chrome-like material that is machinable or I can cut on the laser, and making sure that cutting the brown areas out of the headstock veneer will work with the geometry of the back of the headstock. There's always a way!
|
Left: Getting closer -brown areas will be machined through to expose darker wood behind headstock veneer. Headstock will be black trans finish like body. White plate shown will be chrome or natural maple (like fingerboard). Right: We have decided to make the insert covering the string retainers a mostly silver finish. Shown in yellow! |

I'm using yellow on the computer just to make the geometry stand out while I scale and twek everything to fit. Going to cut a test piece first to make sure everything fits, once that's adjusted I'll make the final piece. May slightly recess it in the headstock - not sure yet.
|
|

I have a little freedom to shape the headstock to reflect the shape of Nantucket Island. We're brainstorming!.
|
Left: I'm doing some detective work since my customer wants a little bit of Nantucket Island incorporated in the headstock. We'll get there once we iron out a cool concept!! Right: The headstock on this guitar is going to be its own ndividual work of art. Right now I am exploring geometry for a plate that will represent water. |

I'm working with ny client to see if we can reflect the Nantucket Island form into the headstock. First stage is a plate that surrounds the string retainers.
|
|

This engraved area will be getting filled once we decide on the color.
|
Left: I sprayed a special sealer into this engraving so that when I add some filler the compound will not bleed into the maple wood. Always have to take precautions!!! Right: We are going to use some of the features that were explored on this image and try to incorporate them on the headstock of the guitar. I'll address them individually! |

There are a lot of features detailed on this drawing. I'm going to try to find a way to make most of them a reality.
|
|

Working on the final surface finish of the instrument. Feels nice already.
|
Left: I'm on the fine grain stage of final sanding. Working progressively from head to end of body making all the surfaces super smooth. Need to also dress all of the frets! Right: Working on the fingerboard and the dressing of all the fret ends to get that task out of the way. Almost done with the general sanding of everything too. |

Getting all the frets dressed both ends and doing a final surface treatment on the fingerboard before finishing.
|
|

As long as I am careful and patient this should work out OK for engraving the artwork behind the neck.
|
Left: I have to defeat a few of the laser's circuitry restrictions n order to get a whole guitar inside the machine. Anyway - I will go ahead and get the artwork engraved. Right: The burning of the custom logo was successful and looks really good where it is located! It will need to be filled to look best after finishing. |

I am very happy this job is done - it was difficult to set up and test and it was quite a relief to get it done. Looks great though!.
|
|

I want to briefly visit the size and angle and placement of this feature before committing but this photo mockup shows the approximate result.
|
Left: Getting ready to laser etch the personalized date into the back of the body near the neck. I have been sanding the instrument to a fine finish and this is one of the last operations. Right: I have discussed the finishing/tints with my customer. We're not going to do the original blue tint plan, but I will detail the new concept here! |

My finisher said he can add small metal flake to the finish we will be applyiing. I tried to find a photo of something similar on the internet but could find nothing. Basically it will be clear to show wood with a sprinkle of small gold flake included.
|
|

Doing some final sanding on the neck to body transition. We're almost done with shaping and sanding and we'll be headed to finishing soon!.
|
Left: Neck is now at the desired thickness and profile and I am working on finishing the body transition where my customer wanted a nice smooth slope from neck to body thickness. Right: Sanding coninues as I prep for this guitar going to finishing. Trying to establish the best color and finish formula to match my customer's vision! |

Doing some final sanding on the neck to body transition. We're almost done with shaping and sanding and we'll be headed to finishing soon!.
|
|

Holes and recesses for controls are done - still need some sanding to blend everything in.
|
Left: I got the three control holes done in the front of the body. The recesses give the pots and switch a flat surface to mount on while blending with the curved top surface. Right: Doing some final sanding on the back of the neck and in a few other areas around the body to get everything ready for the finishing process. |

Getting the last of the neck sanding done and measuring carefully as I go.
|
|

Just about to machine holes and recesses for control knobs and pickup switch. Based on the curve on the instrument to I will probably do a raduised recess for the two knobs.
|
Left: I'm just about to cut and recess the holes in the top for the two pickup volume controls and the 3-way selector switch. Have to be careful about positioning. Right: We considered putting a 3rd party sustainer in the electronics of this guitar but decided after some research we're probably safer doing that externally if needed. |
Good results from machining for the Neutrik locking jack socket assembly.
|
|

Managed to get the instrument set on the CNC in such a way that I could access the back of the control cavity for the jack output assembly.
|
Left: The guitar is in a tricky little set-up right now to allow me to machine out a suitable recess for the output jack socket. Should work out fine. Right: This is the guitar with a jack socket installed - everything ened up working out just fine. The actual jack socket will be chrome/silver finish to match the rest of the hardware color. |

Good results from machining for the Neutrik locking jack socket assembly.
|
|

Need to mark outand pre drill 12 holes for the string clamps.
|
Left: The locations for the sets of holes are being marked out on the headstock. Might refine the lower curve just a little but when we are done. Right: Back to sanding everything to get the last few details done on this guitar. I still have an ebgraving to do on the back of the body and an output plug socket recess oon the side! |

Getting the surfaces ready for final finishing. Lots of sanding to do.
|
|

Descriptive text coming.
|
Left: I need to do a lot of sanding around the body and the area where the neck joins the body. I will also do a final sand on the back of the neck. Right: I am using ABM string clamps on the headstock area. Right now making sure they are laid out on the string paths. I have a pattern of holes to drill so that these can be installed. |

Getting things ready to have the string clamps laid out correctly on the headstock.
|
|

I finally did get the guitar set up in such a way that I could machine these slots. I'm now getting ready to get the actual machining done.
|
Left: Two things shown here. One is the setup holding the guitar in a very strange position for machining the holes. 2nd is the approximate arrangement of the machined holes through to the inner chamber. Right: OK - the slots have been successfully cut all the way through to the closest internal cavity - it all went quite well actually!! |

The three slots are now successfully established and I can move on! We are getting close.
|
|

I'm hoping I can set the instrument up on the CNC in such a way that I have access to this area of the upper body. Slots will probably be 1/8" wide and go through to the closest inner chamber.
|
Left: Not a great photo but this shows the approximate layout and shapes of the holes we are planning to establish in the front of the upper body half. Setup for this should be interesting! Right: This is part of the fairly comlex setup that will be required to cut the three slots in the upper horn. Should be ok as long as I am careful! |

The guitar needs to be set up on the machine table in such a way that I can work round the neck and get the slots at just the right angle.
|
|

I'm working on a nice pattern of holes through to the inside chambering.
|
Left: There's a small area on the top of the body where we are going to drill a little pattern of holes connecting to the inside chambering of the instrument. Right: The holes through to the inner chambers have a special pattern my customer woulld like so I am working on a setup that will facilitate the initial machining work. |

The goal here is to create three slots as illustrated which connect to an inner chamber in the front section of the instrument body.
|
|

Looks good and will be even more impressive after finishing! Moving along to other tasks!
|
Left: I have the inlay glued into the tops of the two pickup covers. Next I need to look at the breathe holes and a couple of other features requested by my customer! Right: Text and picture coming. Right: Doing some final carving work so that I can get to the sanding stage and clean up the whole body and neck areas! |

I have to create a nice edge break all round the back of the body. Also working onneck-to-body transition. Will be drilling aroma holes VERY soon..
|
|

Recesses cut into pickup covers and they are ready for inlay.
|
Left: Recesses have now been cut into the tops of the two pickup units and I will now get some Walnut veneer cut to match these and get that glued in to complete the two covers. Right: Work in progress -I'm trying to get everything to fit and line up, especially with the magnet holes. Will get it done tonight! |

It's a little tricky but we're getting there. Some small adjustments and we should be done.
|
|

The counterbored holes for the adjustment screws are done and now we're going to do the cutom inlay on the top surfaces.
|
Left: Before machining the top surfaces for the inlay I had to finish drill the 4 adjustment holes and also machine concentric counterbores in each one for the adjustment screws. Right: Due to the proximity of the holes to the adjustment screw counterbores, the bridge pickup will look like this. Very slight adjustment. |

Just trying to keep these features separate- it would look strange if the were to run into each other.
|
|

Another step in the race for the finish line - the truss rod cover!
|
Left: I am adding a personalized trussrod cover on the headstock. Cut this one out on the laser. May fill the text with one of the neck inlay colors. Right: Doing some measuring and calculations so that I can create machine paths and artwork for the laser to accurately place the walnit inlay material on the tops of the pickups. |

Doing the math on the geometry of the little channels and inlay material on the tops of the two pickups!
|
|

I am getting ready to create inlays in these two pickup tops possibly usng walnut material.
|
Left: I am getting ready to do some decorative inlay on the top surfaces of these two pickup covers. It will add nicely to the industrialized theme on this guitar. Right: This is my ciustomer's vision of Crop Circle art along the back of the neck. We have a gold color we may use to achieve this and I am working on a method to apply this! |

I have only once tried and inlay pn the back of an instrument neck. If this works it will bevery unique and unusual!!
|
|

I am planning to do some artwork in this area - have to figure out the best way to use the available space!!!
|
Left: Looking at the back/top of the guitar body. We have two features going on in this area. A set of holes that connect to an interior chamber and a series of crop circle icons. Right: This is the cover for the truss rod access area which is custom-engraved and will probably be filled with a contrasting compound before finishing. |
The truss rod cover is cut and engraved and I will be working on the rest of the headstock features to get that area completed!
|
|

These two inlays should look very cool once the insdustrialized finish is completed!!
|
Left: Both the back covers have now been filled and leveled and are ready for fnishing. Have a little more shaping on the neck and body and need to get this completed asap as my finisher has a big Covid-related backlog! Right: Looking ahead to my upcoming challenges - I will be customizing the headstock soon - more details coming! |

The headstock may have a slightly geographical theme - working on the geometry right now!
|
|

I'm anxious to get the body shaping and sanding completed so that I can get the whole instrument ready for the finishing process!
|
Left: Back working on the neck and body shaping so that I can get all that finished asap. I'm roughing out some of the basic shapes and will do the final work with hand tools. Right: In the process of finishing up the inlay on the two back cavity covers. Once all the resin has cured I will flatten surfaces and prep for finishing. |

Sealing up the inlay on the two back cover plates!
|
|

Took me 3days to clean up this little bugger! I used a lot of tint whichended up making the set solution atiny bit less glasshard thn it should have been. Had to sand the excess off where normally I could have just scraped it. Nevertheless it come out nice - have some final cleanup to do but otherwise DONE!
|
Left: Almost there with the Flower of Light inlay - I will actually come out looking pretty good once we are all done. Was a lot of work to remove the buildup of filler! Right: I was able to get the inlay material embedded into the battery cover plate of the guitar. I need to clean this up and level with a clear filler next. |

Battery cavity cover now has the inlay material attached and I will have this part of the guitar ready for finishing very soon!
|
|

The FOL inlay is so fine and detailed that I will probably not succeed in getting a solid orange in the recesses. I mixed the resin as dark as I could and I expect the results to look good but perhaps more "industrialized" than a solid orange - we will see. It will look pretty cool no matter what! Esp[ecially qafther the whole instrument is finished in its final colors.
|
Left: I'm working on getting the Flower of Light inlay filled first but I'm also getting ready to cut blue shell for the battery cover logo too. It will be nice to have these done! Right: I spent some time on the battery cavity logo to get anice fit with a coupleof different shells. Both are nice- will probably use the one on the right.
|

Both shells looked great but the one on the right is the same material as trhe blue inlay on the fingerboard. I can always use the other logo somewhere else.
|
|

Engraved both plates in the laser this morning and results are good. Need to get them cleaned up then Flower of Light will get orange compound and the battery cavity cover art will get shell - both to match colors of the inlay on the fingerboard.
|
Left: The two covers are right out of the laser engraver so they need to be cleaned up a little but everything so far has worked out well. Will be doing some sanding before filling. Right: I sanded the two back covers down to their finihshed thickness and I can now focus on getting the recesses filled with their respective colors. |

Back cover plates are now flush with body surface and cleaned up. Will get started on the inlay work.
|
|

Test burn on the laser so I can evaluate the results before comitting to the actual cover.
|
Left: Doing a test of the engraving on a similar piece of maple to see how the artwork looks. I will have to find away to embed orange filler in this as it is too detailed for shell. Right: Experimenting with filler as the detailed logo has very thin lines. I think I have the best balance of line weight in the artwork and filler formula should work. |

Lots of testing going on to try to make sure the Flower of Light logo will come out looking OK in an orange color to match the front inlay.
|
|

Now have some nice clean artwork ready for engraving onto the two back cover plates..
|
Left: Just finalized the artwork for the two back covers so I will get these designs engraved as soon as possible and we'll be closer to getting this guitar stained and finished. Right: This is the final layout for the artwork on the back covers. Wedecided the battery cover inlay will be blue and the control cover artwork will be orange. |

These are basically the vector files I will be using to engrave this artwork onto the two covers on the laser. Should be interesting!
|
|

This FOL design is a little more solid looking. Will leave the choice to my customer though....
|
Left: We decided to rotate the logo on the right 90 degrees. Also - on the left is another version of the Flower of Light design for consideration. Right: I wasn't able to download a clean enough version of the flower art to convert to vector so I decided to draw my own one. Not as easy to do as you wouldy think! |

This will help with laser engraving the pattern into the cavity cover.
|
|

I'll need space for 6 LEDs and I will have to do some research related to the resistance required in the circuitry.
|
Left: Another interesting challenge I have is the colors of the LED lighting. We are trying to use 6 different colors so I need to see if I can accomodate all these LEDs. Right: I received my string clamps by ABM all the way from Germany! I will get these unpacked and will post some pictures of how they will work on the headstock area. |

Delivery of these units was surprisingly quick - I can now plan on getting these arranged on the headstock the best way.
|
|

I have used a lot of AMB parts in the past - not the cheapest, but definitely the best quality. Items like these are very hard to find.
|
Left: After a lot of research the only quality contruction string retainers in chrome for guitar out there are those made by the German company ABM. I'll probably get these. Right: My customer wanted a more gradual blend between the back surface of the body to the neck. I'm working on grinding that and blending everything together. |

Neck to body transition is going to me slightly custom so I am working on that right now.
I have used a lot of AMB parts in the past - not the cheapest but definitely the best quality. Items like these are very hard to find.
|
|

Current goal is to get the neck sanded down to finished shape and thickness.
|
Left: Did a lot more sanding and shaping to the back of the neck to get it close to finished size. Also working on the neck/body transition to get that in a place where I can consider it finished. Right: Working on artwork for the two back covers right now. I need to get both of these engraved and filled before going to finishing. |

I am working with both of these pattern files to get the best look..
|
|

Not a huge amount of choice out there in chrome single string retainers that could be discretely mounted.
|
Left: I'm looking for string clamps for the headstock end of the guitar. They could be on the front or the back of the headstock as long as I can find nice chrome ones. Right: I was thinking that this logo from my customer may well be able to exist on the battery compartment cover since we have the other artwork on the control cavity cover.. |

Just a thought but if we have the Flower of Light on the control cavity we could put this one on the cattery cover in a matching filler color.
|
|

Shaping and sanding the neck and its tyransitions with the body and headstock.
|
Left: Working on the final shaping of the back of the neck as we approach the finishing stage. I also need to establish a set of string retainers for the headstock. Right: I have to reduce the back covers to final thickness but we are also planning to include an inlay of the "Flower of Light" in some complimentary color (probably shell of metallic). |

This should be a very nice feature on the guitar. I need to find some clean art that will allow me to engrave somthing like this.
|
|

I think these covers are shaping up to look really good on this instrument.
|
Left: Now we are getting somewhere - first of the two very custom pickup covers has been cut and I will now start on the bridge p/u cover. After they are both done we'll look at the custom inlay on each. Right: Quick update on the body with the pickups in place - I'm now getting back to final shaping and sanding around body and neck. |

Pickup covers ready for final detail, I have a back cavity cover to do some inlay on. Working on getting the body and neck finished.
|
|

A little scary as I only get one shot at getting each pickup cut with the correct geometry. Always safer to test cut in some scrap material first!.
|
Left: Before cutting the actual pickup cover I wanted to make sure the recess and the set of holes fit the pickup bobbins and magnets correctly by test cutting in spare material. Right: I have now cut the bridge pickup to the correct depth and I'm getting ready to cut the six holes for the bobbin poles. Being very careful! |

So far the machining has gone well. I'm using my vector deawing to tell me where to place the six holes relative to my x and y zero.
|
|

CHad to do some vector drawing to prep for the machining of the insides of the covers.
|
Left: Had to do some planning for the machining of the insides of the pickup covers. They will have exposed poles and some industrial looking inlay too. Right: The guitar will look awesome when we finally do the industrialized blue finish on the curly maple. The pickups will also look very cool once they are completed. |

Thought I would take a quick photo of the guitar plus pickup covers.
|
|

I have to reduce the neck width and when it is closer I will revisit the neck profile preferences my customer would like.
|
Left: I'm now working on the back of the body, neck and headstock to get them all shaped correctly and ready for final sanding. Right: Doing some outer finishing work to the assembled pickup covers. I will get the insides machined out of them both so that the bobbins sets can fit in each one. (each is a different shape & size) |

Cleaning up the outsides of the pickup coversso that I can get the insides machined.
|
|

Gluing the pickup cover tops onto material that will be their bodies.
|
Left: Clamping the two pickup cover tops I made onto more material that will become the bodies of the pickup covers. I'll cut and clean them up to match the shape of each top. Right: The two pickup covers are moving along - I heed to carefully sand them to their finished external shapes. Once that is done I will machine the insides. |

The birth of what will be two very fancy looking pickup covers.
|
|

Pickup cover tops are done qand now I have to find some maple to use for the lower half of each cover.
|
Left: These are the two finished pickup cover tops. They will be glued to more Maple and then finish machined on the outside and the inside. Also will have holes for the pickup poles. Right: Testing my geometry for the insides of the pickup covers against the actual sizes of the two pickup bobbin pairs. Looks like it will all work. |

These two pickups are a fairly custom and hi-tech project and they look like they are going to do a great job.
|
|

Material clamped on the table and I'm setting up to cut the two pickup tops out.
|
Left: The pickup top material is now set up on the CNC and I an just getting it all ready to cut. I am placing them on an area where the wood grain will match really well. Right: Half way through machining the pickup tops and before I cut all the way through I drilled the four holes in each cover so that I have accurate positions for them all. |

Cutting the two ppickup tops. We have some interesting plans for them and they will look awesome.
|
|

Testing the shapes and sizes of the geometry of the pickup covers so that I can get those rolling.
|
Left: First step in getting the pickup covers done is to cut accurate templates from my vector drawing on the laser. This will help me make sure the sizes and geometry are correct. Right: I picked out the best grain-related area for the tops of the pickups. I will now final sand this wood and cut the top out on the CNC. |

Picked the best grain area for the two pickups. Will finish sand and then start cutting.
|
|

I went and pickued up the four pickup bobbins from my winder and I will now be building the custom pickup covers.
|
Left: I now have custody of the four wound pickup bobbins and I will beusing these to design and build a couple of fancy covers close to the design concept described to me by my customer! Right: I am getting the wood for the pickup covers ready for machining. I also have some cool shell product that would enhance the tops! |

This is the material from which I am cutting the pickup blanks. It's from the same material panel as the top plate of the guitar.
|
|

The pickups are charged and ready for winding. I left longer poles to extend through the covers when I made the bobbins but I believe that they will stillwork for the updated design we are considering for the pickup covers.
|
Left: My pickup winder was kind enough to send me a couple of pics from his workbench. These are the bobbins being magnetized and evaluated before winding! Right: This photo shows one of the pickup bobbins in the process of being wound. They are now complete and I am trying to schedule a trip there to pick them up! |

This is a vert cool photo of the pickup winding process. The orange blur in the middle is one of the pickup bobbins rotating at high speed.
|
|

I have the body up on the CNC so that I can machine out a smaller radius behind the tuners on the lower body. If we do put the output jack here it willprovide a little more space for the fixture.
|
Left: My customer would prefer to have the output jack socket located on the lower surface of the tuner relief area. This can be done but I want to be sure it doesn't create interference with the tuners! Right: The inner raduis below the tuners was cut to a smaller one to make more room for the possibility of an output socket there. |

I want to make sure there's enough space between a jack plug and the tuner knobs before I commit to an output socket in this area. Either way I think the smaller radius matches better.
|
|

This image shows the desired control layout on the instrument body.
|
Left: As we get closer to the finishing stage of this guitar we are looking at the final treatments for the knob layout and whatever artistic enhancements we need to include before the finish is applied! Right: This design is known as the "Flower of Light" and we are going to try and incorporate this into the surface of the guitar! |

Text coming.
|
|

Right now roughing out the neck thickness and when that is complete I will use a finer grain abrasive to shape the profile and all the geometry around the neck and body transition.
|
Left: Doing a LOT of sanding to get all the features and geometry of the body ready for the finishing process. I am also ready to drill holes in headstock for the six string retainers. Right: Some design changes going on for pickups. Was planning to have them covered with the same industrialized blue/black maple but may change that. |

I communicated with my customer on the vision of what the pickups should look like when done. My concept is shown here - using the matching industrialized blue on the covers and including exposed poles (on one or both) and on one of them using one (or two) metallic looking strips. All of these features can be mixed and matched.
|
|

Busy shaping and sanding the body details to get that part ready for finishing. The neck needs to be shaped and sanded too.
|
Left: I revised the shape of the lower horn a little and my goal right now is to get all these body features and curves shaped and sanded down to a condition that will make it ready for the finishing process. Right: I'm refining the profile of the lower horn, sanding body top, shaping back of neck and working on body/neck transition. |

Working on the grinding and shaping and sanding of features on the back of the instrument.
|
|

I removed most of the material at the back of the body using bandsaw and spindle sander. This is only roughed out at this point as I have some final machining to do to complete the work in this area..
|
Left: Got started on the removal of that relief area behind the tuners. It's just roughed out right now but I will be finishing it off on the CNC as soon as I get a program written. Right: While setting up to cut out the back of the body I'm also carefully comparing the location of the battery wiring channel which is very close to the area. |

I just want to make sure I can avoid the wiring channel before I cut deep enough to expose the internal laminates. I could work round this if that was the case but will confirm.
|
|

This is just a piece of matching maple to complete the fingerboard transition to the headstock.
|
Left: I'm gluing a little transition piece onto the nut end of the headstock to complete the assembly work in that area. Once this is done I can do two things, workon the neck thickness and profile and final sand the headstock area. Right: Marking out an area behind tuners where I will be removing body material. Some machining to follow. |

I will saw out some of the extra material at the back of the body and following that I will have to set the body up on the CNC and do some machining to finish off the geometry. Should look good after that's done though!.
|
|

The lower horn has been modified by taking about 5/8 inch or so off the end and blending. Still have some room to trim more if customer desires. At back end - yellow line shows where material will be cut out and/or modified behind tuners. My customer had a good idea to do it in two levels, one below tuners exposing core woods and the second area cut right out of the body. That's the effect I am shooting for.
|
Left: I have taken off quite a bit of the lower horn, could do more if required. Also showing the back of the body where I will be removing material behind tuners. Right: Before I attack the body with the CNC I am cutting a small part of the headstock that allows adjustment access to the truss rod. Almost at the final sanding stage! |

Doing a quick machining job to extend access to the truss rod end just enough to get the adjustment allen key in there whenver necessary.
|
|

I will get this horn shaping done first then move to the back of the guitar body where I will be creating a cutout area at the back of the tuners.
|
Left: I am taking a little material off of the lower horn to get closer to my customer's preference. This will fortunately not interfere with internal chambering in that area. Right: I'm now setting up on the CNC and creating a program with which I will relieve the back of the guitar with a cut out section in the area behind the tuners |

I will be cutting out a recess at the back of the body profile and then relieving a portion to expose the core laminates.
|
|

I have a little area behind the nut to level off for a finishing piece on the headstock.
|
Left: Doing a little machining after the headstock veneer went on to level a little area behind the nut where I will add a small maple insert. Right: Got the nut end of the headstock machined and now need to flip the guitar over and take a little material off the headstock thickness. After that I will cut a truss rod access slot. |
I have a little area behind the nut to level off for a finishing piece on the headstock.
|
|

Before the back plate went on I took a paper impression of all the internal cavities. I'm using this to help me define how far I can adjust the body shape without breaking in to an internal feature!!
|
Left: I was smart enough before I put the back plate on to take a real paper impression of the existing cavities inside the instrument. This is invaluable when making any body contour modifications. Right: I took the opportunity to glue the headstock veneer onto the headstock. One more job out of the way and glue will be set in the morning! |

Headtsock veneer is the same material as the body top and will se stained and treated the same way so that it matches!.
|
|

Headstock material roughcut and I am fitting it in plate.Will attach it permanently as soon as I have atruss rod access solution.
|
Left: I am working on getting the headplate fitted onto the surface of the headstock. I will then need to remove asmall piece to expose the truss rod - or perhaps create a cover - will know soon. Right: I am looking at a couple of small body contour changes suggested by my customer. I will illustrate these on this page in the next day or two. |

Small adjustments to lower body horn and we'll be removing some material at the back end close to the tuner relief area.
|
|

Bobbins have been made and will be going soon to my pickup winder. I will be making wood covers for these soon.
|
Left: All the bobbins have now been assembled. I used shorter magnets for the humbucking coils and the longer magnets for those that will be exposed through the matching wood pickup covers. Right: I have some matching maple on hand to make the headstock veneer and also the two pickup covers. They will all match in color! |

I'm going to cut this headstock material just a little oversize and sand it down nice and flat. I willprobably heat bend it alittle to get it to match the curve at the neck end! Should be interesting.
|
|

The pickups are custom humbuckers and I'd like to have them addembled before the guitar goes off to finishing just to make sure everything fits the way it should!!.
|
Left: I have the flatwork for the pickups already cut so I am going to start assembling the bobbins so that I can get these fancy custom pickups wound! Right: Creating the bobbins is a procedure requiring some care. In the case of these bobbins I have longer poles for those that will stick through the matching covers so going carefully! |

Creating the two shorter pole bobbins first then I will do the outer two sets.
|
|

Got started on cutting the two pickup cavities on the CNC.
|
Left: I am now machining out the two recesses for the pickups. The pickups will have matching wood covers which will be stained to match the color treatment of the top. Right: This is the guitar with the tuner recess and the two pickup cavities machined. My next goal is to finish sanding the body and round all the sides. |

The guitar looks much better with the pickup holes established.
|
|

Machining out finger clearance for access to the tuners.
|
Left: Guitar is up on teh CNC where I am machining out clearance for the player's fingers for access to the sixtuning knobs. Almost there, just cutting till my fingers fit! Right: I machined down till I could fairly comfortably adjust the tuners. Obviously some sanding still to do but I can now move on to cutting the two pickup recesses. |

Recess machined - I will blend it in by hand once the instrument is off the machine..
|
|

I have to machine out finger clearance for the tuner knobs and while I am planning that area out I am also positioning the pickup locations.
|
Left: Before I finish the curved areas of the top I want to machine out the clearance for access to the tuner knobs. I'm carefully marking out the extent of that area and also the positioning for the pickup locations. Right: Programming has been done for both the finger relief and the two pickup recesses and I can now get this on the CNC. |

This image shows the approximate layout and positioning of the relief and the two pickup locations. They will have wood covers tinted and antiques like the rest of the instrument top.
|
|

Getting closer with the shaping of the top plate.
|
Left: I spent some using the orbital sander to do some further shaping of the domed top and generate a nice clean and even finish across the top surface. Right: I am getting through the sanding and shaping work despite blisters on my fingers. The body shape is feeling good. I may cut the tuner relief soon as it is part of the top shape. |

Lots of heavy sanding going on.
|
|

I took the thickness down only around the perimeter and I now have to grind away material to create the domed top shape bearing in mind that the pickup and tuner areas need to be relatively flat.
|
Left: I machined around the perimeter to the point that balanced the thickness of the back plate. Have also started the grinding/shaping process of creating the domed top plate. Right: Started work on the shaping of the domed top. This task will be quite a lot of work but it will be really good to get it done. Will cut pickup holes soon. |

I am now busy grinding and filing the top of the guitar to generate the domed top profile.
|
|

Planning a CNC setup where I can cut a small step around the edge of the body defining the lowest area of the domes top (around the perimeter).
|
Left: I am marking out the cut that will define the edge of the domed top plate. I'll probably set the body up on the CNC and machine that edge and carve the rest by hand to blend everything. Right: Before cutting any top material I wanted to mark out the area on which the tuners rest since this area needs to stay relatively flat after carving. |

Top will be curved down to a specific level round the perimeter. There will also be an area UNDER the tuner ends that needs to be relieved enough to get the player's fingers access to grip the tuning knobs.
|
|

Prepping all the interior areas so that they will be clean enough to go to finishing.
|
Left: I cleaned out the two back cavities to remove glue deposit and get these areas to a nice flat surface. The insides of the control cavity and the two pickup recesses will be copper shielded. Right: Got the custom set of strings from Kalium and these should suit the scale lengths and the tuning requirements very well. |

Strings are in and waiting for the guitar to be finished.
|
|

Did some rough grinding to remove unwanted material from the back plate. Next will be filing and shaping and followed by sanding.
|
Left: I am now carving away the extra parts of the back plate to roughly blend it to the belly cut and the neck-to-body joint areas. I'll move to more precise tools next and get all these surfaces flowing together. Right: My next challenge is probably the creation of the curved/domed top. Right now sanding the back of the guitar. |

I am sanding the finish on the back of the gutar and grinding out some of the glue overspill around the joint areas.
|
|

I'm gluing and clamping the back plate onto the guitar body.
|
Left: It's happening! I am gluing the back plate onto the instrument body! Once this is attached I'll do some cleanup and can start on the final shaping of the body and the neck of the guitar! Right: Got the back glued on and unclamped. I am now using the spindle sander to clean up the edges of the body. Next I will grind of the belly cut area. |

Back is now permanently part of the guitar and I'l starting to clean up the body to finished sizes.
|
|

Back is ready to go onto the instrument. Once it is on I will trim it around the edges to finished size and also finish up the belly cut angle.
|
Left: Next task is to carefully place the backplate and drill a few locating holes so that I can pin it in place while it is being glued to the rest of the instrument body. Right: I am not only taking a few photos, but also creating a very useful life-size paper impression of all the internal features that the back plate will end up covering. |

Creating the paper impression gives me an accurate map of all the internal cavities that will be covered up by the back plate. Very useful to have a life-size physical reference.
|
|

Got started on the belly cut area - roughing it out right now.
|
Left: I started the carving of the belly cut area so that I could get a feel for its size, shape and angle. The guitar definitely feels more comfortable with the belly cut section removed! Right: Just to play it safe I machined a couple of wiring channels for pickup wires in case I have any trouble with the ones I cut earlier under top plate. |

I feel better having a choice on the channels that allow the pickup wires to travel from pickups to control cavity.
|
|

Machining of the body chambers is now complete. Will soon be able to attach the back plate!
|
Left: Got all three chamber cavities cut into the back of the body. I will probably play it safe and cut part of the belly cut before gluing the back plate on so I can control the material thickness. Right: I am going to cut pickup cavities and also cut the pickup covers. The covers will help me set final sizes for the bobbin assemblies. |

This photo shows the bobbins and the pickup covers together.
|
|

Setting up CNC for chambering. Already have the programs!
|
Left: Setting up now on the CNC so that I can machine out all the chambered areas that I have drawn on the back of the body. Once that's done we can get the back plate on! Right: Machining the frst of three internal chambering areas. This is a very custom project and I am hoping that all these internal areas will work happily together! |

First of three chambering areas in the guitar being machined. This one was the safest one to start with!
|
|

PI had to slightly adjust the bobbins at the bridge end but all good now. Moving on so I can get some machining done!!!
|
Left: I used the pickup drawings I made to accurately plot the positions and sizes of the two humbuckers. That allows me to machine out all the available chambering areas which is my next machining job. Right: Transferring the artwork to the back of the guitar so that I can be sure the chambering will not conflict with any areas I need to be solid. |

I now have enough data to machine the chambers with a little confidence! More to come!
|
|

Getting ready to cut the tops and bottoms of the pickup bobbins.
|
Left: Cut one of the bobbin pieces to check the diameters and recesses. Made a couple of small adjustments and now I can cut all the required pieces. Right: Got all the bobbin pieces cut on the laser. I used a lighter colored material because these will be under matching wood covers on this guitar. Will get these assembled w/magnets soon! |

Pickup bobbins are now cut. They will need to be assembled to align the magnets at the correct angles. More on that later!
|
|

Blue and green areas I just have to cut out very carefully - The red area is the battery compartment cover...if I put a little chamber above the battery but still behind the back plate I could put a pattern of little holes in that area just above the battery recess for my customer to let that little chamber "breathe"!.
|
Left: I'm working on the areas where I can afford some chambering without interfering with other features on (or in) the guitar. The red area indicates battery cover - could have a small chamber above and behind that. Right: Pickup design has been refined and I'm ready to cut the bobbin components so that we can build them!! |

These are the final drawings for the bobbins that will be incorporated into the two humbucking pickups.
|
|

I'm making note of the expected pickup locations and geometry which helps me make calculations for the chambering.
|
Left: I'm plotting locations for the pickups so that I can maximize the extent of any of the chambered areas. Want to get these cut so that I can get the back plate attached! Right: I'm giving some thought to the pickups on this guitar. Favoring 2-coil humbucking style with one set magnets exposed through matching wood stained covers. |

Rough idea of the pickups I will have to create. I can make the custom bobbins and covers, and my electronics guru will wind, wire and pot them.
|
|

Potting pretty much complete - I want to get the back on but will do any possible chambering first.
|
Left: Fibers have been potted into the back channel. I now want to see what options I have in the body area to create some chambering. If there's room I will machine before back plate goes on! Right: Marking out the features on the back of the body. We'll probably have a belly cut for comfort. 3 areas for possible chambering shown in pencil. |

I know my client wanted a chamber with holes through the side so that he could smell the natural wood! Area A might be the best for that purpose. I can probably do all three - I have to be careful about pickup placement.
|
|

I'm in the process of potting the channel through which the fibers travel from the fingerboard.
|
Left: Fibers have been bent and glued into the channel on the back of the guitar. Now I am potting the spaces around the fibers so that they are protected inside the body of the instrument. Right: I'm adding a filler epoxy down into the FO channel and I have to prop up the guitar to make sure the fluid goes all the way down and sets. |

I am doing this in stages so that I can be sure all the gaps inside get filled. If I do it on one big pour I will get air pockets so doing a little at a time.
|
|

Just about to fit all these fibers into teh slot that rund theminto the control cavity.
|
Left: Next operation is to carefully heat bend the fibers to fit into the channel on the back of the instrument. Shoud not be too difficult. I'll epoxy them in place and they will be potted with everything else. Right: In the process of gluing the fiber optic cables into the slot in the back of the guitar. Have to heat bend and so about 3 at a time. |

I'mcarefully gluing the fibers into the slot that will run them all intop the control cavity. I'm heat bending 3 or 4 as I go - hard to do more than that in one batch!.
|
|

I now have the fingerboard attached to the neck of the guitar. Next job will be to clean up all the edges to remove extra glue.
|
Left: I took this photo just as I released the clamps and rubber bands from the gluing assembly. We now have a fingerboard attached with all the fiber optics run through to the control cavity. Right: A quick photo to show that the fibers have indeed survived the fingerboard gluing process. I'll be cleaning up the excess glue next. |

Great to have the fingerboard on the guitar. I will be carefully heat bending the fibers at the back to nest them into the channel. After that I'll pot everything to protect the cables and the back plate of the guitar can go on!.
|
|

These fibers can be a little fragile until they are potted into a condition where they are "solid-state" and can't move.
|
Left: A very basic test but I needed to know that all the fibers were undamaged before the fingerboard went on. They all light up so I can move ahead and get this done! Right: A big step forward getting this fingerboard attached. I did a lot of prep before applying the glue and clamping. So far everything looks ok, will need to set overnight. |

I'll be a little nervous until I can re-test all the fibers. I have done everything a human possibly could to avoid putting any of the fibers under stress during the clamping procedure. I can breate again after I test them all post-gluing.
|
|

I am pretty sure that the fibers are now safe and have enough clearance to tolerate the fingerboard being glued on. Wish me luck!.
|
Left: I spent quite a lot of time making sure the fibers exiting the fingerboard ran into the body without any pressure or stress. Lots of careful grinding to create clearance! Right: About ready to commit to gluing fingerboard onto neck of the instrument - a lot of the last couple of week's work has been dedicated to this! |

Sufaces have been prepped and I'm ready to add fingerboard to neck.
|
|

Fingerboard is looking good on the guitar - I should be able to get it glued in place very soon.
|
Left: Frets have been cleaned up and are now flush with FB edges. I'm now testing the fit where the group of fibers enter the body to see if I need to adjust anything in that area. Right: Got the neck fitted pretty well on the front, I will be carefully bending the fibers through the channel in the back and cut the fibers to length when done. |

The fibers will be potted into this channel on the back of the guitar.
|
|

The rest of the frets went in well and the fingerboard looks really nice already. I need to trim the ends flush then test all the fibers again.
|
Left: Well I got all the frets installed in the fingerboard and everything went pretty well. I will now be doing some careful trimming to bring the ends flush with the fingerboard edges. Right: I am now very carefully trimming the ends of the fretwire back to flush with the sides of the fingerboard. I'm almost there! When done I'll dress all the ends. |

I'm trimming the ends of all the frets back to the point where they are flush with the edges of the fingerboard.
|
|

The first four or five frets are the most tricky - after that there's plenty of stability and support as I work toward the headstock end.
|
Left: Fretwire bent to correct radius and I'm starting at the most difficult end next to all these fragile fibers. I will feel better when these are all in and dressed on the ends! Right: Fret 24 was a little bit of work but I finally got it installed! the rest should get progressively easier as I get away from all the fiber optic cables. |

I'm getting insto the 'safe' area now with the frets. I will be checking the fiber optics soon to make sure no damage has been done to those while I was working on istalling the first 4 frets. Then I can relax and get the rest done!
|
|

Gluing went fine so now trimming the excess back flush with the sides.
|
Left: Veneer successfully attached to fingerboard and now I am trimming off the excess and will be sanding the four edges flush. This should complete this stage and I'm ready to install frets. Right: I have the long (2ft) pieces of fretwire running through the bending tool so that I can match the fret radius to the fingerboard radius. |

Once the fretwire sections are bent I will cut them just a little oversize and get them all installed.
|
|

I created a custom fixture that will allow me to clamp and press a maple veneer onto the underside of the fingerbopard to creat a nice clean solid joint.
|
Left: Hard to see in this pic but I made a gluing fixture for the fingerboard so that I could get that safety maple veneer attached to the underside. I want this assembly to be nice and soilid and secure! Right: Veneer is now being glued to the back surface of the fingerboard creating a protective layer between the fibers and the neck. |

Looks elaborate - the main goal is to do this very carefully so that I avoid any stress on he actual fiber optic cables!!!!!!.
|
|

This is definitely the hardest part of this build but once it is done I have a pretty clear path to the end product. Frets will be going in and then the fingerboard will be attached!!.
|
Left: Working now of carefully settling the fibers into the space in the neck surface so that everything fits together nice and cleanly. Right: I'm working on applying a thin layer of maple veneer which will help give me a very flat joint surface and a better transition for the fibers as I glue it on to the neck of the guitar! |

This veneer will add stability and a nice flat surface for attachment onto the neck of the guitar.
|
|

The potting process fills any remaining spaces between wood and fibers top create a much more stable solid-state condition.
|
Left: I started the potting process - which means I fill all the remaining air space after gluing in the fibers with a viscose epoxy which fills all the remaining gaps and results in a solid-state condition. Right: I got all the potting of the open spaces in the channels done and scraped everything flat. Did a little more carving at back of neck. |

Filledin all the gaps between the fibers and the wood to create a nice stable solid-state condition.
|
|
I am in the process of carefully fitting these two parts together and allowing enough recess space for the fibers.
|
Left: I am now deciding whether to install the jumbo fretwire before or after fixing the fingerboard to the neck of the guitar. I think I will make a fixture and put the frets in first. Much easier to clean up and dress the ends. Right: Got most of the fibers potted inside their channels and glued right up to the end of the neck. |

Working very carefully on gradually bending the fibers so that they are ready for the board to be glued on.
|
|

I am in the process of carefully fitting these two parts together and allowing enough recess space for the fibers.
|
Left: Got all the fibers through to the control cavity. I now have to make sure the transition fron FB through the hole does not put stress on any of these cables. I will hand carve where necessary. Right: I did some more carving and careful bending of the fibers and I am now closer to the desired fit between fingerboard and neck. |

These fibers need to pass through to the control cavity with as little stress as possible so this is a tricky job to get all of these fibers heat bent and then secured so that the fingerboard can go on. It's a matter of doing one task at a time - each time getting closer to the goal. Just about there! I may add a veneer on the bottom to seure everything, then add frets, then fingerboard goes on! This is basically the last big and difficult job before getting the instrument finished!!!.
|
|

Last of the FO cables going in to the nack of the neck. The only way to do them is one a t a time so it's a bit laborious!!.
|
Left: Got all the fiber optic cabling installed into the back of the fingerboard and now I can get things ready to get the frets installed. When frets are in I can then attach the fingerboard to the neck!! Right: Doing some arrangement with the FO cables so that they transition from the back of the neck through the body without stress on any area. |

Where they collect at the end of the neck I have to carefully heat bend the FO cables to fit through the channel in the body without and evident stress.
|
|

In the process of gluing the FO cables through their sleeves in the side dots and into the machined channels on the underside of the fingerboard.
|
Left: I am gluing the fiber cables into the sleeves and the slots along the fingerboard. I will end up with a big bunch of them at the body end to feed through the body to the cavity. Right: Working my way up the fingerboard. I have to glue each one carefully and make sure it is flush with the bottom surface. Going well at least this far! |

This jobwill be done soon!!!.
|
|

The fibers fit into their slots and exut through the tubing inserts. This will create a nice looking side dot both with the lights on or off.
|
Left: The fiber optic cables run along their slots and end up supported in the tubing inserted in the side of the fingerboard. I'm gluing all this together into one piece! Right: I lightly heat bend the fibers where they curve back from the fingerboard edge and then I run the cables all the way to the control cavity and cut slightly oversize. |

I glue the fibers in as I move from nut back towards the body. When done I will pot any voids with a special epoxy to create a solid state condition.
|
|

Machining of FO slots was successful and I removed all the attached fixturing. Ready now for the cables to be installed.
|
Left: I sawed and sanded off the support material to end up with a clean fingerboard with the fiber optic cable slots cut into it. Now I will work on embedding the cables into the board. Right: I'm now running the fiber optics along neck and through body to establish the required lengths. I'll cut a set and start the installation process. |

Working from first fret backwards I will be installing the fiber optic strings into their respective slots leaving enough to feed through the body to the control cavity.
|
|

The fingerboard surface is now ready and able to be machined.
|
Left: It's a fairly elaborate setup on the CNC but this allows the machined underside of the fingerboard to be held flat and have all the required surfaces exposed. Right: In the middle of machining our fiber optic cable channels. So far looks good - only had to make a couple of programming adjustments - should be done soon. |

Setting up was a lengthy procedure as I had to make sure side dot sleeves and machined channels all lined up correctly. After that the actual machining wasn't too bad!
|
|

There's not a lot of room for the clamps based on the required paths of the fibers so I am making sure my cutter can get in nice and close to the clamped areas.
|
Left: Did a little modification to the retaining blocks on the fingerboard to provide clearance for the cutter getting in there. Now I can get it up on the machine and cut the slots. Right: I have been working on the best layout to channel the fiber optic cables to the end of the fingerboard. I'm now getting ready to do the machining. |

I will probably be suing this layout to route all teh fiber optic cables along the bottom of the fingerboard.
|
|

I'm making a small fixture to hold the fingerboard while I machine the channels for the fiber optics.
|
Left: I wrote a program to allow me to machine a pattern of fiber optic slots under the fingerboard in the best possible configuration. Setting up fingerboard for machining! Right: The fingerboard has to be securely held upside down so that I can machine the fiber optic channels. I have a program that will establish all the channels. |

Setting up on CNC to cyt a pattern of channels into which I wills eal the fiber optic cables.
|
|

These are the little sleeves for the fiber optic cables. They are delicate and tricky to cut so I leave them a little long and carefully sand flush when we are done.
|
Left: Cut sleeves slightly oversize in length and fitting them into all the side dot holes I drilled. After that I have to machine the board from the underside. Right: Setting up the fingerboard on the CNC to cut the fiber optic channels before installing the metal sleeves permanently - mainly so that the cutter doesn't distort the inner ends of the tubing. |

I'm making a small fixture to hold the fingerboard while I machine the channels for the fiber optics.
|
|

Fingerboard is being prepared for some machining to permit the installation of the fiber optic cables.
|
Left: I removed the substrate support material from the fingerboard and put it on the body just to see what it looked like in place. I have a lot of delicate fiber optic work coming up but will be posting photos! Right: I will be installing this tubing into the side dot holes. This serves as support sleeves for the fiber optic cabling. |

Getting ready to install sleeves for the FO cabling.
|
|

Holes for the side dots have been successfully drilled.
|
Left: The holes for the little metal sleeves that will hold the fiber optic cables have all been drilled. I'll probably go ahead and install the sleeves and remove the fingerboard from the support piece. Right: Next tasks are to separate the fingerboard from its support, machine slots for fiberoptic cables and get them installed and potted. |

Fiber optic cable ready for installation under the fingerboard.
|
|

The blue and gold make a good contrast to separate the individual morse code letters
|
Left: This is the fingerboard with the finished inlay - lighting was bad bacuse it was late and dark but will post better photos as we progress. Right: The fingerboard is now up on the CNC where I will be drilling the holes for the illuminated side dots. When those are established I can remove the fingerboard from the support material. |

TDrilling holes in the side of the fingerboard for the sleeves that will house the fiber optic cables.
|
|

I applied a couple of sealer coats to the fingerboard so that I wouln't risk any bleeding from porous surfaces during the inlay process.
|
Left: Right before working on the inlay I wanted to give the sufrfaces a couple of coats of sealer so that any glue or other fluids used would not bleed into the wood. Just a precaution. Right: Inlay process is moving along. Fairly tricky detail work but I almost have all the blue installed. Should be a very cool looking fongerboard! |

Moving through the fingerboard inlay process. Blue first then moving to the gold.
|
|

Working on fingerboard positioning which allows me to plan on tuner/bridge placement and somefeatures of the headstock.
|
Left: I am getting ready to install inlay pieces and I'm also checking the linear positioning of the fingerboard relative to the neck and body. More photos on this coming! Right: I did several tests on inlay and colors. My best results appear to be a combination of gold metalflake and solid blue shell inlays. Both look great. |

Working on fingerboard positioning which allows me to plan on tuner/bridge placement and somefeatures of the headstock.
|
|

Working on the support pieces wich will exist below the actual shell inlay pieces.
|
Left: Right now I am getting the inlay pieces carefully cut and aligned to the radius of the top. The small pieces installed right now are carefully shaped to match the compound radius. Right: I need to find the best contrast in colors so that individual letters stand out. I looked at a lot of shell - best two so far were orange and light blue! |

Will confirm on thsi soon - I want to get inlay done so that I can move onto fiber optic cabling for the side dots!.
|
|

Neck with truss rod fitted in its machined slot.
|
Left: I have the truss rod which I have previously aquired now fitted into the neck so that everything is ready for the fingerboard when it is done. Right: I have a couple of delicate operations to get the inlay set flush with the fingerboard surface but I am looking forward to seeing this unique inlay complete on the fingerboard. |

The inlay process is delicate and mostly done under good lighting and magnification. It will be worth all the work though!.
|
|

With the final industrialized finish on the maple in mind I was trying to find some shell of complimentary colors for the Morse Code inlay.
|
Left: Hard to capture the actual colors on a photo but I think a light blue and white/gold shell will contrast well with the dark wood and will define the morse code letters well in the fingerboard inlay. More on this coming! Right: This is the fret wire I am planning to use in the fingerboard. The whole thing should look impressive when complete. |

I wanted to post this so that we had a reference for the jumbo fret dimensions.
|
|

Ran the program a couple of times to just mark the surface and letting me adjust for optimum placement.
|
Left: I was very cautious getting the pattern of the inlay set accurately in relation to the fret positions but it looks like everything is going as planned. Right: Ran the program and now have all of the morse code recesses established in the fingerboard. Lots more to do but definitely good to get this part done!! Side dots and fiber optics coming! |
All the dots and dashes are now engraved into the wood and I can move on.
|
|

Writing a CNC program and I will be setting this up very carefully on the actual fingerboard blank for positioning.
|
Left: Final layout of morse code which I am now using to create the machining program. I need to be careful to make sure placement will be very accurate! Right: I now have a program ready to run on the CNC to create all the Morse Code inlay. I wanted to get this done before I removed the fingerboard setup from the machine table. |

The program is simple enough but it needs to be very carefully positioned.
|
|

The side dots will be two different shell colors - I'm thinking white and a pale blue bearing in mind the eventual color of the guitar itself. Just making sure placement is correct before cutting anything!
|
Left: I have replicated the fingerboard in the computer so that I can accurately place the inlay features. I have to double check a few things but this will be my format for programming. Right: Based on the calculated string paths I moved the inlay recesses slightly inward so that the strings would not cover the morse code artwork. |

based on my calculations I should be able to expose all of the inlay this way without it being hidden behind the strings!!!
|
|

Now have a program for the CNC for cutting the fret slots.
|
Left: The fret slots have been programmed and I am now going to run that part of the fingerboard work on the CNC. When that is done I will do the inlay details. Right: Fret slots have been cut into the top surface of the fingerboard. I now need to run a program that will cut all the little recesses for the Morse Code inlay on the edges. |

Got the fret slots cut and now I can place all the morse code dots and dashes on the dark borders so that I can inlay those with shell. Should look really nice!
|
|

Perimeter and top radius have been machined on the assembly. Fret slots probably next.
|
Left: The neck has now had its outer perimeter re-established and I have also finished the machining of the top surface. I'm now doing some cleanup and we'll move on to establishing fret slots. Right: I am setting up the fingerboard to have the fret slots cut and then all the machined recesses for the Morse Code inlay |

While the fingerboard is on the machine I will be cutting fret slots and recesses for inlay features.
|
|

MYellow likne is current profile and the red line is more like where it will end up after carving/shaping.
|
Left: I have a better concept of the required neck to body transition and will be doing some shaping to achieve that. Also considering chambering options before the back goes on. Right: The fingerboard is up on the CNC for some delicate machining to finish up the surfaces. This will then allow me to do the morse code inlay work! |

Setting the fingerboard up on the CNC for some fairly intricate work.
|
|

Cutting the control cavity in the guitar.
|
Left: I am now machining the main control cavity. With this done I will have a means to route the fiber optics into the cavity, plus do whatever chambering is required before back goes on. Right: Both cavities have been successfully machined into the back of the body. I can now remove the back plate and get some more internal work done. |

Machining of cavities complete. The back will look great with the matching covers harvested from the same wood!.
|
|

Two recesses up for machining so that I can attach the fingerboard/fiber optic assembly!.
|
Left: Instrument now up on CNC where I will be cutting out the control cavity and the battery cavity areas. This will allow me to thread the neck fiber optics into the instrument body. Right: I started by machining the 2x 9v battery cavity area and when this is complete I will then machine the control cavity in the same setup. |

Two machining operations up on the CNC right now.
|
|

The darker wood has been very carefully machined so that I have accurate joint faces for assembly.
|
Left: I machined the two darker wood edges on the CNC to give me two nice clean and square edges to ensure a clean joint onto the Maple fingerboard. Right: I'm now in the process of gluing the neck inlay wood into the recesses I machined for them. When these are attached I will get this fingerboard back on the CNC for more work. |

Fingerboard in the vacuum press to attach the upper and lower inlay areas.
|
|

I was going to cut all the way through but close to the end I thought having a matching maple pinstripe at the base of the fingerboard would look very cool and it retains the existing flat surface at the bottom of the fingerboard saving me time and setups.
|
Left: I might leave a little material on the bottom of the maple for 2 reasons. One - that it will add a cool little pinstripe on the base of the fingerboard and also it will make it easier to add the darker wood and still use the existing fixture. Right: I cut some of the border wood for the fingerboard which should look really nice! |

I wanted to get some fairly consistent and relatively dark border material. Looks like this will work out pretty nicely.
|
|

The paper form of the cavity which I cut on the laser allows me to select points I can use to temporarily attach the back plate.
|
Left: I am preparing the body for the machining of the control cavity. I'll be temporarily attaching the back plate to get this feature machined. Right: Was working on this last night - measuring to make sure the morse code inlays would not sit directly behind the strings. I'm hoping to have them visible between fiorst pairs of strings! |

Always important to try and think ahead when you are creating something new and unusual!.
|
|

This operation will provide a joint face on top and bottom of the fingerboard onto which I will glue the darker material in order to create the upper and lower areas for the morse code inlay.
|
Left: I ended up writing a program to trim the edges of the fingerboard so that I can then cut and insert the ziricote edges into the fingerboard. I will then re-machine the profile and top. Right: I am looking at the body to neck transition so that I can make plans to finish up the geometry. Will be cutting control cavity next. |

Next step will probably be machining the control cavity. I need to have that area machines before threading the fiber optic cables through.
|
|

Looking for the right material for the darker areas of the fingerboard. The two in the center are both ziricote so I will probably use one of those.
|
Left: I'm going through my inventory of darker exotic woods to see if I have a couple of suitable inlay strips that will work really well on the fingerboard surface. Right: I have a couple of materials on hand that give me a nice clean background material for the Morse Code inlay. I'll plan on embedding this material into the fingerboard. |

I'm using this material for the upper and lower edges of the fingerboard. I only need about 8mm wide in from the upper and lower edges. This wood will provide a great contrast for the inlay material I will use for the morse code markers.
|
|

These two channels are the main ones. I need to plut bridge and pickup positions to establish the other three. Right now the next requirement is a finished fingerboard..
|
Left: I cut a channel for battery power supply wires and one for the fiber optic cables. Pickup and ground wires later. Need to shift focus to finishing fingerboard now. Right: I'm working on the distribution of the morse code relative to the frets and the Ziricote we were planning to use in the fingerboard. This is the plan... |

"This layout is based on our earlier plans - ziricote top and bottom of the fingerboard inside which we will inlay the morse code. I plan to do it in two different colors to isolate the letter symbols.
|
|

Measuring for machined wiring channels to connect fiber optic cables, battery power and ultimately pickup and grounding wires too.
|
Left: Now that I have a hle for the fiber optics I need to mark out and machine a few more wiring channels before the back plate can be attached. Right: Set the body up on the CNC so that I can cut some internal channels. Main one is for fiber optics and others will be for pickup wiring, battery power supply and internal grounding. |

Cutting internal channels for wiring before the back goes on.
|
|

Have to be a little careful here because it is an angled hole that has to start and end in just the right places!.
|
Left: I'm gathering tooling and marking out the angled hole so that I can machine a channel through which the fiber optic cables can travel from the fingerboard through to the back of the body. Right: It doesn't look like much but this carefully angled hole will allow my fiber optic cables to safely pass through the body to the control cavity. |

Drilling an angled hole to allow fiber optic cables to feed to control cavity well out of the way of the neck joint relief area.
|
|

More sanding work on the back of the neck and the transition to the body.
|
Left: Some more carving done to the neck and body joint and I am now set up to do the last couple of machining operations before I can glue the back plate onto the body! Right: This is part of the fingerboard inlay plan. The fingerboard itself is curly maple but we are going to add some ziricote into the surface for added interest! |

Not sure yet sine the morse code inlay will be top and bottom, will I do the contrasting wood top and bottom too - we will see..
|
|

This guitar has quite a lot of cool presonalized features on it..
|
Left: This is the back of the guitar and the pencil lines on the front of the body show roughly where the fiber optic cables will pass through and be routed to the control cavity. Right: On the front of the guitar the fiber optic cables will come together and be routed through the body at the point indicated by the arrow. |

This guitar has quite a lot of cool presonalized features on it..
|
|

This guitar has quite a lot of cool presonalized features on it..
|
Left: This is a logo I am going to incorporate somewhere on the guitar. I'm working on creating a nice clean vector version of it so that I can use it for programming. Right: This is how the actual morse code will probably look on the fingerboard. We have a couple of different ways of doing this artwork so I will post more options. |

Morse code I was considering two colors so that the morse letters were distinct.
|
|

This is the layout of inlay my customer sent me. It will have his name engraved and inlaid in morse code. I will be creating a vecor file to better illustrate this.
|
Left: I'm creating a drawing that will lay out the inlay on the fingerboard in relations to fret lines. I'm also looking at a few different inlay materials that will look impressive on the finished product. Right: This is the Morse Code equivalent of the inlay we will be working with. I think we can make it work well along the fingerboard! |

The inlay should work based on the number of frets we have on the fingerboard. I'm working on a full size version.
|
|

Back plate can go on as soon as I get wiring channels established.
|
Left: Body has been modified to the thickness that will work once we add the back plate. I just now need to cut the wiring channels and the back plate can be attached. Right: Looking at the development of the fingerboard as I just realized that we were planning to incorporate fiber optic side dots and some planning is needed in that area! |

I admit - I actually should have added the fingerboard with the fibers in it before the top went on - however I can run the fibers through below the back plate and into the cavity if I am somewhat careful!.
|
|

I am probably going to take about the same amount of material off the back of the body as the thickness of the plate I will be attaching.
|
Left: The body of the guitar is up on the CNC so that I can trim the thickness down to a size that will yield the most comfortable and practical body thickness after the back plate goes on. Right: I got started on removing material from the back of the body to prepare for the attachment of the custom back plate. So far so good. |

Once this material is removed I will add channels for wiring and possibly some chambering for weight relief.
|
|

Battery lid removed and almost done with this back plate.
|
Left: Got the battery recess lid cut out of the parent material. I will machine from the back and then insert a filler piece and after that will be ready to attach to the main body. Right: The work on the battery area has been completed on the back plate and I can now attach it to the body. Will do some measurements on body first. |

All the continuous grain lid work is finally done and I will be working on adding this section to the existing body.
|
|

Control cavity area complete - I'm now contemplating adding a battery area for two 9v cells.
|
Left: I leveled off the back surface of the back plate and also sanded around the perimeter to get the whole plate much closer to the existing body size. Now making a few descisions on the next moves. Right: Back up on the CNC to cut a battery compartment lid from the back plate. I will do the same thing to this cavity as I did on control cav. |

Getting started on the battery lid and recess.
|
|

Good to get this piece done - I'm now looking at whether I should do the same thing for a little battery compartment or will there be enough space in this cavity.
|
Left: This is what the back plate looks like with the filler for the cavity recess in place. Once it is glued on to the body I will machine the cavity in that area. Right: The insert for the back plate has been sanded close to final thickness and I am now gluing it into the back plate. Now that it has set I can final sand everything flush. |

Back plate insert done and just needs some final sanding to bring the surfaces flush. I will probably also make a similar battery lid on the upper body half.
|
|

Cutting out the control cavity lid from the parent material of the back plate.
|
Left: This is the result of the machining - I now have to cut a filler plate for the inner surface of the back plate so that it is ready to be glued onto the instrument body. Right: Setting up the laser so that I can cut the insert plate for the inside of the back plate of the guitar. I may do the same thing for a battery cavity since we will have LEDs |

CI cut out the filler plate for the back - now I can sand it and glue it in place.
|
|

Cutting out the control cavity lid from the parent material of the back plate.
|
Left: Right now I am cutting out the actual lid for the control cavity. Whan that has been removed I will machine the back side so that I can add an insert to create the surface it will sit on. Right: I flipped the back plate over and machined the other side along the same path using a slightly larger cutter. This removed cover from plate. |

Plate now separated from back plate. Couple more operations and I can then get the back plate onto the guitar body.
|
|

I will be running three separate operations to create the continuous grain cover feature. It will be worth it on the end product.
|
Left: Got a CNC program written to cut the control cavity cover out of the parent material of the back of the guitar. This will look awesome on the finished product. Right: Back plate up on CNC getting the back plate harvested out so it can be used later as an awesome looking continuous grain cover. Several little operations to do here. |

Ready to cut out the control cavity cover from the back material.
|
|

I want to get the fingerboard attached but before that I will need to establish the specifics of the inlay work to be done.
|
Left: I sanded quite a bit of the extra neck material away so that I can get a better feel for the shape as it will blend into the body of the guitar. I'll finish the neck profile as soon as the fingerboard is on. Right: Marking out the back plate so that I can harvest out the continuous grain control cavity cover. This will look awesome when done. |

I marked out the back plate so that I can spindle sand it down to size. That will help me in the placement of the cover that I will harvest out of this very nice piece of wood.
|
|

Back plate ready for marking and cutting. I will orient it to get the best out of the grain.
|
Left: Sanded both sides of the back plate to get it ready for marking and cutting to the body profile. This material will look really nice with the industrialized finish on it!! Right: I marked out the back plate and rough sawed the shape of the guitar so that I would have something to work with. NOw to plan the control cavity. |

Back plate is rough cut. I will bring it much closer to the body dimensions and then plot out the shape and location of the control cavity. I'll probably want to create a separate battery compartment so I will be havesting the cavity lids from this back material.
|
|

The bookmatched back plate will be awesome. Once this is glued together I will rough cut to the body profile!.
|
Left: The back plate is now being glued together to create one beautiful bookmatched unit that will eventually be added to the instrument body.. Right: This is our sanded and assembled back plate for the guitar after it was released from all the clamps. I will clean up the surfaces and plot the instrument shape on the wood. |

Back plate now one bookmatched piece and ready for more action. First I need to sand it to remove glue squeeze out and get a nice finish on the outer side..
|
|

The CNC gives me the best possible straight edge for glued joints.
|
Left: I am using the CNC to accurately cut square and straight joint faces on the edges of the two back plates. This will allow me to assemble them into one piece. Right: The two bookmatched halves fit nicely together along their common machined edges now so I can go ahead and get them glued together. |

THis back plate will look really good on the instrument body!.
|
|

The back material is really nice. I have two different ways I can bookmatch the pieces so I'm comparing to see which one best suits the body shape.
|
Left: This is the back plate which I will be gluing into one piece. I need to decide which of the two edge choices will look best as a bookmatched assembly. Right: Getting ready to machine the control cavity. I'm creating a scaled vector drawing of the shape and will create a program from that. The lid will come from the maple backplate. |

Need to get the cover geometry worked out as it affects the existing body and also the back plate material.
|
|

Got the back nice and flat so marking it our for ongoing machining operations.
|
Left: Now that I have a machined back and a body thickness (similar to Les Paul) to work with, I can mark out areas for chambering and cavities for electronics. Allowing also for some kind of belly cut. Right: Finishing up around the body contour. Want to have a fairly finished body profile as I am using this to cut the back plate. |

Cleaning up body edges, will be using the guitar shape as a template for cutting out the back plate.
|
|

This quilt is just as awesome as the material on the front of the body. Looking forward to seeing it attached.
|
Left: This is the back plate which is a beautiful piece of quilted maple. I'm figuring out the net thickness of the body based on the maple thickness so that I can machine to size. Right: Guitar is now up on the CNC having the back of the body machined down to a nice flat surface so that it will be ready for me to attach the back plate. |

I'm machining to get the back ready for its maple laminate. I may do a couple of other machining operations before it gows on - possibly some chambering and also cutting the lids out of the back plate so that they can be matching grain!.
|
|

Top plate is now part of the guitar and it's looking very nice! I'll be doing some cleanup around the edges and probably marking out pickup locations. Will also be looking at the fingerboard details.
|
Left: The body is now out of the vacuum press with the top plate attached. Top plate will ultimately be curved in a Les Paul style which is why I used such a thick piece of maple. Right: This is the fingerboard which will be getting some inlay work done to it based on ideas we have been discussing. More on this soon. |

I'm cleaning up the surface of the fingerboard so that I can plan on doing some of the inlay work on it.
|
|

These slots should line up with the pickup recesses and the bottoms of the tuner assemblies.
|
Left: The wiring channels have been cut on the CNC so I can now get things ready to get the top plate glued onto the body of the guitar! It will look really nice. Right: The top plate is now being glued onto the rest of the body in the vacuum press. Once this is done I will clean up perimeter and will then be able to set pickup locations. |

Once the top is attached I will be able to locate tuners and pickup recesses and get some creative work done on our fingerboard.
|
|

Based on the multiscale geometry we are thinking of making pickups which include two single coils side by side which can be tapped.
|
Left: Based on the multiscale geometry of this guitar we have a couple of options on the pickups. Since they will be set at an angle I can either use 7-string guitar pickups using bar magnets, or design and wind custom. Right: I have been formulating pickups with my electronics guru - we have a plan for these pickups that may work! |

Working on spindle sander to bring top down to the same profile as the body.
|
|

Most of the body perimeter is established. I need to decide the best approach for tuner clearance.
|
Left: For the moment I am done with the shaping of the perimeter. Any further modifications can be done after the top is attached. Looking nice so far. Right: I am marking out where I will be placing wiring channels on the top surface of the body. I will machine these into the body material before the top gets glued in place. |

Based on the multiscale measurements and anticipated bridge and pickup placement I marked out wiring channels for pickup wires and grounding wires which I will now cut on the top surface of the existing body.
|
|

Working on spindle sander to bring top down to the same profile as the body.
|
Left: Working round the body to clean up top plate to match the body shape. Almost done with this part and will set things up for gluing the top onto the body. Right: I'm using scale length, hardware and pickup locations to determine internal channels for pickup wires, grounding wires etc. which I will cut before the top is glued on. |

I have to be faurly careful setting out where the tuners will be located so that I set the ground wiring in an area that doesn't interfere with screws or moving saddles.
|
|

Getting tsrated on the cnc machining the neck joint area into the top plate.
|
Left: Setting up and running the maple top plate on the CNC so that I can machine the neck joint geometry and thereby allow the top to fit neatly onto the instrument. Right: Neck joint machining was successful and now the top fits onto the body. I will trim the top to blend and finalize the outer perimeter of the guitar body. |

Top plate now fits nicely onto the body - now I have to trim and clean up the edges.
|
|

Glad to get that portion of the machining done - next will be wiring channels and machining the top plate to fit the end of the neck.
|
Left: Machining has been done to the top of the body and I will be getting it ready now to have wiring channels cut and after that get the top plate attached. Right: I have now cleaned up the top surface by removing the extra material on the areas where I had to clamp. I'm going to look at pickup placement so I can define wiring channels. |

Surface ready for top plate - need to get wiring channels in there first.
|
|

Removing quite a bit of material from the front face of the guitar for the fancy top plate.
|
Left: In this photo I am machining two features. One is establishing the front face at the right height for te top plate, the other is cutting the end of the neck heel. Right: Front face has now been machined down to the level that should allow the tuner on the top plate of the guitar to exist at the correct height for neck angle. |

This is the surface onto which the top plate will be attached. I now have to machine the end of the neck heel.
|
|

One of the most important features here is the cutting of the heel of the neck since it will be defining the position of the fingerboard on the neck.
|
Left: I have calculated the amount of material I need to remove to match the thickness of the top plate. I am setting it up on the CNC so that I can mill down to that size. Right: In this photo I am making sure I have good linear plots for the locations of the end of the neck and the tuner locations before cutting the top surface. |

I only get one shot at these measurements so it's worth double checking before I start machining!.
|
|

The top plate is going to be trimmed to match the body shape.
|
Left: I am just about to mark out the top plate so that I can rough cut it to match the body. I will be doing the same thing to the back plate. Right: Front plate now rough cut and I will be working on this to refine the edges. It also defines the level to which I need to mill the top surface of the body. That will be happening soon. |

This is the top with quite a bit of extra material around the edges. The next move will be to cut out relief for the neck joint so that it fits onto the body, then I can trim the edges to size.
|
|

Nice to get the body halves on. The body will have a maple top and back so I will be doing some machining to both sides to yield final thickness.
|
Left: Both sides successfully attached. Before I put the quilt maple back plate on I need to do some refining of the body profile to get it to finished shape/size. Right: I have been refining the body shape closer to its final size before I do the front and back machining. Litte bit more to come off but almost there. Back and front plates ready. |

Almost done with getting the body shaped trimmed down to size.
|
|

Calculating linear positions of body halves.
|
Left: I was able to make some careful measurements of top and back plates to determine the center position of the body halves relative to the core thickness. Will now glue the first of the two. Right: The other critical requirement when attaching these body parts was to make sure they were placed in the correct linear positions for scale length. |

First of the two body halves being attached to the core of the guitar.
|
|

Got the joint faces cut on CNC and now prepping to glue these two body halves onto the core section.
|
Left: I machined the joint faces of the two body halves and they are now ready to be attached to the core section of the guitar. I'm doing some checking for linear placement. Right: I'm doing some careful planning for the placement of the core body pieces based on ultimate body thickness and the thickness of the front and back plates! |

Taking the thicknesses of the front and back plates and the desired thickness of the guitar at it's thickest point tells me wherer these center pieces should be glued to permit further machining.
|
|

The center of the two body halves have to be glued onto the core of the guitar - getting things ready for that.
|
Left: Now that I have a top plate and a back plate it's time to get the two body center halves glued to the core of the guitar. I'm prepping the joint surfaces. Right: I used our paper template to mark how much I needed to trim off the body pieces, drum sanded sides, and now setting these up on my machine to cut the joint faces on each part. |

The two parts were sanded both sides to guarantee flatness. I also rough sawed off some of the extra material at the joint edges and can now clean those up on the CNC to create joint surfaces.
|
|

The guuing of the two top plate pieces was very successful so now I'm planning for cutting out the profile and figuring out the domed cross-section!.
|
Left: This is the glued-together bookmatched quilted maple top for the guitar which is now thick enough to be carved to be a nice domed top plate for the instrument. Right: I am now machining the back of the material to one flat surface and deciding on the final thickness from sides to center for the top plate. |

Once this rough machining is done I will clean up on the drum sander and get the body template to mark out the instrumebt top.
|
|

I'm machining joint faces on the two top plate halves so that I can glue them together into one beautiful piece!.
|
Left: I have drum sanded both sides of both halves of the top plate and now I need to machine nice clean joint faces so that I can join the two bookmatched halves together!. Right: The top halves are now being glued together into one complete top plate which I will then carve into a domed topsimilar to les pau etc.l |

I am now gling the two halves of the bookmatched top together.
|
|

The block of maple is now in two bookmatched pieces. I need to drum sand the faces next.
|
Left: Success - got the slab sawed in half with a very straight and square cut so I can now get these pieces over to the drum sander and get them cleaned up. Right: I took the two rough sawn halves and ran them through the drum sander to clean up the faces. The bookmatched quilt looks really nice already!! |

Got the two top halves sanded. They are still thicker than I need but almost ready to glue together into one piece!.
|
|

In order to help with sawing I was able to trim this block down a little smaller based on our body temaplate.
|
Left: I was able to trim the block of quilted maple a bit closer to the actual size of the guitar body before I moved it to the bandsaw to split it down the middle. Right: Right now on the bandsaw being VERY careful to get a nice straight cut since theboard it being bookmatched. The straighter the cut the less I have to clean up flat! |

In the process of sawing - wish me luck!.
|
|

I now have a very nice slab of quilted maple which will become the radiused top.
|
Left: I received a very nice piece of quilted maple which is 1.7 inches thick. I had to invest in this piece because my customer wants a radiused top and that requires a thicker top plate than I was going to use. Right: Ready for sawing this piece of quilt into two top plates. It's a big cut but as long as I am carefull all should be good! |

Setting up to split the new top plate.
|
|
Received my set of ABM tuners from Berlin.
|
Left: I'm using the body template to mark out the best grain orientation for the Quilted Maple front and back plates that will make this instrument look awesome. Right: Text and picture coming. |
Received my set of ABM tuners from Berlin.
|
|

Cutting Maple for the back and front of the guitar - Starting with the back so I can work with the net thickness and calculate forward from there.
|
Left: Body core pieces are thicknessed and I am now going to rough cut the Curly Maple plates for both the back and the front of the instrument. Right: Text and picture coming. |
Received my set of ABM tuners from Berlin.
|
|

The challenge here is setting the height of the body assembly correctly relative to the fingerboard height. Just being careful!
|
Left: Body core pieces are thicknessed and I am now going to rough cut the Curly Maple plates for both the back and the front of the instrument. Right: This is the neck and the fingerboard side by side. I'm collecting materials to get started on some of the inlay requirements of this instrument. |

I have a few different levels of inlay work to achieve so making plans to get started on that.
|
|

I will use some veneer to pinstripe alont the wood joints - will look good!.
|
Left: I will be using decorative veneer to enhance the transitions between wood species. This will have a nice pinstriping effect on the finished instrument. Right: I have been attacking the back of the neck with my sanders and grinders to start shaping all the features in that area. Another step forward. |

I removed much of the excess material from the neck section - can't go too far until I get the body parts attached. I'm leaving stock for a small volute at the headstock end.
|
|

I will be assembling these body parts soon and need to make sure they are set in the correct relative locations.
|
Left: I am doing some marking out of features on the body so that I can relate the body parts to the scale lengths and specifically the fingerboard and bridge locations. Right: I'm shooting for a body thickness of about 1.550" - more than that feels really bulky. Will have quilted maple front and back. |

I'm looking at both sets of quilted maple to see which I want to use on front and back. I know we want a slight radius o teh top pf the body and I wish this material was a tiny bit thicker for that purpose. We can still make it work fine though.
|
|

Just need to take a little more of the thickness of both of the body halves.
|
Left: I'm machining and sanding the body center pieces so that the combination of those and the maple front and backs end up at the desired body thickness. Right: Body core is up on the CNC to establish a parallel back surface to that of the already machined front surface. |

Although I am planning to put a full piece of curly maple across the back I still need to machine a clean reference surface on the back that is parallel to the one I machined on the front.
|
|

Body is still oversize right now but will soon be spindle sanded to finished sizes.
|
Left: Working on the core section to get it ready for the addition of the body parts. I want to get it all assembled into one piece! Right: The fingerboard on this instrument will not only feature various woods, but will have some very interesting inlay involved including some Morse Code and some other interesting additions!!! |

I'm working on a final vector drawing of the fingerboard composition which I hope to post here soon.
|
|

Received my set of ABM tuners from Berlin.
|
Left: I was able to locate some top quality quilted maple in New England and this piece will be used for the front of the instrument. Right: I chose this for the back of the guitar since it matched the front and will also tolerate our "industrial" looking finish very well. I liked the size of the quilt - not too big or small! |

Received my set of ABM tuners from Berlin.
|
|

body halves have been cut from the Cedar raw material.
|
Left: The two halves of Cedar for the body have been cut out from the parent material. They are both a bit oversize right now but I will be sanding them down closer to size. Right: I now have the body parts sanded and ready for further machining. I am trying to find just the right curly maple for front and back. |

Received my set of ABM tuners from Berlin.
|
|

I'm machining both sides of the body part of the core section so that we are ready for attaching body parts.
|
Left: I am now machining the two sides of the core so that they are ready to have the body halves attached. These joint faces need to be nice and square and parallel to neck taper. Right: I have the Cedar body material ready for cutting so I will be marking it out using our template and cutting them oversize. |

The cedar will be the 'meat' in the body sandwich. Want to get the pieces cut out so I have them prepped for assembly..
|
|

It took quite a bit of manual sanding work but the carbon fiber has been carefully sanded down to create a perfectly flat joint surface for our fingerboard.
|
Left: Carbon fiber rods all cleaned up on the top surface of the neck and I'm now going to be setting up to reduce headstock thickness from the back side.. Right: I flipped the neck over and machined the back of the headstock down to the thickness it needs to be befor the face plate is applied to front. |

Headstock havs been thinned down to finished size on the back - front will be getting a matching facep[late to the body top wood.
|
|

Rods are in and I am going to now do some surface cleanup so I can move on.
|
Left: Just a quick photo of the core of the guitar after gluing. The CF has to be cleaned up flush to the joint face which will be my next task. Right: The CF rods are being filed flush with the top joint face of the neck and I have also done some trimming to the edges and back of the neck area. |

It's a messy job filing carbon fiber but this will yield our nice flat joint surface for our fingerboard.
|
|

Carbon Fiber rods cut and shaped to fit the slots in the neck section.
|
Left: Carbon fiber rods fitted and ready for gluing. The gluing process need a little preparation time so I am clearing an area especially for that task. Right: The CF re-inforcing rods are being glued into the structure of the guitar neck. These will add stability and rigidity to the neck under tension. |

Gluing the carbon fiber rods in to the neck with a very strong bonding epoxy.
|
|

Just cut the carbon fiber that will be implanted in the neck. I'm trimming to fit and will then get them glued in.
|
Left: Carbon fiber rods are now being glued into the neck using a very high aerospace grade epoxy. Cure time is slow so I will be leaving this assembly overnight. Right: I'm working on getting the machining marks ribbed off the fingerboard blank because I'm making plans for the additional wood inlay. |

This fingerboard will be a composite of ziricote and possibly other additions so I'm getting the blank ready for more inlay work.
|
|

This is the core section with the headstock rough cut and sanded close to its profile. I will bring this to finished size one I have machined the back to establish final thickness.
|
Left: Headstock shape has been rough cut and I will probably spindle sand it a good bit closer to its final shape. Should look nice when done. Right: I'm cutting some carbon fiber rod which I will be gluing into the two slots I cut in the neck section. These add an additional level of strength to the structure of the neck. |
My best carbon fiber rod is 3/8in x 1/8" which fits really well inside a typical neck. I'm cutting these to fit slots I cut in the neck.
|
|

Marking out the headstock shape just a tiny bit oversize for safety.
|
Left: I'm making a 100% scale template of the headstock so that I can mark the area and remove some of the excess material. Right: I filed down the headstock transition to incorporate the radius between the two surfaces. I'm now ready to cut the headstock shape into the existing blank material. |

Doing some cleanup to the radius between nut and headstock face as I will need to create a matching radius for the headplate which will match the body wood.
|
|

Got some more work done on the core section so it is getting close to being ready for body components.
|
Left: The initial few machining operations have been completed and now have truss rod slot established and also the two carbon fiber rod slots. Right: I cut off the excess material from the sides of the core section to get much closer to our finished shape and size. Looks a lot more like a guitar already! |

Core has beem trimmed down a little and ready for more machining.
|
|

I'm working of machining off all the spare material so that I can clean up the core to close to finished dimensions. After that I will machine carefullt right down to final size.
|
Left: Primary objective of the first operation here is to remove extra material. I'm bringing down the neck dimension close to final size, and when the material is removed I will machine to finished size. Right: Neck with has now been machined to finished sizes which I have also extended through the core. Looking good. |

The entire core section has been machined to size based on the calculated taper of the neck. I will now try to get the slots for the truss rod and carbon fiber rods cut into the top.
|
|
Received my set of ABM tuners from Berlin.
|
Left: I have Cedar on hand for the center section of the upper and lower body halves. These will be ultimately be glued to the core section . Right: I have the core back on the CNC where I am going to cut many of the neck features. This will in turn allow me to establish headstock geometry and transition. |

The core section is about to get machined to establish neck profile and probably some other related features..
|
|

Body profile has been more or less finalized - at least until we do some final body shaping for fit and comfort.
|
Left: Just updated the body profile so I thought I would post it here for reference. It will soon exist in wood but wanted to make sure it was close to our plan. Right: Fingerboard radius on top of the board is now being established. I'm making it pretty standard and per my customer we will be putting jumbo frets in.
|

I got the compound radius for the top of the board established. I will probably have to run a few other operations to get the inlay installed but this is a good start!!.
|
|
Received my set of ABM tuners from Berlin.
|
Left: This is an illustration of the basic plan for the instrument inlay. I have a strip of ziricote to insert on the top section of the board, them some more intricate details after that! Right: Back on the core section, I have filed, shaped and sanded the transition between the nut area and the headstock face. |
Received my set of ABM tuners from Berlin.
|
|

Received my set of ABM tuners from Berlin.
|
Left: Time to get the fingerboard started - I'm setting it up on the CNC to cut the profile, and the compund radius on the top. Working on the inlay also. Right: Outer perimeter of the fingerboard has been machined to its final size. Looking pretty good already! I'm formulating and inlay plan to follow! |

I got the fingerboard machined to its finishied profile. Now I hope to be able to run the compond radius on the top surface.
|
|
 |
Left: Back up on machine this time to establish the surface and step between fingerboard and headstock, allowing for our headstock faceplate. Right: Outer perimeter of the fingerboard has been machined to its final size. Looking pretty good already! I'm formulating and inlay plan to follow! |
 |
|

Making refinements to out headstock so that we can transfer that to the real wood version!.
|
Left: Up on CNC for first machining operations. I machined the top surface of the neck where the fingerboard will be attached. Right: I ran another operation to cut the top surface of the body area at just the right neck-to-body angle to the fingerboard surface to compensate for the ABM bridge height. |

Received my set of ABM tuners from Berlin.
|
|

Received my set of ABM tuners from Berlin.
|
Left: Setting up core section on CNC so that I can start some of the machining. Will start with headstock and neck. Right: I'm only roughing it out at this stage but our concept is to include a small reversed headstock reflecting the body shape. This area will not need tuners but will hold six string retainers. |

In this photo I have machined the top surface of the neck. This gives me my main datum surface for the rest of the instrument's critical features.
|
|

Fingerboard attached to a solid surface to keep it stable while I do several upcoming machining operations.
|
Left: Fingerboard is sanded and trimmed and attached to a substrate material so that I can move ahead and do some machining operations done. Right: I am marking out the main features on the surface of the core section so that this piece is ready for some machining on the CNC to create finished dimensions. |

Marking out the neck and headstock so that I can get it machined.
|
|

This piece for flame maple will look awesome with a finish on it and should look great on the instrument along with the other woods we are using.
|
Left: This is a really nice piece of live edge curly maple that I was holding on to as a great candidate for the fingerboard. Just finished sanding it. It will have additional ziricote inserts. Right: I worked through the fret placement for the fingerboard using Fret 8 as our square/common fret. So far so good. |

Fret layout done on my 100% scale drawing, these will now be able to be used for programming the cutting of the slots and also the upcoming ziricote inserts.
|
|
Received my set of ABM tuners from Berlin.
|
Left: Neck assembly now set up in the CNC for some initial surface cleanup. I will start with the headstock area and then the neck.. Right: I'm just about to define the final paths for the angled frets based on the two scale lengths we are using for this instrument. I want to get the fingerboard moved along. |

Working on fingerboard geometry so that we can get that parts created. Body shape will be updated in later image!.
|
|

Starting a setup to cut some important reference surfaces.
|
Left: This is our core section with both the headstock additions attached. We are now ready to start machining the core section to establish final datum surfaces. Right: I did a lot of material removal on the core assembly which makes it an easier job for me on the cnc cleaning up these surfaces! |

Much of the roughing done to the core assembly - now it need to be places on the CNC.
|
|

First of two headstock pieces being attached.
|
Left: I'm now adding the first of the two headstock pieces which will give me the additional real estate for the shape of the headstock. Right: I'm now gluing the 2nd headstock piece of real estate onto the end of the core section. I'll get started on cleanup and ongoing machine surfaces after this. |

2nd headstock extension being attached.
|
|

I needed to mark and measure a few features to give me data for upcoming programming and machining.
|
Left: I am now marking out some of the features on the core section to establish fingerboard ends and calculate neck to body angle. Right: I'm adding a couple of pieces for the headstock to the side of the core section so that I have a complete oversize piece on which to do the machining. |

Cut a couple of additional Rosewood pieces to make room for the headstock.
|
|

The first of the two outer pieces of Rosewood is being attached to the center aessembly.
|
Left: The edges of the components have been cleaned up and I am now gluing the first of the two side pieces onto the center piece. Right: The first two glued components have been cleaned up and the other Rosewood side has been attached. This will be a strong and great looking core section. |

We now have a glued-up core section which will soon be up on the CNC for machining.
|
|

Decided to use a subtle decorative veneer between the two woods.
|
Left: I have the two outer pieces of the core section in thevacuum press where I am attaching a light contrast veneer to the inner side of each. Right: These are the components of thecore section with the veneer attached to the inner side of each rosewood piece. Now to get them assembled. |

All cor components ready for assembly.
|
|

The two rosewood outer pircrs for the neck have been sawn out of the board..
|
Left: In this photo I marked out and then sawed out the two outer pieces of the neck assembly that will complete the core secrtion for me. Right: The two outer pieces of the core are now being run through the drum sander to yield a nice flat and parallel surface on both sides of each piece. This material is hard! |

Received my set of ABM tuners from Berlin.
|
|
Received my set of ABM tuners from Berlin.
|
Left: Working on cutting the upper and lower body cores from some cedar material. Top and back material will be maple (at least top). Right: I got hold of some very nice straight grained Rosewood which is going to be used for the outer sections of the neck (and perhaps elsewhere). Will be cutting this up soon. |

Found some Rosewood suitable for the project but it always shocks me when I buy imported hardwoods because the price goes up every time!!.
|
|

Second Koa stringer now gliued onto core section.
|
Left: Core section taking shape. Have the two decorative Koa pieces attached and now we can get the outer two Rosewood pieces done. Right: I'm refining the body template for this guitar so that I can get the body components cut and assembled. We will have a cedar core with maple on the front and back. |
Received my set of ABM tuners from Berlin.
|
|

Center of neck/body ready for its neighboring components.
|
Left: This is the center core of the neck and bosy after having been tapered, sanded and trimmed to length based on the instrument dimensions. Right: I'm gluing the first of two Koa stringers onto either side of the tapered center piece. This will result in a really nice looking highlight between the curly maple pieces. |

Cant use too many clamps! I'm attaching a Koa stringer to the central piece of maple. Once that's set I will clean up edges and repeat on the other side.
|
|

Cut the taper on the center neck/body laminate.
|
Left: I was able to get this part run on my CNC to its final dimensions. I want it to me the main feature down the center of the instrument - grain is nice! Right: I got my tuners from ABM in Germany! Chrome finish so that we can selectively distress their surfaces and give them a matching industrialized look! |

Received my set of ABM tuners from Berlin.
|
|

Have Cedar for the center section of body - will be cutting soon.
|
I have Cedar which I am going to be using for the center section of the body halves. Front of the instrument will be Quilted Maple and we are looking out for a radical wood choice for the back that will still complement the other woods we will be using. Right now I can use my template to get these pieces rough cut and ready for ongoing work. Cedar is a great wood because it's good for tone but doesn't weigh too much so guitar should not be heavy! |
|

Setup to machine taper on the core section of the guitar.
|
I have the center piece of the core of the guitar up on the CNC machine so that I can cut it to a precise taper along its length. That will then allow me to add some decorative woods to either side before we add the Rosewood outer laminates and complete the core section. I want to find ways to make booth the back and the front of this guitar visually impressive. I'm currently shpooing for an impressive piece of quilted top wood! |
|

Center laminate has been cut and is ready for drum sanding.
|
Maple has been cut from a nicely figured board and this will have an impressive grain running across the center section of the back of the neck. My next task here is to get the laminate drum sanded so that it can then be taper cut on my CNC machine. When that is done I will be adding some contrasting veneer to the laminate sides and this will provide a double pinstiped effect between this Maple and the two outer Rosewood neck pieces. |
|

This is an example of our concept of the wood and tint for the top of the guitar.
|
As I approach the programming for the geometry of the fingerboard I needed to do a couple of comparisons on the relative fret locations. It's helpful to choose a fret on the board which is not only square to the centerline of the guitar but also common between the two extreme scale lengths. In the photo I have illustrated the difference between the coomon fret being #7 and #8 as it relates to the angles of the nut and the end of the fingerboard. |
|

This is an example of our concept of the wood and tint for the top of the guitar.
|
From a color and wood grain point of view this is close to the combination of figure and tint we are looking to achieve at least on the top of the instrument. We may also have it "aged" in a way to industrialize it - we have a few good ideas which we will percolate through the process of building until such time as we have to commit to the final finish process. No matter what - it's going to look impressive! |
|

Curly maple for the neck - with a great side grain which you caqn't see. We'll probably tint this blue like the top .
|
I am cutting maple laminates for the core section of the guitar right now. These are safely oversize so that I can retain a little discretion on gluing and machining final dimensions. The immediate goal is to get all the core laminates rough sawn and drum sanded so that the process of taper machining, decorative veneers and gluing can get under way. We want to make this guitar as impressive from the back as from the front!!! |
|
Curly maple for the neck - with a great side grain which you caqn't see. We'll probably tint this blue like the top .
|
I have my scale vector drawing complete and also templates for the instrument from which I will be cutting laminate pieces. I have my material on hand and ready to be cut and I have also spoken to my folks at ABM in Germany to set up things so that I can get hold of the tuner assemblies for this instrument. I have also created some basic vector drawings that will be used for the inlay components on the fingerboard. More to come! |
|

Some of the Cedar which will be used for body components.
|
As far as raw material goes, my first concerns are creating templates from which I can cut the various components of the core section of the guitar. In the photos you can see both the Cedar for the body halves and the Maple for the core. Both are hand selected and have very pronounced side grain which is what I need. |

Curly maple for the neck - with a great side grain which you caqn't see. We'll probably tint this blue like the top .
|
|

This is a photo of one of the ABM tuner units I will be ordering from Germany.
|
I have been creating a 100% scale vector drawing of this new project so that we have a reliable reference for all future design and production. I am also going to be using German tuner/bridge combinations from ABM for this guitar (see photo). I will be selecting woods and getting some of the core section pieces rough cut soon, on our way to making this unusual instrument a reality. This page will be updated with all progress and changes. |
|

This is the concept drawing of the guitar we are building. No doubt there will be updates and changes as we move forward but this picture shows the general idea.
|
Started this guitar today so I am posting a notice to that effect. The guitar will be a 6-string with a long list of unique features. It will technically be a headless instrument in that we will have the tuning hardware at the body end, but will also feature a headstock to complete the overall geometry of our intended project. As always - some of the specifications will develop as we get further into the build.
|