
Did a bit of extra work on the internal wiring to tidy everything up and be able to test the end result. So far so good!.
|
Left: This is a photo s |
|
|

Photo showing front strap button. Almost done here.
|
Left: This is a photo showing the front strap lock in place. I'm now working on refinin nut slots and checking electronic wiring to get the desired results. Right: The wiring on the switch and volume and tone controls has been tidied up and both pickup sound great so far. Time to re-assemble and get a new set of strings on so we can set up. |

Did a bit of extra work on the internal wiring to tidy everything up and be able to test the end result. So far so good!.
|
|

I made my pwn string trees since many of the commercial ones were not the right design or didn;t come in drown or black.
|
Left: I made a couple of custom string trees to keep the strings under control. I might round off the corners a bit but they are doing their job. Moving on. Right: This is the back strap button installed with a small cushioning washer added to protect the finish. I'll post a pic of the front one too. Just have to finish up electronics. |

Strap buttons match the rest of the hardware and look nice against the wood grain too..
|
|

Filing of the nut slots is tedious. Got to get exactly the right spacing and exactly thr ight depths!.
|
Left: Nut slots almost done which will help me get the brindge adjusted to a final setup. Also have to create and install string trees to hold the top 4 strings. Right: I used more substantial strap button screws than those that were supplied with the kit. Original is shown below the new screws in the picture. Nice and solid! |

My customer wanted a much stronger and longer screw to secure the strap buttons!.
|
|

Doing the last couple of connection to get the control plate installed.
|
Left: Got the wiring connected and now hooking it all up to the output plug. When that's done I will carefully pack all the wiring onto the cavity and attach the control plate. Right: Strings are on and this allows me to get the nut finished and take a look at bridge saddles and see if I can adjust them slightly to work without making new ones! |

Almost done with the guitar. Have to finish nut, adjust parts of bridge - do a sound test and add strap buttons.
|
|

Connecting all the grounding first - then plug and pickups.
|
Left: I'm connecting up the iring from bridge to ground and potentiometers to ground right now. Next I will hook up the output jack socket and finally will connect pickups to the selector switch. Right: I;m filing in the string slots on the nut and while I am doing that I will also be reducing it to the optimum height. Then I can get strings on! |

Got my spacing guide attached next to the nut so that I can accurately establish the six string slots.
|
|

Just about wired up here except for grounding and pickup wire connections. I'm assuming my wiring diagram is correct!!!!! .
|
Left: Got most of the wiring connected on the control plate and now I have to transfer that unit to the guitar and hook up the pickups, ground wires and output connections. Right: I'm working right now on getting all the wires connected between pickups and controls so that I can install the control plate and get strings attached! |

Hooking the contols up the to pickup, grounding and output connections.
|
|

Working on the wiring of the controls so I can test this guitar with strings on!.
|
Left: Working on getting the wiring done on the selector switch and pots so that we can get some sound out of this guitar! Should not take long to get this installed. Right: Some progress on the wiring and assembly of the electronics. Once I get everything connected I will hook it all up to pickups, ground and output socket. |

The knobs are a great match to everything else although they are small in diameter. I may create laser cut seats for the bottom joints to blend it all in nicely .
|
|

I have the nut installed and I am ready to get the strings slots cut into it.
|
Left: Getting the nut slotted and fitted securely into the nut slot. This will allow me to get strings on this guitar so that I can get some initial setup done on it. Right: Starting on the wiring process to hook up the pickups and the selector switch through to the output jack socket. Once this is done we will string her up. |

Getting started on the wiring in the control cavity.
|
|

Marking screw locations so that I can get them drilled and counterbored
|
Left: Marking out the locations for the pickguard screws so that I can get this part of the guitar permanently mounted to the body. Also doing the same thing for the strap buttons. Right: The pickguard holes have been drilled to the correct size and I carefully screwed the plate onto the body of the guitar. Looks really nice! |

I drilled the pickguard and the body in the same setup so that I could guarantee alignment of the pikguard and the attachment holes for the screws.
|
|
Tuners on teh headstock and I will get the nut installed and move onto pickguard and electronics!
|
Left: Working on getting the nut finished to size and getting the six string slots cut into it. This wil allow me to get a set of strings onto the guitar for testing. Right: Positioning the pickguard so that it is aligned with the bridge and the centerline of the control cavity. Looks awesome! Now have to drill locating holes! |

Now that the bridge is on I can place the pickguard correctly. I will drill a set of locating holes and get this attached tpo the body of the instrument!
|
|

The older style bridge only has 4 attachment holes and screws at the back end. I noticed when these were tightened down that it caused the front of the bridge plate to lift up. I removed bridge and added a couple of holes at the front end and it is now well secured onto the body with two additional small screws at the front end.
|
Left: Both pickups installed and bridge grounded and attached to body. This now allows me to position and drill the pickguard for installation. Right: The headstock is now complete with the tuners permanently attached. I will be adding a nut and establishing the string slots. That will allow the instrument to be strung up. |

Tuners on the headstock and I will get the nut installed and move onto pickguard and electronics!
|
|

The placement of the pickguard and the screws that hold it to the body are all dependent on the bridge location. Now that I have the bridge where I want it everything else should fall into place
|
Left: With the bridge back on I can now get the pickguard positioned and get the holes for the locating screws established to attach the pickguard to the guitar body. Right: I was able to get the P90 pickup mounted into the recess in the body. I'm currently working on assembling the other pickup into the bridge assembly. |

The P90 has a nice snug fit with the body of the guitar. THis will help with the placement of the pickguard.
|
|

Should have the tuners permanently mounted on the headstock soon. Setting up to drill the location/clamping screws on the back.
|
Left: Setting the tuners into the headstock. The hardest challenge here is to get the clamping screws on the back accurately marked so that all the tuners are correctly positioned. Right: Doing a little adjustment to the bridge location before I move forward and get it permanently attached. Also got some Tele adjustment screws. |

I discovered that this bridge plate is a very old design and I had to move it a few thousandths upwards because the recess for the pickup was showing below the bridge body. I plugged the retainer holes and re-drilled them so that the bridge plate was covering the recess a little better. It will all end up perfect.
|
|

Applying the copper shielding into such small cavities was a challenging job but got it all done. I will inter-connect the shielding in the two pickup recesses to the shielding in the cavity so that they are all part of one circuit.
|
Left: Grounding wiring from bridge to cavity has been established and I have applied copper shielding to the pickup recesses and the control cavity. Moving ahead! Right: These are the two pickup assemblies that will be going in to this guitar. Made in La Quinta by my electronics expert so looking forard to hearing them in action. |

I'm pre-assembling the pickup components so that I can get them built into the bridge and pickup recesses.
|
|

It will be very helpful to get this bridge permanently placed so that I can take care of other features based on its position..
|
Left: Bridge placement is pretty critical so I am being very careful with this feature. Has to be centered to the neck and still work with the pickguard which is in turn related to the cavity cover. Right: Holes have been drilled for bridge attachment and for a grounding wire from thebridge to control cavity. Now need to copper shield cavity. |

I was careful to position the bridge as accurately as possible. I will now add copper shielding to the control cavity recess.
|
|

The pickguard is a tiny bit thicker than a standard one due to the wood laminate so I have to be careful getting it to fit snughly in place. Once its correctly located I will drill locating screw holes and it will be ready to attach.
|
Left: I'm working on fitting the pickguard correctly relative to the end of the fingerboard and the pickup recess. Just a case of cautiously removing a little at a time. Looks good against the body wood! Right: Pickguard is set where I want it and I am now looking at the relative locations of the bridge and the control plate. |

Pickguard looks good now so I will get the holes drilled so that I can fix it in place. It has a positional relationship with both the bridge and the control plate too.
|
|

IBolting the neck onto the body. When that's set I can use the neck to define the exact positioning of the bridge plate.
|
Left: Now that I have the fingerboard and frets all cleaned up I can get the neck attached to the body. The plating on the hardware looks really good on the guitar. Right: Attached the neck and added some finishing conditioning oil to the fingerboard. I will let this dry and then work on getting the bridge accurately placed and attached. |

The oil has just been applied so its a but shiny right now but it really brings out the colors of the fingerboard wood.
|
|

I wanted to get the frets dressed and polished and the fingerboard finished off before I finally attached the neck to the body of the guitar.
|
Left: Got the frets dressed on both ends and they now only need a fine grit polish and after that I will add some finishing compound to the fingerboard. Right: I got the little recess housing drilled in such a way that I could get it mounted into the recessed hole I machined before finishing. I will now get the neck installed onto the body. |

I got the output socket hardware attached to the body.
|
|

I'm very happy we added this on the guitar. I also drilled the output plug hole through to the control cavity. Lots to do!
|
Left: Woodgrain looking awesome and the inscription came out really nice (I am glad I filled it before finishing). Next task is fitting the little output socket into the existing hole. Right: I worked today on the tuner holes to get them opened back out to the right size and make sure the tuner units fit correctly in place. Looking good! |

These tuners are a great match for the color scheme of the guitar. Got the holes all reamed out - now to establish the little locating screws.
|
|

Letters have been filled, scraped flat and finish sanded and they will be great!.
|
Left: Done. These letters will really show well after finishing. I felt it was a lot safer to guarantee the results as I have had issues with non filled engraved letters after poly resin finishing. Right: OK - finishing has been done quicker than I expected and I'm now working on the instrument. First task of many was to work on pocket to fit neck. |

The instrument really does look beautiful - wood colors are excellent and it will definitely be a good looking instrument! I had to work on the overspray to get the neck to fit snugly into the neck pocket. Got that done so moving on!
|
|

I thought it was a better guarantee to actually fill the engraved letters so will do that after this area of sealer has completely dried. The sealer prevents any bleeding along teh grain..
|
Left: I decided that recessed letters may not respond as well to the finish as filled letters so I am going to fill this script area with a color that matches the hardware. May do the same with the logo too. Right: I'm in the process of filling the inscription letters with a special epoxy so that I can yield a nice flat surface for the finishing process. |

This stuff hardens like glass and I colored it close to the color of the hardware. Should look very nice when finished.
|
|

Got the tuner holes established in the headstock..
|
Left: I set the instrument up on the CNC so that I could accurately establish the positions for the tuner holes and also clean up the headstock edge as a parallel surface. Right: The tuner holes had to be also counterbored from the back of the headstock so I did a couple of setups to let me create that. Almost ready for finishing. |

I counterbored the tuner holes from the back side to fit the tuner geometry.
|
|

This has to be a very accurate gluing process because these two pieces need to line up exactly to one another.
|
Left: The baseplate and veneer of the pickguard are in the vacuum press where I am gluing these two pieces into one. When set I will establish the holes for the screws and finish up the edges. Right: The gluing of the pickguard was successful and now I am removing excess glue and sanding the surface. This may go to finishing with the guitar. |

Successful glue-up on the custom wood pickguard. Getting it ready to go to finishing with the guitar very soon.
|
|

I tried a few tests to make sure this shape fit correctly. It will provide a solid and stable base laminate for the wood pickguard.
|
Left: Now that I have proved out the paper template shape I was able to cut the actual pickguard base material. I will roughen up the upper surface and glue on the wood veneer next. Right: This is the pickguard and its wood veneer surface next to it. My challenge now is to get these two pieces securely glued together into one. |

This is the veneer we chose to work with the rest of the guitar. I'll get it glued onto the pickuard asap.
|
|

I need to check the pickguard shape against the body, neck and bridge.
|
Left: I am working on the pickguard for the guitar so that I can get it cut out. I'll check dimensions on a paper cut first and make adjustments before final cut. Right: I'm test-cutting the shape of the pickguard so that I can adjust for fit and then cut the final shape in the wood veneer and also the plastic substrate material. |

The pickguard will be a wood veneer attached to a rigid pickguars material.
|
|

Drilling the required hole for the output jack socket assembly.
|
Left: In order to drill all the way to the control cavity I decided the best way was to set the body up at a 90 degree angle on my drill press and use a forstner bit. Right: End result of drilling the jack socket hole on the side of the guitar. I went deep enough to house the jack socket and harware - will drill through to cavity slightly smaller. |

I now have a hole for the output plug..
|
|

I used the laser to add a little tribute since the wood was the property of Mr William DeGroat of the Nite Owl Toy Shop.
|
Left: We put a nice inscription on the back of the guitar as a tribute to the man and the business from which the woods for this guitar came. Right: I have an output plug assembly that may need minor modifications to work in this guitar but should be easy enough to retrofit. I need to drill a hole from the side through to control cavity. |
Control cavity cut and I will now drill a hole for the jack socket that connects with the cavity.
|
|

This photo shows the placement of the control panel. I'mmarking out the position and creating a program to cut the cavity.
|
Left: I'm carefully plotting out the location of the control cavity on the front of the guitar so that I can get it machined. Placing it pretty much in standard Tele position. Right: I have now machined the control cavity into the top of the body. I will now get the hole established for the output jack plug on the side of the instrument. |

TControl cavity cut and I will now drill a hole for the jack socket that connects with the cavity.
|
|

The belly vcut makes a big difference in the feel and fit of the guitar.
|
Left: The belly cut is roughed out and I will file and sand it to fnished condition. After that I will probably get the body perimeter finished so I can add edge breaks all around. Right: Belly cut ground and filed to size and I am now sanding the surface so that it's closer to a finish-ready surface. Next will be edge breaks front and back. |

Guitar body much more smooth and edges have been rediused. Still doing sanding but getting it ready for cutting the control cavity.
|
|

Both pickup recesses cut and they did connect nicely with my routed wiring channels.
|
Left: I also cut the neck P-90 pickup recess so we are now done as far as machining the body is concerned. I'm double checking depth then taking this off the machine. Right: Planning a nice comfortable belly cut on the back of the guitar. Once that's done I will finish perimeter and get a nice radiused edge break all around. |

BoMarking the back of the body for a belly cut to make the instrument more comfortable.
|
|

Doing a 100% scale drawing just to make sure everything should fit together the way we wantgni.
|
Left: Working on the computer checking the positioning and relationships between the features I will need to machine for the bridge and pickups. Right: I'm busy cutting out the bridge pickup recess right now and as soon as that's done I will move on to the neck pickup recess. The machining should expose my internal wiring channels. |

Cutting the two pickup recesses into the body.
|
|

I'm planning out the location of the bridge so that I can machine the related pickup recess and that of the neck pickup.
|
Left: Got the neck pocket finished, now extending the lines off the edges of the neck to get the bridge placed correctly in line with neck centerline. Right: I had to attach the neck to the body so that I could accurately plot out the locations of the bridge and pickups. I will machine pickup recesses next and also bridge screw holes. |

Nice to get the neck attached to the body. This helps a lot in aligning the features on the top..
|
|

I have two choice for the bridge pickup - will know more when I have them in my hands.
|
Left: The bridge pickup for the instrument happened to come in two choices from my winder. He wound one and felt its geometry might not work so wound a secone one. I think either will work! Right: I'm planning to use this piece of veneer to create the pickguard for the guitar. I'll use the best part of the grain and it would look really nice! |

Not even sure what species of wood this is - I have had it for ages.
|
|

This material will be the substrate for a beautiful wood pickguard on the instrument to nicely match the existing woods in the guitar..
|
Left: Just received the pickguard backing material from one of my suppliers. I will use this material to cut a pickguard and wood veneer on top of it Right: This is the custom built and would P90 pickup for the guitar made by my electronics guru in Palm Desert. Great to be able to have a hand made pickup made by a local producer. |

P90 pickup looks good - he actually custom tinted the cover too!.
|
|

Neck pocket is next - then we will have a complete instrument!.
|
Left: Now that I have the package of hardware of the guitar I can use the bridge to define the neck to body angle and with that information I can machine the neck pocket into the body! Right: I got the neck pocket machined into the body which will in turn help me get the rest of the body work done. More body work coming up. |

Got neck pocket established. The two dark laminates in body and neck line up nicely.
|
|

Successfully glued on the top plate.
|
Left: This is the glued body that just came out of the vacuum press. Nice to have a complete body where I can now look at getting the neck pocket established. Right: Working on the spindle sander to get the edges of the body blend around the perimeter. I'll clean it up to pretty much its final size then move on to machining. |

Dusty job cleaning up the edges of the body!.
|
|

Wiring channels for the two pickups and ground from the bridge have been machined into the body top.
|
Left: I used the positioning of the hardware marked on the body to establish locations for the internal wiring channels. Got those machined so that I don't have to drill anything when the body is assembled. Right: Now gluing the top plate onto the body of the instrument. Once that's on I can clean up perimeter and cut the neck pocket. |

I was able to get the top glued onto the body and the assembly put into the vacuum press which will clamp them together until the glue has set.
|
|

First stage in neck shaping is doing the rough grinding and for that I usually use the angle grinder.
|
Left: Now that the fingerboard and neck are one piece I can get started on the shaping of the back of the neck. Have quite a bit of material to remove. Right: Received the hardware so I can start positioning them relative to neck so I know where machining will need to happen. Right now I need to plot wiring channels which I will cut next. |

The positions of the control cavity and the two pickups define wher I need to cut wiring channels before the top plate goes on..
|
|

Fingerboard being glued onto the neck blank.
|
Left: Time to get the neck and fingerboard attached and into one piece. These rubber bands provide a nioce even clamping pressure to keep the assemby together while the glue dries. Right: This is the end result of the gluing process and it looks good. I now have to remove a lot of unwanted material from the back of the neck. |

iFingerboard now part of the neck and I can start on the carving and shaping on the back side.
|
|

Stainless steel frets are now all installed - I need to dress them down flush with the sides of the fingerboard..
|
Left: All the frets have now been inserted into the fret slots and the fingerboard is looking good. I now need to trim the ends down flush with the sides of the board. Right: Frets have been trimmed and also the side dots have been installed, so I am now ready to get the fingerboard attached to the neck of the instrument. |

Fingerboard looks good on the neck - time to get these two pieces attached together.
|
|

Time to get the frets bent and then I will cut them individually for installation.
|
Left: I received the stainless steel fretwire I ordered for this fingerboard and the next step will be to bend the long pieces to the correct radius for installation. Right: I will now be setting up with a dremel and a thin abrasive compound wheel to get the fretwire cut into the 22 individual frets. Stainless in quite hard to cut and file. |

Cutting the fretwire with an abrasive disc since this stuff is really hard!.
|
|

The inlay on the neck is also made from my customer's material.
|
Left: I cut the playing card icons from the lighter part of the body material and although there were small I got them successfully set into their recesses and leveled flat. Right: We chose a very unique set of hardware for this instrument that has an antique bronze finish. Bridge, control plate, tuners, strap buttons, neck plate, jack socket & knobs. |

The antique bronze hardware should look really good on the guitar.
|
|

With the heel finished I am anle to attach fingerboard and cut the neck socket whe the body is ready.
|
Left: I just finished machining the thickness and back and sides of the neck heel so that I can plan for attaching the fingerboard. Also working on the inlay programming. Right: I had to use two separate machined to get the inlay recesses completed. CNC did the card icons and the laser did the script because it was just too small for CNC. |

Got all the recesses machined and engraved into the fingerboard. They are pretty small in some areas so if cutting the wood we chose doesn't work because the pieces are too fragile I will make a compound out of the same wood and fill with that.
|
|

Fingerboard being prepped for inlay recesses.
|
Left: The fingerboard is ready for inlay and I have been discussing the inlay options with my customer. We will have some script and playing card icons on there. Right: My customer told me that we're doing a standard Tele headstock so I am marking that out on the neck so that I can get that cut and shaped! |

I rough sawed the headstock shape and will now do some sanding to bring it into its finished profile.
|
|

The compound radius has been machjined onto the fingerboard and the fret slots have been cut .
|
Left: This is the fingerboard with the fret slots machined into the top surface. We have some insteresting upcoming plans for the inlay on the fingerboard. Right: The original body material has some white grain which I am hoping I can use for the fingerbpard inlay! If that is the case I will cut it nice and thin and cut pieces on the laser. |

If my customer is OK with it I will use some of the lighter material for the inlay on the darker grained fingerboard.
|
|

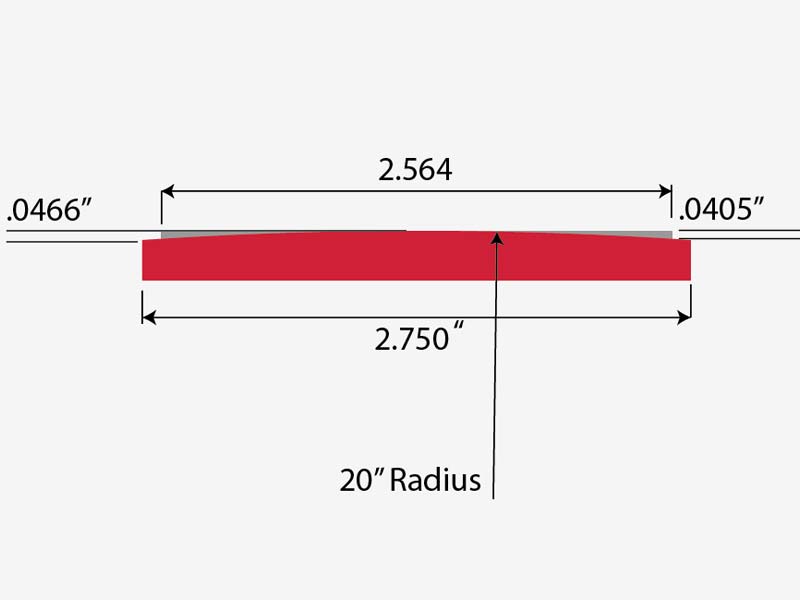
These Hipshot tele bridges have individual saddles.
|
Left: We are planning to use one of these bridges from Hipshot - it's a pretty high quality bridge unit and should look very class on the finished instrument. Right: Right now I am machining the compound radius on the top of the fingerboard. Once this is done I'll sand the surface and then set things up to cut the 22 fret slots. |

This is a slow operation where my machine generated the compound fingerboard radius.
|
|

The tapered laminates look really good together!.
|
Left: I am now measuring out the scale length based on the neck/body relationship so that I can plot out wiring channels, bridge, pickup and neck recess locations. Right: I have to now machine the fingerboard so that I can complete the neck. Just got the board set up on the CNC so I am getting started by machining the outer profile. |

First op on the fingerboard is cutting the outside dimensions.
|
|

Cutting the neck profile on teh CNC.
|
Left: I machined all the features into the neck and then sawed off the extra material. I now have a finished headstock surface and a truss rod installed. Right: Setting up CNC so that I can establish the headstock thickness and also get the headstock profile rough cut. Will be going back to the body soon to cut wiring slots. |
Cutting the neck profile on teh CNC.
|
|

Getting started on the machining of the neck.
|
Left: Neck assembly is now up on the CNC where I am machining the top joint surface to create a nice clean reference plane. Right: The top surface has been cleaned up and I am now machining the outer profile of the neck to its finished length and width. I will them move on to the headstock surface and truss rod slot. |

Cutting the neck profile on teh CNC.
|
|

My suggested fingerboard material for this guitar which is otherwise constructed with wood materals given to me by my customer.
|
Left: I have a piece of fingerboard material which I have had for a long time and I think it's the perfect color to complement the rest of the instrument. I am not 100% sure what the wood species is but it's perfectly hard enough. Right: This is a photo of the fingerboard wood wet compared to a couple of other areas of the guitar. |

I think these woods will look very good together!
|
|

I'm gluing the two sides to the sandwicjh of three pieces I already assembled. This will create the neck blank.
|
Left: More gluing - in this photo I am gluing all the neck components together into one piece so I can get the neck shaped. Will match the body really well. Right: So here are the body and the neck. Body has been sanded and is ready for more work, neck needs to be machined to establish its size and headstock shape. |

Starting to see the results of all that gluing - we have a body and a neck blank.
|
|

This will mke an inmpressive body/neck combination when assembled together.
|
Left: These are now the neck component pieces. The laminates in the center have been assembled. I now have to attach the two outer pieces! Right: Right now I'm in the process of gluing the second body half onto the body assembly. Once this is set and cleaned up we will have a complete body ready for machining etc. |

Gluing the second half of the body together.
|
|

I machined joint faces onto both of the body halves.
|
Left: I ran the two body halves through the CNC to eatablish nice clean joint faces on each. This now allows me to get the body components glued together into one piece! Right: In this photo I am gluing the 3 piece center laminates onto one of the body halves. When this is done I will repeat with the other body half. |

Gluing the 3-layer center laminates onto one oif the body halves.
|
|

Center 3 laminates have been glued and they look good in the body. I now need to prepare the joint faces on teh two body halves.
|
Left: Just testing the newly glued center piece with the two body halves to see what it looks like. Will get it all glued together soon! Right: These clamps are holding down the first glued joint of the neck assembly. Since I had to be careful about cutting the limited amount of laminate material I have to be equally careful gluing! |

Just getting started on the gluing of the neck laminates.
|
|

This is the material I am using for the neck - I have to cut it carefully to make sure there's enough of it in the right places.
|
Left: Almost didn't have enough of this dark wood to do body and neck laminates but I devsied a way to cut out the pieces so they would do the job. Right: First joint of the body construction being glued & clamped. I will be doing a lot of gluing in the next couple of days to get these structural assemblies completed. |

The tapered center pieces for both neck and body will not only look good on the guitar but allows me to get the best yield from the available material.
|
|

In order to create a nice continuous laminate section through neck and body I have to start with some sawing.
|
Left: I have made a few more cuts in order to incorporate the darker laminate wood in the neck and center of the body. Will be sanding and gluing together. Right: I took all my sawed up pieces and sanded them flat. Now I'm taking neck and body center pieces and cutteng them to a taper that will look great on the finished instrument. |

The tapered center pieces for both neck and body will not only look good on the guitar but allows me to get the best yield from the available material.
|
|

I had an opportunity to get the stock material for the neck sawn up.
|
Left: I went ahead and sawed up the neck material so that I would have a piece I would mark out for further operations. It will ultimately be a 5 piece laminate construction. Right: The neck piece has been sanded and it's ready for me to do some sawing and layering with the decorative strips we are adding. |

I'm going to saw up the blank, machine some joint surfaces on it and end up making a nice 5-piece assembly.
|
|

Top plate went together well and it looks good already.
|
Left: The two halves of the top plate have now been glued together and the top is ready for the body parts to be assembled and prepped. Looking good. Right: I was looking at the neck wood to see what the best way would be to get the greatest yield out of the raw material. Enough for two necks in this block. |

Doing some measuring so that I can saw up some of this material to get the neck contructed.
|
|

Unknown at this point but we may use a matching tint color to create a sbutle sunburst on the top - we will discuss.
|
Left: This is the top of the guitar just before I glue and clamp it together into one piece. It should end up being a really attractive top for our guitar. Right: I have now glued and clamped the two top plates halves together and once the glue has set I will go ahead and sand and shape the top close to finished dimensions. |

Two top plate halves are being glued together.
|
|

Great to get these pieces sanded as it allows me to get the top plates glued together and also to do some work on preparing body halves for further work.
|
Left: I have spent some time on the sander and cleaned upboth sides of each of the top plates. I have also sanded the inner side of each of the body halves so I can user them as reference surfaces. Right: On the CNC now as it is the best way to cut the joint edges of the two top plates so that I get a nice clean joint. |

Using the CNC to generate joint faces for gluing top together.
|
|

I will be drum sanding both sides of the top plates and both sides of the body halves.
|
Left: Next task in our project is to drum sand both the top plates and the body halves so that they have nice clean and flat surfaces on both sides. Right: This is the material we are going to use to create the neck of the guitar. The plan is to make it laminated fo extra strength using some of the thinner wood that was provided. |

Getting started on the neck material - we will use the dark woods as laminates whicjh will yield extra strength in the neck.
|
|

Now that I have marked the body shape on the wood pieces I can go ahead and start cutting.
|
Left: I marked out the two selected pieces of cherry from which I will cut the top plates of the guitar.We have some interesting plans coming up on this guitar. Right: My new bandsaw blad worked well - cut top plate material off both pieces that I previously rough sawn to shape. My goal if possible is to use all these pieces together. |

I rough sawed each body half out based on perimeter and then sawed the top plate off each piece. This should work out well!!.
|
|

Since the wood isn't flat I have to start bu creating a flat surface on each of the boards so that I can locate off of that for further machining operations.
|
Left: I am now drum sanding the pieces that will give us the top of the instrument so that I have parallel flat faces on both sides. This will help in sawing the top pieces. Right: This is a photo of the woods after drum sanding was done. It takes a little work to get these surfaces perfectly flat as the raw material was a little uneven. |

The boards now have nice flat surfaces on them which in turn allows me to get set up on the band saw and cut off the selected top pieces!.
|
|

Narrowed the top plate material down to this combination..
|
Left: Of all the available wood these two pieces would work best as a bookmatched pair for the top of the instrument. I wet the wood to show the really nice color of the grain. Right: First machining task is to generate a flat surface on the two boards that will either provide us the top or the whole instrument (depends on thickness). |

Since the wood isn't flat I have to start bu creating a flat surface on each of the boards so that I can locate off of that for further machining operations.
|
|

The woods here will be used for making the neck. More on this as things develop.
|
Left: Getting things rolling on this guitar. The instrument will be built from woods that belonged to a friend's father and grandfather. Photo shows some Mahogany and Cocobolo pieces. Right: We have four pieces of cherry from which I want to choose body halves and top plate pieces. I'm looking at them all and will use the best ones! |

Four nice pieces of very dry mature cherry wood. Two will be body halevs and one will be a bookmatched top plate.
|
|


