Now ready to seal up the box for shipping, get it weighed and measured and create the paperwork.
|
Left: Got the bass packed into the shipping box with as much safety padding as I could get in there. Just have to seal it up and it will be physically ready to be shipped. Right: All boxed up with Fragile stickers and heading to the FedEx store. It will be nice to get this very unusual bass into the owner's hands. |

Should be nice and safe in this very padded package.
|
|

I'm ready to pack the bass into its Mono case plus some extra internal padding.
|
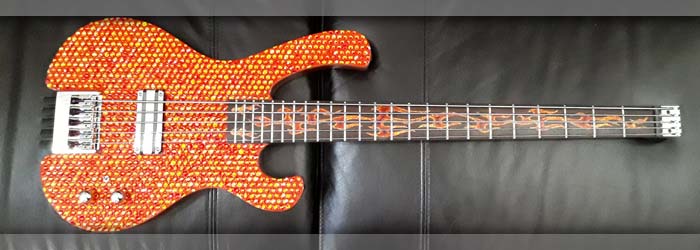
Left: This is the finished bass readyto be packed. Below it you can see the Mono case that it will live in. I am putting some extra padding inside the case and the green material is designed to protect fingerboard. Right: Bass is safely sealed in the Mono case and it is now ready to be packaged in the shipping box plus more padding! |

Bass is now sealed up in the case and nect job is to get it sealed in the box with as much protective padding as I can fit in there! I trust FedEx but no harm in being extra safe!
|
|

On the bench for a final few details before I get it safely packaged for a long journey.
|
Left: Late in the evening but I have pretty much everything reolved. I just finished copper shielding the control cavity cover and tidying up internal wiring. Will take some photos in the morning and get it packed up. Right: Back is really nice too. Battery for LEDs is in the upper cavity and electrinonics and LKEDs in main lower cavity. |

Neck is satin and feels very nice to play. Pretty fancy bass.
|
|

I think I have just about everything dialed in. I need to do a final test by playing it and making whatever adjustments are necesseray but after that I'll just take a few glamor shots and get it packed for its journey.
|
Left: While I had the strings off for the nut slots I also did a quick fret leveling job to make sure the playing surface was flat and even. I also tested for sound and everything from pickup to output plug works! Right: Nut done, strings on and I have been playing this bass a bit to get everything settled in. Everything seems to be working! |

The bass is very impressive looking and I have to say it sounds really good and punchy too.
|
|

All strings are on and nut is close to being done. Have to set up all the other hardware and then do a complete sound test.
|
Left: Got all the strings on the bass - I have numerous adjustments to do between nut, pickups, bridge etc and then I will test the bass for sound. Right: While I am working on nut slots I gave the fingerboard a coat of conditioner/sealant which always makes the wood and inlay pop out and look impressive! |

Last adjustment to nut slots and then a sound test - fingers crossed.
|
|

Strings hoing on which allows me to start adjusting string heights at the nut.
|
Left: Had to work on the string retainer a bit to make adjustments for the larger diameter B string - worked out fine and now I am adding strings and checking the string slot depths in the nut. Right: I'm setting the nut slots and adjusting truss rod as I add strings to the bass. Goal is to get it all adjusted colse to finished settings. |

Nut slots are time consuming to finalize because you have to remove the strings to file the depth of the slots. Pretty close with everything - will set it up - play it for a bit and do a final setup.
|
|

Anxious to get all this hardware attached so that I can get the strings on this bass!.
|
Left: The end plate worked out well and I am now getting everything ready for final assembly. I have to drill four holes for the end plate and once the retainer is re-attached I will add the retainer too. Right: Attaching string retainer and the end plate which involved drilling four carefully placed holes. Should be ready for strings! |

Re-assembling the headstock end of the bass.
|
|

The ebony end piece has been drilled and engraved so I will finish sanding it and then try to fill the lkogo part with an orange colored compound.
|
Left: Got the end piece machined successfully on the CNC. I am have burned the logo into the end on the laser. I plan to fill the engraved portion although it is fairly small. Right: Mixed filler and color to match the other the colors on the bass and filled the Watson logo on the end plate. Hopefully it will look good when we clean it up! |

End plate logo engraving has been filled. Will know tomorrow how this looks when the excess is removed.
|
|

Next job is machining the end plate. When that is done and installed I will get the bass strung up.
|
Left: Machining of the headstock complete and now I have to cut the plate that will be fitted on the end. I have some nice ebony which should work well. Right: I now have the ebony set up on the CNC table and I have a program written to cut out the perimeter. Once this is machined I will probably do the inlay portion on the laser. |

The ebony for the end plate is now on the CNC and ready for machining.
|
|

I need to machine a flat surface onto which my end plate wil be fitted. Working on a setup that will safeguard the finish and crystals on the instrument surfaces.
|
Left: Doing one of the last tasks on this instrument which is machining a flat surface onto which I will be attaching the end-plate. I will then string up the bass and test everything! Right: The end of the headstock is being nachined to create a flat surface for my end piece. It will probably be machined from ebony. |

I will be cutting an ebony end plate which will go into this machined surface.
|
|

Bridge is back on the bass so I will get everything ready to get the strings on!.
|
Left: Rebuilt bridge is now back on the instrument so I will be moving ahead with a few remaining tasks to get this very unusual instrument finished. Right: I am now doing one of the last jobs on this bass which is creating an endpiece for the neck which will also serve as a branded nameplate for the instrument. Should look nice. |

I am making this out of black phenolic or ebony - it will have a matching orange logo inlay.
|
|

Doing some modifications to the bridge after which I will string the instrument up with the final set of strings!!!!.
|
Left: I had a minor issue with the string retainers on the bridge but the manufacturer was great about resolving this. I have new parts which I am swapping out in the bridge - should work out fine! Right: I finished re-assembling the bridge (adding new saddles) and once the thread lock has set this bridge can go back onto the instrument! |

I had to dis-assemble the bridge but everything went fairly smoothly. Back onto the instrument with the final set of strings!.
|
|

Almost done now - I may take the bass to my electronics friend to get the wiring done as he will know the correct resistors to use.
|
Left: Work on headstock area almost done which means I can get the strings on this beast and then get the remaining internal wiring finished up. Right: I drove this guitar all the way to Palm Desert today to have my electronics guru take care of the installation and wiring of the Volume and Tone controls and resistors. |

Internal electronics have been completed and I will hopefully be able to test everything tomorrow. Some minor work to do on the headstock end but we are very close. I am als having the bridge manufacturer send me a part that I feel may need replacing but that should all happen very soon!.
|
|

Holes for strap button sleeves have been drilled. Will get them installed next.
|
Left: I got the two big holes for the string retainer sleeves successfully drilled. Hard to drill on end grain plus being careful not to chip finish!!!! Right: Final installation of strap buttons is done front and back. Glad that job is done. My next goal will be finishing up the nut/string retainer area so that I can get strings on and test everything. |

Happy to have the string retainer assemblies secured in place on the instrument.
|
|

Haven't tried these strings before - looking forward to seeing how they feel and sound.
|
Left: Strings are in and I will use a separate similar set for the instrument setup (since they go on and off a lot) and when its all ready I wll put this set on and adjust accordingly. Right: getting the nut and the string retainer as close to complete as I can. I'll have to have strings on and off a lot to finalize the string slot depths! |
Going slow and careful on teh drilling of the strap button holes.
|
|

Going slow and careful on teh drilling of the strap button holes.
|
Left: Drilling the strap button holes takes a lot of care as I have to drill .375 dia flat bottomed holes withoud stressing or cracking the surrounding finish. Being extremely careful! Right: I have potentiometers and resistors for the volume and tone controls on this bass. Hoping to get all of that wired up so I can add strings and test!! |

Will be getting the pickup and internal wiring connected up soon!.
|
|

The drilling of the holes for the strap lock installation is slightly tricky but once that's done the rest is easy!.
|
Left: I am marking out the two locations for the strap buttons so that I can get them installed. Need to be very careful not to damage finish as I have to drill 3/8" diameter holes for the sleeves. Right: Now drilling the strap button mounting holes. Keeping the back one a little towards the back (away from tuners) to make room for strap. |

Keeping the back strap button as far from tuners as practical so that strap end does not interfere with tuner knobs!.
|
|

I will be installing Dunlop locking strap buttons.
|
Left: Time to get these Dunlop Locking strap buttons installed in the instrument. These are strongs and very good quality retainers and are very easy to use. Right: I ordered the strings my customer preferred recently - should see those here very soon. The bass will be ready to be strung up soon! Stay tuned! |

Customer requested these strings for the bass. I am looking forward to trying them.
|
|

Adding a chrome on/off switch for the LED lighting circuit.
|
Left: I'm trading out one crystal for placememnt of the on/off switch for the LED lights. I can then finish up the electronics and take care of the rest of the finishing work. Right: The switch has been wired inside the control cavity - I will now get it installed, tested and wiring cleaned up. Looking forward to being done with everything! |

On/off switch has been connected and tested. I now need to get it fitted in place and tidy up the wiring.
|
|

Fitting the jack socket assembly into the instrument body.
|
Left: Now installing the Neutrik locking Jack socket assembly into the recess in the side of the bass. Once this unit is in I can get the pickup and the controls wired together. Right: This is a very poor photo and I will get a better one - just showing the lighting along the side of the fingerboard as I was testing it today. |

Side dots are lighting up nicely - looking very cool!.
|
|
Working on the first two LEDs to get those set in the control cavity.
|
Left: Working on the finer details of the nut and also getting the little chrome on/off switch installed in the body so that we can selectively switch the led side dots on and off. Right: Connecting up the LEDs and their resistor so that I can get all this lighting circuitry completed. It's always a delicate and detailed job but almost done! |

WThe three LED lights have been inter-connected.
|
|

Working on the first two LEDs to get those set in the control cavity.
|
Left: I am now adding two of the three LED lights to the fibers. I can be a lot of tricky work but my goal is to make them solid and stable so they don't move once they are installed. Right: Got all three LEDs installed and I am now wiring them up with their resistor and will fix them in place. Red lights with white at frets 12 and 24. |

Will be hooking these terminals together and wiring to the on/off switch.
|
|

I am using a green LED to idenify the side dots from the group of fibers. I will then be attaching LEDs.
|
Left: Got some close fitting tubing to support three groups of fibers for the 3 LED light sources I will be using. I need to set the lengths of each group and level and polish the ends of the fibers after they are locked in. Right: Fibers have now been separated into three groups and I added some shrink wrap tubing to secure things. |

II have three groups of fibers for the three LEDs. I now need to very carefully cut these to finished length and secure, level and polish the ends.
|
|

Getting started on the LED install. I will need to add the on/off switch in a suitably deiscrete location.
|
Left: I am now getting ready to work on the connections of fiber optics and LEDs and get that system working. I plan to use 3 LEDs in the array. Hopefully it will be a relatively easy task! Right: While the work is going on with LEDs and pickup connections and pots I am finishing up some work on the nut/headstock and string retainer assembly |
Getting started on the LED install. I will need to add the on/off switch in a suitably deiscrete location.
|
|

Bridge is on - now getting the pickup installed.
|
Left: Bridge is now grounded and on the instrument. I'm working on the support system to the pickup adjustment screws right now and will get that installed next. That chrome looking good against the color of the bass. Right: I got the pickup installed and it seeme to be working out just right for height, stability and adjustment range. |

Pickup is now in the bass! Getting close.
|
|

One battery is perfectly sufficient for the low power draw if the LEDs but I have space for a spare battery just in case.
|
Left: The LEDs will run fine on a 9v supply. Since the battery compartment holds two 9v batteries it makes sense to always have a spare in there! I'll also add a small chrome 2-way switch so that the side dots can be switched on and off. Right: Drilled for bridge mounting and also added a ground wire to the cavity common ground. |

Added a bridge ground connection and I am now installing the bridge onto the instrument body.
|
|

Marking out holes for the bridge attachment and grounding wire through to control cavity.
|
Left: I'm measuring and drilling location holes for the mounting of the bridge unit and also creating a channel from the bridge to the control cavity through which I will run a grounding wire. Right: I soldered a wire to connect ground from the pickup recess top the control cavity. I am now running battery power lines through the body. |

This is the benefit of machining wiring channels earlier on before the top[ plate went on. I am running battery power wrirng for the LEDs from the battery compartment through to the control cavity.
|
|

The detail work drove me a little batshit today! It's very work intensive but very close to being done!.
|
Left: Finishing up the installation work on the nut and string retainer. I want to be able to string this bass up and test it for alignment and intonation. I also have volume and tone pots, resitors and output socket to install. Right: I believe I am DONE with the crystals!!! Doing some cleanup but I managed to get all the edges complete! |

My next cosmetic task is to apply a couple of layers on the fingerboard to get it up to its full glory.
|
|

Working on getting th \e rest of the hardware attached and installed. Also have a few crystals to add but getting closer to our goal here!.
|
Left: Test fitting the pickup right now so that I can set it for the correct range of height adjustment. Also preparing to plot hole locations for the bridge unit so that I can get that attached too. Right: One of the last jobs I have on the instrument is adding the slightly crystals around the edges where the curves demand partial insets. |

Only have about 20 to put in now - round the bridge and a few on the edges!!!.
|
|

Working on the assembly of the headstock components. Also finishing up the crystall installs around the body perimater.
|
Left: I'm currently working on the headstock area so that I can install anut - cut the string slots for spacing and install and bolt in the string retainer at the end. Once that's done I'll get the bridge attached. Right: Got the nut installed and I have been fitting the string retainer unit. Once I get it all set I will probably install the bridge unit. |

The string retainer has been fitted to the end of the neck. Just have to get the nut slots takn care of.
|
|

Magnets have been embedded in the two back covers.
|
Left: I have now installed magnets in the two covers for the back of the instrument. I will beed to shield the cavity cover with copper. Will post a pic with the covers attached. Right: Back two covers fit nicely in the cavity recesses without ugly screws! Looking good.I'm working feverishly on the cuswtom crystals round the edges! |

Getting closer to DONE on this unique instrument. Cavity and battery covers are fitted!.
|
|

Almost doen with this crystal marathon!!! Woo-hoo!.
|
Left: Crystal installation practically done - working my way around the edges with a few custom cut ones so that everything looks complete. Looking good! Right: Time to check the fit of the back cavity covers and get the retaining magnets installed. I need to put magnets in both the body recesses and the back of the two lids. |

Just getting ready to add magnets to the inside of the two covers so that they can be part of the instrument!.
|
|

The end is in sight - just being very careful as they are not easy to install.
|
Left: Working on both side crystals and top crystals to get the rest of the top completed. I have a couple in there that I want to remove and replace - it's a tough job but we are getting there. Right: Did some test fitting of the pickup so that I could determine the best support underneath to allow for a good range of vertical adjustment. |

Getting things prepped for pickup and bridge installation while the last of the rystals are going in.
|
|

The crystals dont like to be re-shaped - I have to avoid temperature and impact issues and VERY carefully file and polish each one.
|
Left: Some of the crystals have to be slightly modified to avoid blank spaces around the edge of the curved body profile. I have developed a way to shape these somewhat fragile crystals to comply with that. Right: While the crystals are being finished up I am working now on getting a nut installed and fixing string retainer to headstock. |

The hardware will look good on this bass..
|
|

Not an easy task - I'm learning new skills as I go!!!.
|
Left: I have 288 more crystals coming from my supplier and, while that is happening, I am working my way around the edges installing some that need custom shaping to comply with the body curves! Right: I now have my remaining crystals delivered and I have improved my method of modifying crystals for areas around the edges. |

More crystals from my supplier - I think I'm good on these now!.
|
|

I think this bass will look pretty spectacular when complete - we are not far away.
|
Left: I found a slightly faster way to position and glue the crystals so I am getting more of them in each session. I am definitely seeing the light at the end of the crystal tunnel! Right: Closing the gap on the crystals and I will finish the procees up by installing some of the crystals around the edge of the body. Bridge and pickup on soon too! |

Keeping the crystal installation going - helps a lot to do it in daylight.
|
|

Actually took this photo a couple of days ago - will update with a newer one.
|
Left: I have been busy every day gluing crystals into the top of the bass. It's looking a bit more complete now and I will be very GLAD when all these crystals are fitted in place!!! Right: The covered area is growing and I have calculated approximately how much space my stock of crystals will cover and how many more boxes I need. |

AIt's a lot of work but egtting there - I have more recent photos coming also.
|
|

Got a lot more crystals installed and getting more done every day.
|
Left: A good amount more crystals installed. I'm just going to keep postind progress shots till I have the whole top covered. Looking great - just slow work but getting there! Right: Keeping the crystal project going. They look good on the instrument and I'm doing my best to get as many on these as I can each day. Will be done soon. |

Crytals combine to create a pretty intensely colored instrument!.
|
|

Moving along here with the installation. There's definitely a technique to this.
|
Left: I have to add new crystals a little separate from each other so that I don't disturb those where the adhesive hasn't yet hardened. I'm getting a little faster at it! Right: I am adding crystals every day - has to be done very carefully but I am making progress. Have gone through three boxes of crystals already!!! |

Each crystal has to be glued and positioned and left alone till the glue sets. I do sessions of maybe 20 at a time in differelt locations so I don't accidentally move any that are in the process of setting.
|
|

Hoping I can get a picture that will do all this color and sparkle justice.
|
Left: Keeping it going here, I have to very carefiully place these things and wait till the glue takes a good solid hold. I go back to it every 1/2 hour or so. Right: I will be adding more crystals later today and tomorrow. I do about 10-15 at a time then leave it for the glue to completely harden so I don't nudge one out of place! |

They sure do catch and reflect a lot of light. Color is awesome too.
|
|

Since there are so many crystals to install I am working on the best possible system to hold them and position them in the installation process.
|
Left: I made a little tool to help me hold the crystal while I am positioning it, that helps me move forward a little. I will be improving on this system as I go but at least things are rolling! Right: I found a better way to handle these pesky little crystals so I am now getting things moving. It's hard to show the actual effect on phot but looks great!. |

SI should have more progress now that I have a reasonably good system to place them (they are so hard to hold).
|
|

NGetting started on the crystal installation - started under the bridge to get some practice!.
|
Left: I am starting the crystal installation process. Not too hard to glue them down but it IS hard to hold them and place them carefully in the right spot. Looking for a novel way to hold them. Right: I got all the copper shielding applied inside the control cavity so that area is now ready for electronics and LED assemblies. |

Coppershielding in the control cavity has been applied.
|
|

I have neodymium magnets going in which will retain the battery and control cavity covers.
|
Left: I want to get the control cavity work and some of the associated wiring work done, plus install the new magnets before finishing the crystals since it requires a lot of handling of the instrument. Right: The five neo magnets have been installed (2 in control cavity and 2 in battery cavity). Now I can finish copper shielding. |

Neo magnets are in and I have also been experimenting with the best process to install the crystals on the front side.
|
|

Getting all the copper shielding into control cavity. Being careful to get around the fiber optic cables.
|
Left: Got the control cavity sealed up with copper shielding and now I will be adding magnets to the cavity bosses and the back of the lids so that the covers are securely attached! Right: Testing the bridge and pickup installations so that I can make sure everything is at the right height and grounding issues are taken care of. |

The chrome and the crystals together should look awesome!.
|
|

The cavities have been cleaned of overspray and the surfaces sealed to get the best adhesion for the copper shielding material.
|
Left: I sealed all the inside cavity surfaces to create a better surface on which to apply the copper shielding. I will now add copper to the control cavity area. Right: I'm re-treating the neck area of the bass to take it down to a much more "satin" organic feel. Sealing is already done so I should be able to do this withe abrasives/steel wool. |

I'm reducing the finish on the neck area to yield a more natural 'feel' for that area.
|
|

Working on cleaning up the cavities post-finishing.
|
Left: I put a lot of protective material in the cavities to minimize the amount of finishing spray that would get in these areas. My current task is to clean all of that out so that I can apply copper shielding. Right: I'm busy adding copper shielding to both the pickup recess and the control cavity. I'll need to connect them all to a common ground. |

Doing some of the copper shielding on the instrument.
|
|

The back of the bass is beautiful.
|
Left: This is the finished back of the bass. The body halves match the padouk center laminates perfectly and the whole thing looks awesome already! Looks like I am going to be busy! Right: Out of curiosity I placed some crystals on the body - I think the whole thing will be a visual experience! Now to get some cavity work done. |

I placed about a box worth of crystals on the surface just to see the overall effect. Lookd pretty impressive and I can't imaging what it will be like with the whole top covered.
|
|

This is nice but I wanted more visual impact. I'm having them do the front with a matching solid color orange to the crystals.
|
Left: Close up of the crystals against the trans finish. Although it looks good I still think the front of the bass would have more impact with a brighter solid color. Right: This is the bass with the more solid orange top. It matches the center orange of the fingerboard inlay and should provide a nice continuous look with the crystals! |

The solid orange is a better match to the intense colors in the crystals.
|
|

My finisher tried a transparent finish on the front but it has less impact than a solid orange (at least on the front) so he is working on that.
|
Left: I asked my finisher for a progress shot to see how things were going. Although I liked what he did I noticed that he used a trans finish for the front. I feel that a solid orange matching the crystals will be better. Right: View of the back of the bass which I feel is fine - the blend to the core section looks good and I like this. |

Back will be great when finished. The woods will look great together and it will all be a gloss poly-resin finish.
|
|

Some small adjustments to the belly cut area.
|
Left: Made the belly cut a little deeper into the body in order to get the best possible fit. The bass feels very comfortable in playing position. Right: I inspected everything on the instrument and it's ready for finishing so I am taking to my finisher who is only an hour away. When is done it will look VERY different!! |

The bass is going off to finishing.
|
|

This bass will come back to me looking VERY different. Top will match the orange of the crystals. The orange will blend to translucent over the back and neck which should look awesome.
|
Left: Some final shaping and sanding on the neck, headstock area and around the back of the body using finer grit sandpapers. Have to get this bass off to finishing! Pretty much all of the required sanding is done and and I'm just checking everything to make sure it's safe to do to finishing. It should look spectacular when it comes back!!! Going to have the front and sides tinted to match the mid-to-darkar areas of the orange crystals.
This bass will come back to me looking VERY different. Top will match the orange of the crystals. The orange will blend to translucent over the back and neck which should look awesome.
|
|

The two covers are almost ready for finishing.
|
Left: Working on some final sanding of the thickness of the two cavity covers. Once that's done I will sand them to a fine finish and add a little access relief to each one to facilitate removal. Right: I ordered more Swarovski Fire Opal crystals because I heard that the price was going up! I know I ned a LOT of them to cover the top. |

They come in 144 per box but I have realized that does NOT cover a very big area!!!.
|
|

Getting the output jack recess machined into control cavity.
|
Left: I set up the body in the CNC so that I could cut out the hole and recess for the Neutrik locking jack socket. This is the last part to machine on the bass. Right: Using spindle sander, sandpaper and files to take care of final treatment of edges and radii around the body of the bass. Also test fitting the two cavity covers. |

Back to sanding everything to yield a nice smooth finish.
|
|

Belly cut has been roughed out. Now need to do some shaping and final sanding.
|
Left: I roughed out the belly cut area on the back of the bass. Needs to be leveled and hand sanded to finish but good to get one more thing done on the body. Right: The belly cut has been sanded and I'm now working on the back of the body in general to get these surfaces ready for finishing, including the two cavity covers. |

Belly cut done now sanding everything else.
|
|

Cleaning up the glue after getting the top glued on.
|
Left: I'm doing some post-gluing cleanup around all the egdes of the instrument. After that's done it's all sanding to prepare for the finishing process. Right: I marked out what will be a nice comfortable belly cut for the back of the bass. I'll make this part of the final sanding process so that I can get the whole thing ready for finishing. |

Marking out what will be a belly cut to make the body fit better and be more comfortable for the player.
|
|

Gluing top plate on in the vacuum press.
|
Left: The instrument is now in the vacuum press having the top plate glued on to the rest of the body. This is a big step in the development of this bass. Right: The instrument has now been removed from the vacuum press and the top has been solidly attached. I will have to clean up all the glued edges but all looks good so far! |

Top plate now part of the whole instrument.
|
|

Doing some filal touches on the perimeter and a few other areas prior to attaching top plate.
|
Left: Back on the spindle sander just to make sure the body form and crystal layout pattern don't have any major conflicts. There are a couple of areas where I need to remove a little more material. Right: Took care of the perimeter and the area supporting the bridge so I'm pretty sure I can get this top attached in vacuum press now. |

STime to maske this instrument one picece! On the vaccuum press ready for gluing.
|
|

Since the bridge unit needed its own crystal-free area for assembly I worked that in between the inlay pattern so that I can get the instrument colored at the finished without having to worry about bridge placement. Always thinking ahead on this project!.
|
Left: I'm creating a level surface for the bridge assembly based on size and position of bridge footprint. Gluing a veeneer of wood on the top so that I have a bridge location area. Right: Now sanding and cleaning up the top plate for assembly onto the body. I have all the wiring channels already established so we're good to go! |

The top plate has been prepared for assembly and anything I need to do to it now can probably be done after it is part of the whole bass..
|
|

Bridge saddle height relative to neck angle is always an important consideration before a bass goes to finishing.
|
Left: Doing some final prep for the bridge since I not only ghave to consider string height but also the net height of the crystals after they have been installed Looks good so far though! Right: Im extending position lines from the neck edges, marking the bridge footprint and will be setting final height. Also will drill the bridge grounding hole. |

Based on scale length and neck trajectory I am able to accurately place the bridge position.
|
|

Being very careful making sure positioning of controls is well thought out!.
|
Left: I'm going to be drilling two holes in the top plate for the volume and the LED switch. These will be strategically placed to fit well with the pattern of crystals. Once that's done I think the top can be attached. Right: Established the best locations for the volume knob and LED switch. Just checking bridge placememnt for grounding now. |

Looking carefully at the footprint of the bridge just to make sure it's working with the crystal placement too!.
|
|

I need to establish control holes in the cavity area so I am making sure I know where the ideal locations will be first!
|
Left: Based on the control cavity footprint I was able to establish where on the top plate the control knob/switches would be so that I can prep the crystal recess layout for that! Right: I'm placing the only two controls visible on the front of the instrument. One is a master volume and the other is a switch (or button) that controls LEDs. |

I want to place the two controls such that they don;t interfere with the pattern of crystals. I'm being very careful to get the best results here.
|
|

All recesses established for position. Some on the sides I may manually modify either with custom or smaller sized crystals. Important to get these in place though!
|
Left: Recesses are established and I am checking with my finisher regarding the ideal depth. I have to allow for perhaps .025" of coating buildup but his infor will help me prepare everything. Right: I carefully removed the MDF supports and re-fit the top back onto the instrument to see what it all looked like. Should be VERY interesting! |

I have some more planning to do to allow for bridge parts and tuners but those will be carefully selected and leveled as needed. Nice to get the overall pattern established!
|
|

Each recess is generated by a couple of circular cuts.
|
Left: This photo doesn't illustrate much other than how the little circular paths are generated. I never yet counted how many little holes are in the top of the instrument! Right: Doing a careful first pass with this probram to see how the wood reacts and how the alignment and distribution of the recesses looks. So far so good!! |

Fairly slow program to run given the amount of features we are machining!
|
|

Getting ready to run thr progtram that will generate a lot of little countersinks for the crystals.
|
Left: Top plate set up on CNC and redy for a lot of litlle recesses to be established. I had given it a lot of thought but decided it was a better decision to do this before top was attached to body! Right: Holes were double checked for size and then I imported the layout into my software that creates my CNC machining program. |

The program was created to generate the diameter of each recess with a 1/8 inch diameter 4-flute carbide end mill.
|
|

Working on the neck profile so that I can get everything ready for the finishing process.
|
Left: During the work on the top plate crytal layout the back of the neck has been shaped and thicknessed pretty close to finished size. Still have to finihs up transitions at both ends. Right: Since I had to machine the entire top in 1 operation I glued MDF onto the back of the top so that I would have a means to clamp everything. |

This was my best way to fixture the top plate so that I has access to the entire surface.
|
|

This is the best layout possible since the crystals need to be pretty mathematically correct in alignment to look god at the end of the day. Since the background will have a matching color I will be able to do a little custom work to finish everything.
|
Left: This is the pattern of holes I have ended up with to use for programming. The hole diameters should be correct for crystals after the initial finish is applied. I think it will look very impressive! Right: For a little more clarity, this is how the crystals are laid out with respect to the center of the pickup recess which is the zero co-ordinate. |

It made sense to relate the crystal layout to the only rectangular feature in the center of the body. This is how my CNC machine sees the task..
|
|

I'm interested to find out of I can carefully and artistically grind partial crystals in areas where they might be needed. Going to experiment with that..
|
Left: It's time to commit to machining crystal recesses into the top plate of the instrument. Based on my calculations everything should work out pretty well. Wish me luck! Right: I will be using the pickup hole as a reference point for both the pattern of recesses and the placement of the top on the CNC. Lots of calculations involved. |

Ready to cut all these tiny little recesses
|
|

I am fairly confudent of having the best crystal distribution. Just want to make sure they are arrayed as well as they cab be around the perimeter, neck and pickup areas!.
|
Left: OK - I established a workable layout for the crystals over the whole top of the instrument so I am preparing to do the machining of the pattern of recesses! Right: Double checking on wiring channels, and any possible weight relief in anticipation of attaching the top plate with all its crystal recesses already machined in place. |

This is the instrument body surface onto which the top will be attached.
|
|

I'm gettig the body ready for the finishing process. Looks like I will establish all the crystal recesses, attach top and then send instrument for finishing. Then add crystals and if final finishing is needed after that we'll get that done too.
|
Left: The back of the instrument is only needing a belly cut and the final sanding that will prepare it for the finishing process. Just want to make the bass feel comfortable for the player. Right: I re-distributed the layout of crystals to better match the features on the instrument. It might be tricky to get perfect placement everywhere but we'll see. |

I'm interested to find out of I can carefully and artistically grind partial crystals in areas where they might be needed. Going to experiment with that..
|
|

I'm gettig the body ready for the finishing process. Looks like I will establish all the crystal recesses, attach top and then send instrument for finishing. Then add crystals and if final finishing is needed after that we'll get that done too.
|
Left: The back of the neck and the neck to body transition have been getting some additional work to get these areas more ready for going to finishing after the sanding has been done. Right: After a few different experiments I have a good layout for the stones on the top plate. These will be machined into the top surface before finishing. |

This is the instrument body surface onto which the top will be attached.
|
|

Fitting the top requires cutting relief to create clearance for all the fiber optic cablespassing out from under the fingerboard. That's all done now.
|
Left: I'm fitting the top onto the body (working mostly on the neck joint area) so that I have a complete assembly. I will then plan on establishing recesses for the crystals. Right: Working on the computer to experiment with crystal distribution to see which layout would look the best and work best withing the body profile. |

It's easy enough to distribute the recesses but I'm also taking into consideration the distribution around the perimeter. Fortunately out plan to color the top before the crystals are inserted will allow us to add a lot of color continuity and I am quite confident the formula will produce the best possible amazing results.
|
|

Last level of potting - then I will carefully lever the surface and top of body will e ready for top plate to go on.
|
Left: Last couple of levels of the potting has been done to the top surface and also to the area where the fibers leave the back of the neck. A little cleanup and we're done. Right: This is the top of the body after leveling the potting for the fiber optic cables. I'm now going to fit the top and plot out positions for bridge and wiring channels. |

Potting complete and now moving on to getting the top ready for final fitting.
|
|

Gluing the last of the fiber optic cables into the channel that routes them to the control cavity.
|
Left: Down to the last couple of fibers secured into the chasnnel. When this is done I will then becable to use a different epoxy to pot them in and fill up the spaces. Right: I'm now potting the recess with the fibers in it so that everything is stabilized in a solid state. Once this is complete the body is ready for the top to go on. |

Potting the fibers into the channel so nothing can move.
|
|

Looks like the procedure will be to put the top on the bass and machine hundreds of carefully placed recesses into the top plate. Then we will tint, color and finish the instrument and when I get it back I will do final sizing of the recesses and install all the crystals.
|
Left: I consulted again with my finisher and we decided that we should machine recesses in the top, surface finish the instrument with appropriate tints and colors and then insert the crystals. Right: Getting started on gluing the fiber optic cables through the slot in the body to the control cavity. I glue a couple at a time. |

Working on the fibers to get them secured from neck to control cavity.
|
|

Fingerboard looks really good on the instrument.
|
Left: This is the neck and fingerboard after the gluing process was completed and all the rubber bands came off. The combination looks good and I'm working on the cleanup of the edges. Right: Starting on fixing the fiber optic cables into the slot I had machined. I glue a couple at a time and heat bend them through to control cavity. |

The fiber optic cables need to be handled with care and I carefully heat bend and glue them as I go. This helps keep internal stress in the cables to a minimum.
|
|

Have to make sure there is no pressure from clamping on the fibers. I end up potting any space at the end of the gluing process so that everything ends up solid-state.
|
Left: Doing a final fit to make sure I have created enough clearance for the bundle of fiber optic cables leaving the back end of the fingerboard. Right: The fingerboard is now being glued onto the neck of the instrument. Takes a lot of setup and some intense activity to get all the rubber bands in place. Great to get this task done! |

Fingerboard being attached to the neck.
|
|

Measure twice, cut once! I'm glad I thought to double check as I have a little material to remove at the nut end to achieve the perfect fingerboard (and hence bridge) placement.
|
Left: Measuring from the nut to the bridge as I have a very small window of correct placement for the fingerboard. I'm going to do a little machining op for the nut and to establish a finished front end to the board. Right: I machined the end of the fingerboard for overall length and to acommodate the nut at the end. |

I need to get the fibers from the neck routed through to the control cavity before fingerboard goes on.
|
|

I am now able to fit the fingerboard surface-to-surface with clearance underneath for all the fiber optic cables.
|
Left: I used various hand tools to grind away sufficient internal material to allow the group of fiber optic cables to exit the back of the neck with the fingerboard attached. Right: I wanted to test the fit of the truss rod again before I committed to attaching the fingerboard onto the neck of the bass. All seems good! |

Double checking that I have a good fit for the truss rod before attaching fingerbpard.
|
|

Board has been cleaned up with the frets dressed down flush with the edges of the fngerboard.
|
Left: I have ground down all the ends of the frets so that they are now flush with the edges of the fingerboard. Will allso be dressing the ends. Right: Now getting the fibers fitted into their slot through to the control cavity. This will involve some delicate heat bending initially - then gluing after assembly. |

I need to get the fibers from the neck routed through to the control cavity before fingerboard goes on.
|
|

The fingerboard is looking pretty impressive on the instrument. Need to ckean up all the fret ends and get the fibers threaded through to the cavity.
|
Left: Quick shot of the fingerboard with frets installed against the rest of the instrument. Need to now level the frets to the edge of the fingerboard. Right: I'm making sure everything fits correctly on the headstock area. After I dress back the frets I need to cut a slut for the installation of the nut. |

Working on the headstock and making plans to cut nut slot and a few other related headstock items.
|
|

Starting on the fret installation.
|
Left: Frets now going into the fingerboard and it is looking pretty impressive the more frets that are installed. I'm being careful not to crack any of the shell! Right: I'm using the Hipshot hardware to review linear bridge placement and fingerboard placement for upcoming operations (since they are inter-dependent). |

One more step forward and things are actually looking pretty nice!!.
|
|

One more step forward and things are actually looking pretty nice!!.
|
Left: I'm using my trusty fret depth saw to carefully recut some of the fret slot areas that were inevitably covered with the shell inlay. You have to be really careful to re-establish slots through the shell to maintain the original path but I have the right toold to do that! It was quite a task to get all the slots cleaned out and re-sawn through the inlay but I am now at a point where I can prep for the fret installation. |
|

Some wuick calcuations on fingerboard positioning and removing extra material at the nut end where I allowed a little extra.
|
Left: I'm testing the soon-to-be finished fingerboard against the rest of the bass geometry to define how much I need to remove at the nut end. I will be adding some sealer and surface treatment to the fingerboard in preparation for re-establishing the fret slots after all that shell went in! This helps prevent any possible damage during the re-cutting. After that I will be able to get the frets installed! |
|

Takes a lot of time and multiple sessions to fill the top surfaces of the inlay and scrape carefully to level everything.
|
Left: Fingerboard sealed and scraped and buffed flat on most of the surface now and I am getting ready to re-establish the fret slots so that I can install frets. Right: All the leveling is now done and I'm testing the treatment of the wood areas as well as the inlay so I can start work on frets! |

Looking pretty good as a start to treat the fingerboard surface.
|
|

Even before its cosmetic cleanup to remove additional glue etc this board looks really good. I't definitely going to be a big conversation piece when it's all done.
|
Left: Finally got all the inlay nested into the recesses of the fingerboard. Very glad to be through that and now I will do the overall cleanup and surface treatment to make everything nice and level. Right: This is a section of the fingerboard after I had applied some special hard setting liquid sealer to level the surface. |

It's a laborious job filling the surface - letting it set, then scraping the resulting filled area back to flat but the work will yield a very impressive fingerboard.
|
|

This has been a lot of work but I can see the light at the end of the tunnel!!.
|
Left: Another section cut and ready to be glued in place. I want to get to the other end so that I can get the frets into this fingerboard. Right: Back to the gluing process again but we are getting close to the end of this huge task. I do like the look of the board and it will look impressive on the finished instrument. |

Almost done with the gluing and clamping process.
|
|

Another section cut, shaped, files, interlocked, cleaned up and installed!.
|
Left: I got another section inlayed which makes me feel good! It's tricky to get all these interlocking pieces to sit just at the right depth. Right: Next section being prepared for inlay installation. I have cut and sanded all the inlay pieces and I'm now prepping the surface onto which they will be attatched. |

One more step forward and things are actually looking pretty nice!!.
|
|
| |
|
|
|
| |
|
|
|
| |
|
|
| |
|
|
| |
|
|
| |
|
|
| |
|
|