|

W have a few FedEx offices in town but I usually drive a little extra distance to this one. Bass is now on its way to its customer!
|
Left: This is the FedEx office I went to this morning to ship the bass. Very nice and helpful people! They were even kind enough to apply "Fragile" stickers onto the box since I didn't have any at home. I'm happy that we ended up with an impressive looking bass whose unique character was largely defined by my customer's ideas and requests. These custom basses are a lot of work and I hope this one has a happy future with its new owner!!! |
|

No harm in adding protective materials inside the case while the instrument is in transit. I've never had a bad experience with FedEx but no harm in taking precautions. I will also add padding in the shipping case for extra protection!
|
Left: I want to take as many precautions against transport damage an anyone can so I'm adding packing even inside the instrument case. I'll also use extra padding inside the shipping box! Right: I have to say this is a very safely packed box. I put extra cardboard sheets inside and used a lot of bubble pack to fill every space! |

I made sure the contents were as well protected as possible with extra sheets of cardboard and tons of bubble packing. This box is ready for its trip!!!
|
|

Finally found some shipping materials so that I can get this instrument ready to travel! I'm just finishing up on the setup and will then take a few glamor shots and then get the instrument safely packed up.
|
Left: Shopping for the right sized shipping box so that I can pack everything up and get physical dimensions and weight for shipping! Bass-sized boxes are expensive these days! Right: Text and picture coming!!! Right: Things seem to be nicely adjusted and sounding good! I'm going to be securing the bass in its case and then packing for shipping. |

Did a final test on sound and action before packing the bass. Weather is hot and dry here in Sourthen CA but I don't think the bass will move much even if it ends up in a colder more humid climate. Neck has carbon fiber rods inside it! More news soon!
|
|

Strings off and truss rod adjusted for a straight neck. I'm doing a final fret leveling just to make sure all those frets are even with each other. After this is done I will re-string and test everything.
|
Left: Doing a quick fret level to make sure they are all nice and even all the way along the fingerboard. Next I'll get strings back on and play it a bit and make sure all is OK! Right: Strings back on and I'm making final adjustments. Busy making sure nut slots are all good and bridge and truss rod are adjusted to optimum. |

I want to get this beautiful instrument off to its customer so I am busy adjusting the final details so that I can pack and ship! I'm happy with the way it all came out!.
|
|

Got all five strings on the instrument so that I could work on the details for the nut spacing and each string height. Once that's done I will work on the bridge adjustments to get everything playing nicely!
|
Left: Quick photo with the strings on - I'm busy right now filing the nut slots to get the strings accurately placed and at the optimum height above frets. More updates coming! Right: Electronics installed and I was able to test the whole instrument plugged into an amp. Sounds good and everything is working! More updates coming! |

The electronics have all been wired up and I was able to test the instrument plugged into an amplifier. Both pickups sound good and strong, all the preamp controls work as expected, so this area seems to be good and set up. Now working on final nut slots and bridge adjustments plus whatever compensation the truss rod and fret leveling needs.
|
|

All the internal grounding has now been done. I'm connecting battery power and wiring up the pickups to the preamp. Output plug is also done.
|
Left: About half way through cutting, arranging and soldering wires in cavity. I'm almost finished connecting and then will tidy things up internally as much as possible. Right: Putting the strings on for the first time so that I can get a feel for any required adjustments to bridge, saddles and nut that might be needed. |

Getting the strings on the bass tells me how well the spacing and alignment of everything is working. Looks not too bad so I will do some initial adjustments and also plug the bass in and see what kinds of sounds we get.
|
|

The preamp control circuit box and the battery retainer have been installed. Now setting up the three pots and related wiring so we have our Volume, Balance and 4 Band EQ all set up.
|
Left: I have installed the battery holder and the control board for the Audere Preamp. Working on getting the three pots in place and then wiring it all up! Right: I can admit to being an idiot sometimes - I forgot to ground the pickup cavities to the main control cavity so had to remove pickups and add grounding wires - sorry!!!! |

In my busy-ness I forgot to add grounding wires to connect shielding from the pickup recesses to the main (common) grounding source in the control cavity. My apologies. Had to remove pickups - add the wires and re-assemble!! All good, back to normal and now connecting all those little wires!!!.
|
|

The Audere preamp is now being installed into the control cavity. I created plenty of space so it should not be crowded when everything is installed and connected. Can't wait for this beast to make some sound.
|
Left: Setting the electronic components up in the control cavity. Space looks good so just a case of securing everything in there and making it look neat! Right: There was a lot of overspray in the knob recesses so I ground that out so that I can install the electronics package. Strings going on next and will test! |

TheI spent some time today very carefully grinding out a lot of overspray in the control knob recesses. This will help the knobs sit correctly. Now ready to get the preamp installed and test out the sound.
|
|

Drilled all the required holes and attached the pickguard onto the body. Starting to look like a real bass now! Will get the strap buttons on, cavity cover fitted, neck back on and the electronics installed next.
|
Left: Got the pickguard fitted onto the body so I will now add the second pickup and perhaps fit the strap buttons before I re-attach the neck. Getting close to being done! Right: Got the copper shielding applied to the inner side of the control cavity cover. Will be moving on now to the preamp installation and wiring. |

The copper shielding has been applied to the back/inner surface of the control cavity cover so that's done. I will now be working on preamp installation and finishing the nut.
|
|

I'm in the process of setting up the pickguard positioning to fit neatly with the neck and the pickup recess. I will then drill the holes for the retaining screws. Once that's secured I will install the neck pickup.
|
Left: Time to get the pickguard fitted. Being careful to make sure it is accurately positioned before I establish the screw holes that will allow me to attach it to the body. Right: Quick update - gluing the neo magnets into the underside of the control cavity cover. Once this has set I will caot the back with copper shielding. |

Gluing neodymium magnets into the three recesses on the back of the control cavity cover. I will also cover the finished back surface with copper shielding to provide 360 degree electronic isolation.
|
|

Getting the two pickups set up in their covers and installed in the body.
|
Left: Now working on thre installation of the two pickup assemblies. Also making sure that knobs fit well in their recesses. Getting close to completion! Right: Have the pup wires fed to the cavity - added stabilizing foam under the covers - set up the adjustment screw holes and added compression tubing for vertical adjustment! |

Lots of unseen work to get the pickups fitted. adjustment screw holes added, foam padding and rubber adjustment sleeves added and ready now to add the screws and consider pickups installed.
|
|

The bridge has now been attached to the body with a grounding area underneath and a grounding wire running through the body into the control cavity where the common ground will exist.
|
Left: I created a grounding area at the base of the bridge and ran a connecting wirth through the body to the conrol cavity. I then attached the bridge in place. Right: Getting things ready to install the Audere preamp into the control cavity. Resizing holes, grounding, sorting out all the wires. Also have a 9v battery secured in there! |

I'm working on getting the Audere 4-band preamp physically installed in the control cavity. Once that's done I'll add a battery fixture and start connecting all the wiring.
|
|

Most of the cavity copper shielding is now attached but before finishing I need to glue the three cover retaining magnets into their respective recesses. I also spent some time grinding the finish overspray out of the output plug recess so that I could get that fitted in place.
|
Left: Almost done with copper shielding but first I have to glue in the three magnets for retaining cover. I was also able to clean out overspray to get the output plug to fit in place. Right: Copper shielding of cavity is done. Output 1/4 inch output assembly is done. Next task is adding a grounding connection between bridge and cavity. |

The three retainer magnets have been installed in their recesses. Copper shielding has been completed for the control cavity. Output plug recess has been cleaned and sealed and is ready for installation. Next is connecting bridge ground to cavity and attaching bridge to body.
|
|

Established 3 recesses for the neo-magnets that will retain the cavity cover. Also sanding down the interior surface of control cavity in preparation for applying copper shielding.
|
Left: I'm sanding the inner surface of control cavity in preparation for copper shielding. Also drilled recesses for retaining neo-magnets for the cover plate. Right: Working on the copper shielding on the control cavity. I will also be gluing in the magnets that will hold the cover in place and fitting the locking output assembly in place. |

Copper shielding currently being added to control cavity. also fitting the output plug socket and will glue the three neodymium magnets in place.
|
|

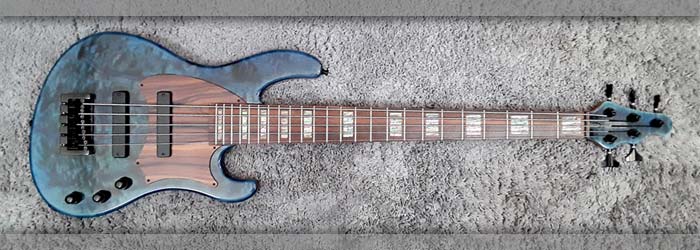
These woods on fingerboard and pickguard are very complimentary, plus they look awesome against the blue colors of the body!!!.
|
Left: It's not fitted in place yet but this photo shows the very nicegrain/color continuity from the fingerboard wood to the pickguard wood. Can't wait to see it all finished! Right: I spent some time drilling access holes for a bridge grounding to the control cavity. Now carefully locating the bridge in place so that I can establish mounting holes. |

I created holes for the bridge grounding wire and now I am setting up the bridge in place. It's attached to the body by 5 screws.
|
|

Marking out the positions of the retaining screws of the Gotoh Tuners. I'll drill very small pilot holes and get these tuners secured in place.
|
Left: I'm working on the final attachment of the tuners onto the headstock. Marking things out, drilling holes for screws and tightening everything in place. Right: The tuners have now been installed and my next task is to establish the height of the nut and cut the five string slots. After that I will be attaching the bridge in place on the body. |

The tuners have now been attached to the headstock. Next is bridge and doing work to finish the nut. Then pickup installation and also attachment of strap buttons on the body.
|
|

I am using long drills to create internal holes between control cavity and pickup cavities for the pickup and grounding wires.
|
Left: In this photo I am drilling holes connecting both pickup cavities to the control cavity to allow for wiring and grounding. Right: Started the copper shielding work on the pickup cavities. Finished connecting holes for the pickup cables and cleaned and sealed the recess surfaces. Then applied copper shielding to all the internal surfaces. |

After drilling the holes to the main cavity I was able to coat the inner surfaces of the pickup recesses with copper shielding. I will solder wire connections from both of these cavities to the main control cavity on the back.
|
|

I'm applying the wood conditioner to the entire fingerboard which achieves the final color of the wood. Looks great so far - not sure if it will need a 2nd coat - will wait till it all soaks in and dries.
|
Left: I am now applying the conditioner to the fingerboard surface which brings the color to a beautiful match with the pickguard. This is the first coat going on. Right: I have a space on my CNC so I was able to get the recesses cut for the pickup adjustment screws. These will now get a final polish before adding bobbins and mounting to body. |

I'm cutting little recesses for the heads of the pickup adjustment screws. With this done I will buff up the pickup sufaces to a nice final finish and install the bobbins inside them.
|
|

Quick shot of the nut I just machined. Sanded it to finished thickness and will now establish width and get it glued in place.
|
Left: I got the nut blank cut and now I just have to establish width and approximate height. I will then glue it in place and establish height and slot depth once it is secure in place. Right: Working on getting the tuners fitted and set up on the headstock. Had to remove some finish overspray from the holes but it all worked out fine. |

I worked on the 5 tuner holes first to remove overspray and make sure the threaded components fit ok. Just got them all attached and I will now get them aligned, fixed in place with screws at the back, and tightened up on the front threads.
|
|

I'm in the process of fitting the neck onto the body. Want to be sure everything fits together properly and evenly. Will post a photo of the complete bass!
|
Left: Time to bolt the neck onto the body. Doing it carefully but everything seems to fit well. It will be great to see the complete instrument. Will fit nut and apply conditioner next. Right: Neck is now attached and we have something much closer to a real instrument! Feels good already. I now have to get nut installed and work on copper shielding! |

I got the neck sucessfully bolted onto the body. Next tasks will be creating and installing the nut and coating pickup recesses and control cavity with copper shielding.
|
|

Machining a nut blank on the CNC out of a very hard phenolic material that s the best nut material I have found! I'll get this installed and get the string slots started on the top based on the string diameters I currently have.
|
Left: I'm machining some very hard phenolic material to create a nut blank that I will be inserting into the neck nut slot. Once that's installed I will apply the fingerboard conditioner. Right: I have been using a dremel tool to extract the very hard finishing compound out of the neck attachment recesses. Just about done with that! |

These metal pressure rings fit before finishing but there was a lot of overspray in there so I have been busy grinding that out to achieve both diameter and depth.
|
|

Neck now fits nicely in the neck pocket. I have to make sure the retaining rings for the neck screws fit into their four little recesses. Once that's done the neck can be bolted onto the body.
|
Left: Got the neck recess cleaned out and was able to get the neck fitted in there. I'll check the neck attachment rings for fit on the back and get the neck bolted on as soon as possible. Right: Fingerboard surface is getting steel wool treatment. Frets are getting filed to create finished ends and initial leveling. Then conditioner will be added. |

Cleaning up fingerboard surface so that I can apply a final couple of coats of conditioner. Also filing the ends of all the frets and dressing each of the 48 ends for a comfortable finish. I'll also do a light preliminary top leveling of all the frets.
|
|

You always get aome extra finish in the neck pocket and the two puckup recesses so I am going to be grinding that out by hand to get everything to fit in place as it should.
|
Left: My next task is to carefully grind out excess finish in the neck recess so that I can get the neck to fit nicely in there. I will then bolt the neck onto the body. Right: I'm working also on fitting the cavity cover into its recess on the back. Once that's done I will apply copper shielding to all the inner surfaces of the cavity. |

I need to dremel out some of the excess finishing in the lid recess of the control cavity to get the cover to fit in there nicely. Will install retaining magnets and cover the inside with copper shielding.
|
|

Picked up these final two components from my finisher today. One is the cover for the back cavity on the body - the other is our custompickguard which came out looking amazing! I will be working on post finishing cleanup (in cavities and recesses) and getting the neck fitted. Then cleaning and conditioning the fingerboard wood. After that - probably final fret dressing and leveling if necessary - installing a nut and adding copper shielding to cavities!
|
Left: Made another trip to my finisher this morning to collect the pickguard and the cavity cover. Both look very impressive and I can't wait to see the combination on the final assembly! Right: This is what the pickguard looks like on the body of the bass. Also added some conditioner to the end of the fingerboard to show finished color! |

Just a quick photo to show the neck and pickguard against the body of the instrument! Neck and pickguard will mtch really well and the combination of colors looks pretty impressive!
|
|

I'm starting some of the cleanup work. The finisher masked off the fingerboard and I have now removed the masking and will be starting the cleanup in truss rod access area and getting the whole fingerboard ready for final conditioner application.
|
Left: Headstock area which is ready for me to work on general cleanup on fingerboard and in the truss rod access area. Fingeboard wood will end up a bit darker after conditioner. Right: Just received the awesome Protec Contego Bass Case - in my opinion the best on the market. Yes - I need to attach the bass neck! |

I (and my history of customers) have been more than happy with Protec's Contego cases for many years. They are strong and protectove but lightweight and easy to handle. Very well designed.
|
|

Very impressed with the final finish after curing and polishing. It changes color in the light and looks very deep and 3D which I am very happy about. Hard to represent all that in a photo because every shot I take has different subtle colors in it! I will be posting more pictures to highlight all the other parts of the instrument!
|
Left: Just picked up the bass from my finisher - color is great and deep and I can't even replicate its combination of grain and colors in a photo - will keep trying! Right: I tried another shot with different lighting to see if I could illustrate the color and effects in the body woodgrain. Definitely impressive and unique. |

Body has a lot of detail and 3D effects in the grain of the maple wood. The colors subtly change based on light source and the angle you look at it from!
|
|

This photo shows an initial finish application using the inlay colors to create a matching body theme. Between the finisher and my customer we decided to slightly change the color formula, will post and update photo later this week.
|
Left: I'm working with my finisher right now to create a body finish that matches the colors of the fingerboard inlay plus, we're trying to also add a little color to blend with the pickguard & neck! Right: Update! We decided on increasing the blue content and changing color highlights to match the pickguard/fingerboard wood. End result looks great! |

A HUGE thank you to my finisher for making these adjustments to the color content of the body. He's doing the final polishing and curing right now so I hope to pick all the parts up soon!!!
|
|

I was able to drop off the guitar and meet with my finisher for some time so that I could explain the finish and color requirements that we collectively came up with. I think the end result will be impressive!!.
|
Left: I was able to bring the body, neck and other parts to my trusted finisher this weekend. I explained our plans for selecting body color from the inlay highlights - should work out nicely! Right: Finishing should be complete this week and I will travel up north pick up the instrument as soon as I get the OK. Just received strings for the bass!!! |

I heard that the instrument is not far from being done at the finisher. Hoping to pick up soon. Received a setof strings for the bass.
|
|

I have used these in many other basses and they have done a great job. Should have them pretty soon and they will be ready when the instrument finishing is complete.
|
Left: I had planned on chrome hardware for this bass but since we are now using black I went ahead and ordered a cool set of black Gotoh tuners. They are well engineered and lightweight! Right: I have been sanding all the body parts in a big effort to get everything ready for the finishing process. Looks like we are pretty much there! |

I spent some hours on the finish sanding and some detail shaping work and I believe everything is now ready for the finishing process. I'm trying to schedule a visit to my finisher as soon as possible so that I can let him work his magic on this instrument.
|
|

I'm doing the final fine grit sanding to all the body parts, will clean everything up ready for finishing and all the parts will be taken to my very trusted finisher in the next day or so.
|
Left: I'm doing final sanding to the body, neck and cavity cover and will be taking this instrument up to Norco CA to get it's color and finish applied. Right: I needed to add a serial number to this instrument so I cut a small recess and created an engraved insert in the back of the headstock. The bass now has its own identity! |

Wanted to make sure we gave this bass its own identity in the world! I created an insert with the serial number in the back of the headstock.
|
|

OK - gluing time and I am hoping that I was able to align everything before the clamping - we'll find out in a few hours. Fingers crossed!!!.
|
Left: We're now in the process of gluing veneer onto the pickguard plate. It's a tricky job as I want to make sure everything is aligned properly. Right: So far so good - I added some conditioner to the fingerboard to show how well the wood matches the pickguard. Happy with it so far and will post more info very soon! |

The gluing of the pickguard and the veneer went well and I wanted to show the nice match between the fingerboard and the pickguard. I put some conditioner on the fingerboard to show its final color - still wet in the photo!!.
|
|

I cut two possible pickguard pieces from the veneer so that I not only had a choice, but a spare piece if something went wrong (which it shouldn't!!) Anyway - I will be gluing one of these to the support plate to create the completed pickguard!
|
Left: I had enough material to make two selections on the grain of the veneer so these will be two possible choices for the pickguard and also an insurance if I need a spare!!! Right: I used a light sealer to prevent the adhesive from bleeding through the veneer. Now I am going to epoxy the veneer onto the pickguard backplate. |

I chose the pickguard veneer that looked best on the instrument, considering the grain in the fingerboard and the shape of the pickguard. I applied a sealer to the back surface of the veneer to prevent bleed-through of any adhesive and now I am going to use a thin coat of epoxy to secure the veneer onto the backplate.
|
|

Doing some final shaping work on the back of the neck to optimize both the thickness and the curved profile.
|
Left: I'm sanding the thickness and the profile of the back of the neck to make it nice and easy to play. I want to get it really nice and comfortable without weakening it - we are very close already! Right: Did some final adjustments to the geometry of the pickguard. I'm now ready to cut the backing plate and the veneer :-) |

I wanted to make sure the entire shape of the pickguard fitted the body geometry, pickup cavity and neck recess. Made a few cosmetic adjustments and now ready to cut the actual materials!
|
|

I need to finish off the cover plate for the back control cavity so I am getting that ready to finish the thickness and fit it to the instrument.
|
Left: I am in the process of finishing the machining and sizing of the back cavity cover. I'm ready to machine and sand this to final thickness. Right: I needed a piece of special plastic to provide a solid and rigid base for our custom pickguard. This will have the Veneer attached to it once I cut out the final shape. |

This plastic (acrylic) panel with provide the backing for the decorative veneered pickguard. I need to cut it out and establish the pickup space and the holes for the clamping screws.
|
|

Doing the final sanding all over the body so that it is in optimum condition for the finishing process. Aklso working on the neck profile and the surfaces of the neck.
|
Left: I'm getting all the body surfaces sanded to a fine grit so that it is ready to go to finishing. I'm also working on the neck profile etc so that they can both be ready together. Right: My order of veneer arrived and I was happy to discover that the color and grain of the material matched that of the fingerboard very well. I can move forward! |

I was very happy to discover that our matching of the fingerboard and the pickguard veneer worked out VERY well!! I'll get that going and it should look awesome!.
|
|

I'm working on the shape of the custom pickguard, this is a good start but will give it a little thought and further consideration before finalizing!
|
Left: I created a test shape for our custom pickguard based on the existing geometry of the body. This is subject to modifications but a good start to see how it would look! Right: I've been searching wood suppliers for veneer for the pickguard that would be a good match for the fingerboard material. Honduran mahogany may be the best bet. |

Exotic veneers are getting much harder to find in the marketplace and many places are very low in stock and pricing what they have very high. I do have a supplier that has Honduran Mahogany which would be a good possible match in grain and color to the existing fingerboard. This is a photo of part of the veneer sheet I puchased. I seems close to the fingerboard color and grain and my supplier is fairly sure it's the same wood species.
|
|

The wood on the top and headstock has a very nice grain which we hope to enhance with the application of carefully selected color tints. I'm doing some homework on that right now.
|
Left: Now looking at two important things for this bass. One is the fancy wood material for the pickguard and the other is the planned application of black/blue tints and finish to make the body look awesome! Right: Hoping to make this bass look slightly different, one of the goals is to create a modified pickuard shape slightly similar to this. |

This pickguard shape was the inspiration to come up with something less traditional for this instrument using a wood similar to the beautiful mahogany we used on the fingerboard which I think is Burmese or Honduran, quite hard stuff!
|
|

I'm in the process of creating a nice radiused edge break all the way areound the back of the body. Lost of filing and sanding. I will then repeat this work on the front of the body.
|
Left: I am now establishing a corner radius all the way around the body to break the edge. I will get the back side sanded and then repeat the process on the front of the body. Right: I'm working on the radus around the edge of the front of the body. Once that's done and sanded I will decide on whether I want an arm relief. |

Now routing and filing and sanding the redius around the front of the body. Once done I will give the hole body a good sanding down to around 120 grit.
|
|

Body and neck both need a little final carving and shaping then a good spell of sanding to get all the surfaces nice and smooth. Will update as it moves along.
|
Left: Getting back to this bass after a long busy spell - I need to get the neck attached to do some final shaping and carving. Also need to decide on a color tint!! Right: I'm now plannng on creating a nice radius around the body front and back and locating the bridge in place. Might also cut an arm relief curve at the top of body. |

Getting ready to establish a nice radiused edge break around the front and back of the body. Also going to set retaining screw holes for the bridge.
|
|

Pickup covers machined and now I have to cut two recesses based on the bridge location to house the pickups.
|
Left: I have machined the two pickup covers and I am now hetting the body of the instrument set up on the CNC so that I can machine out the two pickup recesses. Right: I have machined the two recesses for the pickups which helps move this instrument along! I'm going to be sanding and shaping to get it ready for finishing. |

I was able to machine the two pickup recesses into the top of the body!.
|
|

Will be using an Audere 4-band preamp which uses three stacked control knobs.
|
Left: Been doing some machining on the body. The recess for the Neutrik jack socket has been established and I machined the holes and counterbores for the control knobs. Right: I have the completed pickup bobbins for this bass but will probably manufacture the pickup covers. I'm designing them on computer right now. |

This is close to the cover design that I will end up. Have to machine them on the CNC first!.
|
|

This bass is not very far from finishing so I want to get a final shape and thickness on the neck and cut a nut slot so that I can install a nut.
|
Left: I removed the neck so that I could machine a nut slot at the headstock end and also to work on the neck thickness and profile so I could get them to a finished stage. Right: This is a back view of the instrument right now. All the center body laminates and those of the neck are tapered and match so the back will look awesome! |

Not sure yet whether the back will have a clear coat or a tint but either way it will look impressive.
|
|

I attached the neck so that I could get bridge and pickup locations established. It also allows me to do some final neck shaping to get it ready for finishing.
|
Left: I drilled through the body in the neck pocket so that I could bolt the neck onto the body of the bass. This allows me to accurately place bridge and pickup locations. Right: Time to establish the two pickup positions and sizes and the location of the bridge so that I can get some of the final machining operations done. |
I attached the neck so that I could get bridge and pickup locations established. It also allows me to do some final neck shaping to get it ready for finishing.
|
|

These are a set of J-Bass pickups I had would some time ago. Just re-tested them to make sure they were still ready to go.
|
Left: I have two J-Bass pickups wound and ready for use in this bass. I'll be cutting the pickup recesses for these and hopefully will have the whole instrument ready for finishing very soon. Right: I will be putting a German Schaller bridge on this bass. Once I have the neck bolted on I will plot out the locations for the bridge and pickups. |

This will be an unusual J-Bass anyway and I like the Schaller bridge and how it is constructed. Should work out fine.
|
|

Getting ready to mchine recessed holes for the neck attachment.
|
Left: I now have the body of the bass up on the CNC so that I can accurately place and machine the four recessed holes that will allow the neck to be bolted on to the body. Right: The holes and recesses for the neck attachment and support rings have been drilled through and now ready for me to attach the neck to the body. |

I can now attach neck and body and that will then allow me to plan out the placement for the bridge and pickups.
|
|

Machining the control cavity from the back of the body.
|
Left: Decided to not use a metal J bass plate on front, I'm going to machine a standard control cavity in the back and leave the front clean to show off the grain and finish. Right: The control cavity is now established in the back of the body. I will make a lid for this from the same mahogany material. More body and neck shaping to come soon. |

The control cavity is now part of the body. Next will be some shaping and contouring of body and neck.
|
|

Sanded out the belly cut - will have to cut some cavities soon for pickups and electronics.
|
Left: Got the belly cut leveled and sanded to a finished condition. I will create edge break radii around the perimeter of the front and back of the instrument body. Right: Due to other emergencies I haven't been able to get a lot done on this J-Bass recently. Probably going to use standard Jazz style pickups to maintain the J-Bass theme. |

Standard Jazz Bass pickups should work fine n this bass. Combined with the 4-band Audere EQ it will have plenty of sound.
|
|

Tuner holes now drilled through headstock.
|
Left: Holes for the tuners have now been drilled through the headstock. I'll do a little cleanup around the edges and this part will be done. Right: I was able to get some roughing work done to the belly cut area on the back of the body. This creates a more comfotable instrument and also mitigates some body weight at the same time! |

Belly cut roughed out. Will now file and sand it till its perfect.
|
|

Testing a Hipshot bridge to make sure it would work for this project.
|
Left: I will be using a hipshot chrome bridge on this bass so I'm now checking placement and string spacing to make sure this bridge will work. Should look great against the finish. Right: Got the truss rod slot back into the headstock after the veneer was applied. Now I'm going to drill the five holes for the chrome Hipshot tuners. |

Headstock ready for tuner holes.
|
|

I know my finisher can do a spectacular job in creating a finish that will match this beautiful shell inlay.
|
Left: The top of this bass is an awesome curly/quilted maple which will look amazing after finishing. I'm considering applying a finish to match the various colors in the neck inlay! Right: Currently working on applying a curly maple veneer over the headstock so that when the instrument is colored and finished it will all match!! |

The veneer on the headstock will permit matchig the body finsh on the headstock too.
|
|

I will be cutting the neck pocket soon but before that I wanted to decide which bridge to use.
|
Left: This photo shows the neck and body together although I haven't cut the neck pocket yet. Thinking of using this Schaller bridge if the string spacing is right. Right: Neck pocket has been cut and the neck fits in the body nicely. I will be doing some trimming to the body now to finish up the outer profile. |

Neck pocket complete.
|
|

Frets about to be installed and when they are done I'll clean up the ends and remove the board from the MDF substrate.
|
Left: Now bending the fretwire and cutting it to length so that they are ready to install. Once they are in and cleaned up the board can go on the neck. Right: Fingerboard finished and now being glued onto the neck blank. Once this is set I can clean it up and shape the neck and also work on getting it attached to the body! |

Attaching fingerboard to the neck.
|
|

I only do two inlays at a time because it makes everything a lot more manageable.
|
Left: I was able to get all the shell inlay installed in the fingerboard today so I feel that this bass moved forward a little bit! I'm going to seal the inlay and clean up the surface next.. Right: This is the fingerboard with the surfaces sealed and leveled. Before frets go in I will also apply a sealer to the wood which will make it darker. |

Inlay has been sealed and leveled.
|
|

This bass will have a really cool looking shell block inlay on the fingerboard.
|
Left: I'm currently working in getting the shell inlay installed into the fingerboard. This is an example of the shell that I will be using - should look great against the finished color of the wood. Right: I am carefully cutting out the shell inlay and progressively installing it in to the recesses I caut in the top of the fingerboard. |

I only do two inlays at a time because it makes everything a lot more manageable.
|
|

Machining on fingerboard complete - it's now ready for some inlay pieces.
|
Left: Fingerboard has been machined to size - compound radius has been machined on the top surface and fret slots cut into the top. I also cut the recesses for the block inlay. Right: I have cut inlay support pieces in the laser and fitted them into the recesses and then sanded flush with the compound radius. |

Adding substrate pieces that will eventually be attached to the inlay shell.
|
|

Body is getting close to being ready for machining.
|
Left: I'm sanding around the perimeter of the body to the point where I can call it complete as far as overall shape is concerned. Need to get back to the neck now. Right: I chose a fingerboard material and have it on the CNC right now cutting the perimeter to size. Next will be the compound radius and the frets slots/inlay. |

Fingerboard under construction - trying to get this bass into a more complete condition.
|
|

Gluing the carbon fiber rods into the neck assembly.
|
Left: Clamping the two carbon fiber reinforcing rods while they are being glued into the neck. Once this is done I can plan on getting fingerboard attached. Right: Two carbon fiber rods are glued in and I have carefully leveled the surface flat again so that we are now ready for the addition of a nice fingerboard! |

Thet 2 CF rods make a huge contribution to the rigidity of the neck.
|
|

Body and neck are going to get some more attention in the next day or two.
|
Left: Neck and body will be getting some more sanding work - I'm also getting ready to install the two carbon fiber support rods into the slots I cut in the neck. Right: Carbon fiber rods cut and fitted to slots - I just have to get the glue mixed and I can get these installed into the neck. The add strength and rigidity to the neck assembly. |

Thet 2 CF rods make a huge contribution to the rigidity of the neck.
|
|

Marked out location of neck recess - first chance on cnc I will get that cut!.
|
Left: Not much time to work on this bass due to the priorities of the custom work I am doing. I did get the body and neck markes for cutting the neck recess into the body. Right: I decided to use a Rosewood fingerboard as it will blend nicely with whatever treatment we give the final instrument. |

Rosewood fingerboard attached to substrate for machining.
|
|

Neck with the heel end machined down to final thickness. The tapered lamnates match exactly!.
|
Left:This photo to shows the match between the neck laminates and the body core laminates which end up creating a continuous tapered theme through the whole bass. Right: Time to get things moving on this bass again so that I can get it up for sale! I cut and rough shaped the headstock today. |

Headstock now much closer to finished profile.
|
|

The neck perimeter has now been established.
|
Left: I have now machined the perimeter of the neck to its final size. Next task will be to cut truss rod and carbon fiber slots. Right: More machining completed and now we have the truss rod slot cut and the truss rod sucessfully fitted into the neck. All I have to do now is cut the two slots for carbon fiber rods! |

Got the truss rod slot geometry machined into the neck!.
|
|

Starting work on the neck.
|
Left: The neck of the bass is up on my CNC and I have just surfaced the top joint face. I will also be cutting it to its final widths and machining the headstock area too. Right: I machined the upper surface of the headstock with its curve up to the neck surface. I will veneer this surface to match the body top. |

Cutting the headstock surface.
|
|

gluing the top plate onto the body in the vacuum press.
|
I have had this bass on the shelf for a long time and haven't done anything to it because I have been simply too busy to get to it. I saw it today and thought I should try to get it finished since it could end up being someone's favorite 5-string bass! It has all the ingredients for being a really awesome J-Bass and the top will look great with a tint. As time permits I will get the neck machined so that I can fit it to the body! |
|

gluing the top plate onto the body in the vacuum press.
|
The body and top are now being glued together inside the vacuum press. This method allows even pressure to be distributed over the entire surface of the body and ensured a very clean and even joint. Getting the top glued on allows me to be able to cut neck pocket, pickup holes, control cavity and a number of other features. It shoul dend up being a beautiful looking bass as the top wood is quite impressive! |
|

Top plate prepped and sanded - ready for assembly.
|
This is the maple top plate which I am preparing so that I can get it glued onto the instrument body. It has been sanded both sides and has had some decorative veneer applied to the underside joint face. This maple top will look very nice when finished and will give us many options on color tints if we decide to go with a color or a sunburst. There is a lot of really nice figure in the grain of this top so we will do something cool to bring it out! |
|

Body being machined on CNC.
|
I have the body blank on the CNC just to clean up the top surface. It will be drum sanded so that it is ready for the top plate. The combimation of the maple and mahogany always works well for a bass like this both in sound and in aesthetics. The multi-laminate neck will be very strong and the neck and body core will look really nice together. Now I have to get the parts glued together so that I have a complete body to work with. |
|

Quilted maple top ready to glue together for the top plate.
|
This is a photo of the two top plates after having been machined so that they can be glued together. I know that this curly maple material will look awesome on the finished instrument and also that it will accept any color tint that may be necessary. If I don't get a buyer by the time I have to finish this instrument I will probably use a transparent black or a sienna sunburst. Either way it will look very impressive! |
|

Top bout of the body being glued onto the core.
|
I cut the top and bottom body bouts out of mahogany and rough sawed them to shape. I then machined accurate joint faces on each piece. I maple veneer was glued onto each joint face and the sub-assembly was then cleaned up. Now I am able to glue the body pieces together. In the photo the top bout is being glued onto the body core. I'll add the bottom bout as soon as I have time and we'll have something that looks like a bass! |
|

Core of the body and the neck laminates are now glued together.
|
All the various tapered components have now been successfully glued together. I can now start the machining process on each of these pieces. I want to get the rest of the body cut, machined and assembled so that I can glue the quilted maple top on and have a complete body to work with. The neck will go up on the CNC soon for various machining operations. They are looking good so far - very lightweight and resonant. |
|

Gluing the tapered laminates of the nack and body.
|
I am busy gluing all the tapered laminates together. Each one of them has had a contrasting veneer glued to both joint surfaces, and when they are all together that will create a very attractive double pinstripe between each tapered laminate. A lot of detail work involved in that - but I always feel it is well justified in the finished product. I want to get this bass to the point where it is a complete assembly as soon as possible. |
|

Top plates veneered and ready to glue together.
|
I am using a nice piece of quilted maple for the top of this bass. I have already resawn it from its parent material and sanded the bookmatched pieces to the finished thickness. I then glued two veneers to the bottom surface as a decorative highlight. They are now reay to have the joint faces machined. That will allow me to glue them together into one complete top. It is still a littl;e oversize until I glue it onto the body. |
|

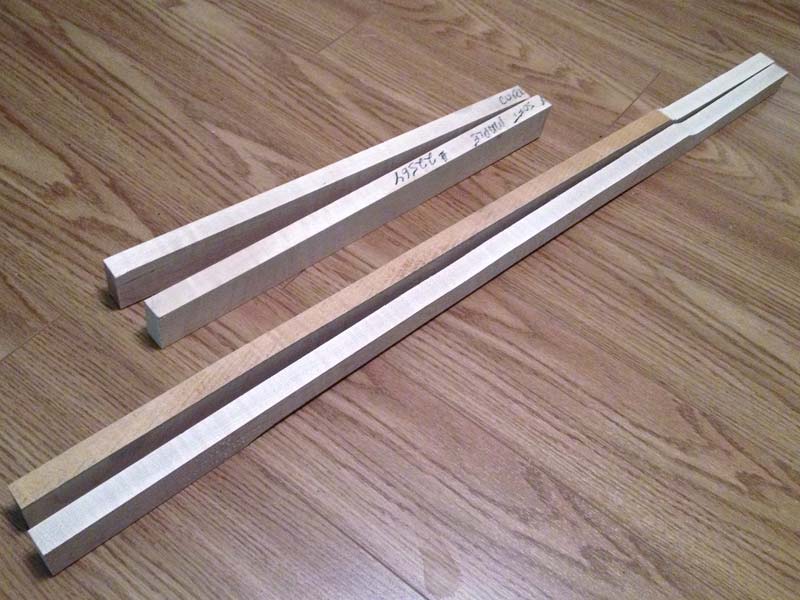
The tapered laminates are ready to glue together.
|
The separate tapered laminates have been machined and vaneered with dark veneer against the light woods and light (maple) veneer against the dark woods. They are all now ready to be gued together. Once these laminates are glued together we will have a neck blank and a body core that will allow us to move rapidly forward. The materials we are using will yield a great tonal response so I am looking forward to seeing what this bass will dweliver!!!! |
|
 |
From humble beginnings... I just got this bass started. A few days ago I made a couple of new templates that were updated based on my last batch of J-Basses (which came out very well). These upcoming ones will have a few engineering changes to keep raising the bar towards the best a J-Bass can possibly be. This particular one will have a maple and sapele neck. In the photo I have rough sawn the forst few pieces of maple. |