|

The Protec case will keep the bass very safe, and allow for storage of all the accessories. Unlike a lot of cases it is relatively light which also helps a lot.
|
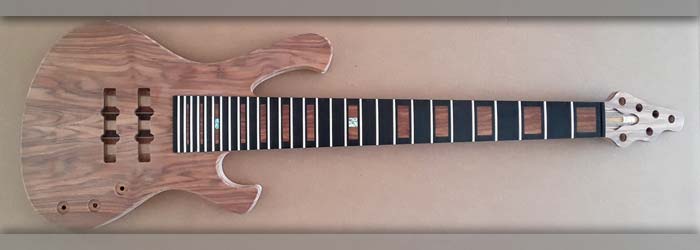
Left: Unpacked the Protec case and let the bass sit in there for a few minutes. It will be safe in there when it's all done! Working on finishing and tint details right now! |
|
|

My favorite instrument case is the Protec Contego which is lightweight but strong and great protection. I contected protec today to see if I can run up to their facility and secure one for this bass.
|
Left: I just reached out to Protec Cases in Fullerton to see if I can get a Contego case for this bass. They are great cases and I have been using them for many years! Right: I Just got back from my trip to Protec Cases and now have the case in the shop. I'll unpack it asap and post a photo of the bass inside the case to show it off. |

Just back from Protec with the case for the bass. Great to have this ready to go. I'll unpack it and put up a photo of the bass in the case!
|
|

Doing some filing and sanding around the back of the body to match the radius around the top of the body. Will post pictures of the results.
|
Left: I have a nice radius all around the top of the body - now I am working on creating a matching radius around the back edges. Also working on back of headstock! Right: Filing and sanding continues with my goal being to get the instrument to finishing as soon as possible. Working my way round the top and bottom body radii. |

Working on the back body radius so that we end up with a nice smooth and consistent body contour all the way around. I'm using slightly rougher sandpaper and files for initial shaping and finer sandpaper for blending and finishing.
|
|

Working on the radius around the body edges. Only tricky area is around the output plug because there's a limited amount of material between the body width and the plug recess but everything seems to be working out fine. Will have more detailed photos soon!.
|
Left: I'm busy creating the radius around the body top and bottom. I have to be slightly careful around the output plug area but everything seems to be going pretty well so far. Right: Grinding, filing and sanding my way around the top & back of the body to achieve a nice corner radius. Lots more sanding to go but it will look good! |

I rough the edges with the rotary sander, then even things out with the hand files and finish the process by sanding with different grades of sandpaper. Same process on the back of the body!.
|
|

There's quite a bit of sanding and shaping coming up on this bass including body edges (front and back), neck profile shape, and areas around the heastock but it's all do-able and I will update on the progress.
|
Left: Next move on this instrument will be the shaping of the neck profile and finishing the neck/headstock volute. I'm going to create a more flat profile in the center area. Right: I'm working on all the edges and transitions around the body which is the first step in preparing for finishing. Body will be rounded off a bit - more pics coming! |

I have been working on the neck-to-body transition where I have had to grind and file some of the unfinished areas. Once all the body shaping is done there will be a lot of sanding work to prepare for the finish thet will be applied.
|
|

Getting ready to add an insert for the serial number. After that I just need to grind, file and sand this instrument until it is ready for the finishing process.
|
Left: I need to add a serial number into the top cavity and start filing and sanding this instrument down to a surface condition that is ready for the finishing process! Right: This image shows the pickups & bridge hardware that are going on this bass. The individual bridge units allow better spacing alingment and are lighter than a one-piece! |

The pickups are Nordstrand models and should provide us with a good dynamic sound. Thr bridge units are individual which allow me to accurately set spacing on a custom instrument like this! Photo also shows the cavity covers and the truss rod cover.
|
|

Nice to get the tuner holes done. Moving on to final neck shaping and other finishing details.
|
Left: The holes for the tuners have now been drilled through the headstock and I can now get busy with final shaping and sanding. Should all look great when complete. Right: Sanding the back of the neck to achieve a desired thickness from nut to bofy joint. Once that's close I will refine the curve on the back of the neck. |

Back to working on the neck. Goal right now is sanding down to very close to final thickness along the length of the neck.
|
|

Headstock almost done - ready for tuner holes.
|
Left: Headstock has been trimmed to final shape and I am now ready to drill the six tuner holes throughthe headstock and get that area sanded and close to finished. Right: Set up now for drilling the six tuner holes through the headstock. I start them using this setup and finish the drilling by hand from the back side. |

One more operation almost out of the way and one step closer to finishing.
|
|

I machined out the two pickup recesses to move this instrument further along. Next will probably be some shaping on back of the neck and back of headstock.
|
Left: The two recesses have been successfully cut out for the pickups. Most of the remaining work is going to be on the back of the bass, shaping neck and other features. Right: I cut the two cavity covers for the back of the bass from material I had on hand. Getting closer to a point where I can get this bass sent to finishing!!!!! |

Working on this project asd I get time! Now that I have cut the two back coversI'm a lot closer to getting this bass off to finishing. It's going to look awesome!!!.
|
|

Can't be too careful with this stuff - cutting some spare material so I can make sure recess and pickup cover are a good match.
|
Left: I wrote a program for the pickup recess but just to be careful I am cutting it first in some MDF so I can check if it fits the pickup cover dimensions! If it's good I'll do both recesses on the bass. Right: Currently working on the back of the body and neck. Creating a belly cut - shaping profile, body/neck transition and neck thickness. |

Most of the final woodworking on this bass is on the back. I will finalize the belly cut - reduce neck thickness and finish carving the neck to body transition area..
|
|

I'm checking the size of the recesses I will have to cut for the pickups to make sure the geometry is correct. Also working on the optimap placement of the two pickups based on scale length and a few other factors.
|
Left: Since I have pickups for this bass I can now plan on their placement relative to the bridge and go ahead and cut recesses for them to fit into. Hope to get it to finishing soon. Right: After some deliberation I decided on locations for the two pickups. Also have a program for the recesses which I will test in spare material first. |

Settled on pickup locations and I'm ready to get the machining of the two recesses done.
|
|

Another small step - truss rod cover has been laser engraved.
|
Left: The logo has now been engraved in the truss rod cover using the Laser. I'll probably fill this with some colored filler to create a nice flat surface before finishing. Right: I am now plotting out the positions for the bridge units and the two pickups so that I can get some holes drilled and route out the two pickup cavities. |

I have the bridge units and the two pickups in stock so I just need to plot out and drill ocating holes and machine out the two pickup cavities.
|
|

Headstock veneer ready to be attached.
|
Left: I machined the truss rod cover out of the headstock veneer material and also rough sawed the headstock shape to facilitate gluing. Now it is ready to be glued onto the headstock. Right: Glued the headstock veneer onto the headstock and trimmed it down close to the final shape. Nice to have all these front pieces match! |

Headstock veneer now on the bass. Next jpb will be engraving the WG logo into the truss rod cover piece and fitting that in place.
|
|

Headstock veneer pieces have been glued together and will now be machined to create the truss rod access cover.
|
Left: Headstock veneer has now been glued together and is ready for me to cut out th etruss rod access cover. When that's done the veneer can be glued onto the headstock. Right: Very exciting - just received the six bridge/string retainer units which I will be using on this bass. As sson as it comes back from finishing these will go on. |

Decided to use individual bridge units on this bass.
|
|

I'm getting ready to make the Rosewood headstock veneer - should look awesome.
|
Left: I am now ready to sand and assemble the material for the headstock veneer (same as inlay and body top) and get that attached to the front face of the headstock. Right: I drum sanded the material for the headstock veneer and now I have to machine a joint side on each so that I can bookmatch these pieces together. |

Doing a quick setup on the CNC to cut joint egdes on the headstock veneer halves.
|
|

Finally got a chance to get the fingerboard glued on. One step closer to completion.
|
Left: I got the fingerboard glued onto the neck of the bass today. It will be great to have this instument as all one piece. When this is set I can start work on body shaping. Right: Great to have this instrument all one piece. I still have a headstock veneer to apply but getting the fingerboard on is a hige task out of the way!! |

Fingerboard now firmly attached to the neck. I can now start the carving and shaping and get the headstock veneer done.
|
|

Pretty happy with the fingerboard so far.All the frets are installed and not I have to clean up the oversize ends.
|
Left: All the frets are now installed and everything looks good so far. My next move will be to trim all the ends of the frets flush with the fingerboard edges and dress the ends. Right: Well I can already tell this is going to be a beautiful bass. As I get time I will be getting this fingerboard ready for attachment to the neck of the instrument. |

Body wood - fingerboard and inlay look awesome together.
|
|

Fist fret went in very evenly so I'm hoping all the others will do the same.
|
Left: Time to install frets on this fingerboard. I have the fretwire pre-bent to match the fingerboard radius. Have never installed frets in a phenolic board so it should be an interesting process! Right: I am being careful but it looks like the frets are going in pretty well - not anticipating any major problems with the rest of the job. |

Frets seem to be seating pretty well so will keep going!.
|
|

Bass looks really nice with this fingerboard.
|
Left: I have been preparing the fingerboard for the installation of frets. Almost ready to get started on that. When frets are in I will attach the fingerboard to the neck. Right: In an effort to move this bass forward I bought these 6-string pickups from Nordstrand. They should definitely deliver the goods on sound! |

Bought a set of Nordstrand pickups for this bass!.
|
|

Both back cavities completed and the channels I previously machined for wiring slots worked out perfectly.
|
Left: This is the back of the bass now that I have established both of the rear cavities. I will be cutting lids for both of these from the same type of mahogany. Right: I hot the fingerboard with shellac to give the wood a little protection. I then rubbed it all down with steel wool. May repeat that a couple of times but looks good. |

Prepping the fingerboqard so that I can add frets.
|
|

Setting up to machine back cavities.
|
Left: Setting the bass up on the CNC so that I can cut out the control cavity. May do the battery compartment while it is up there too. Right: I machined the complete control cavity and I'm now working on the details of the battery recess and creating a slot for the serial number insert. Very happy to get this work done and movethis bass along. |

Control can battery cavities have been machined.
|
|

Getting the headstock veneer ready for application.
|
Left: I'm getting the material for the headstock face ready to be glued together, cut and applied to the surface of the headstock. It will match the body wood and the inlay wood. Right: Working on a design for the control cavity and once that's set I can create a program to have that area machined out. Will also add a battery compartment. |

I will convert these vector shapes into code for the CNC and get the control cavity and lid recess cut out.
|
|

I am installing two pieces of shell inlay on 12th and 24th fret locations.
|
Left: This photo shows the shell pieces I am installing in the inlay for 12th and 24th frets. Just wanted something that would pop out visibly against the darker woods. Right: I have added the shell highlights in the fingerboard inlay and removed the fingerboard from the support substrate.Looks pretty good on the instrument already! |

Hoping to get this cool fingerboard installed in the neck of this bass sometime soon!.
|
|

The inlay has now been sanded flush with the top radius of the fingerboard.
|
Left: I have been sanding the inlay pieces on the fingerboard flush with the radiused top. I still have to drop some shell in there but almost done. Right: I have been sanding around the body edges to get closer to finished sizes. Also pretty much ready to machinerecesses for the J-Bass style pickups that will be installed in this one. |

Bass is now waiting for me to get a few more machining operations done.
|
|

Top plate was just a little bit larger than the body perimeter so I am now sanding them both flush.
|
Left: Now that the top has been glued on I am using the spindle sander to sand all the way around the body perimeter and cleand all the sides up. Looking good already! Right: Time to look at the geometry and machining of the control and battery cavities. I will write programs so that I can machine both features plus pickup recesses! |
Top plate was just a little bit larger than the body perimeter so I am now sanding them both flush.
|
|

Prepping the body for the top plate to go on.
|
Left: I'm cleaning up and preparing surfaces on the top of the body so that I can glue on the top plate. It will be great to have this bass as one piece and it should look awesome. Right: I applied glue to the joint area and now have the bass in the vacuum press where I am securely gluing the top onto the body of the bass. |

Vacuum press will do a nice job of getting a good quality joint between body and top plate.
|
|

I need to cut wiring channels for bridge grounding, pickups and battery power cables.
|
Left: I need to accurately plot out the positions of the pickups so that I can cut wiring channels in the top of the body material before the top plate is attached. Right: Having calculated the pickup positions I'm now setting up on the CNC to cut a few slots in the top of the body for wiring channels before top goes on. |

Will run slots for pickup wiring and grounding, bridge grounding and battery power cabling.
|
|

Machining out inlay pieces.
|
Left: I am using spare top material to machine block inlays for the neck. I'll also do a headstock veneer with the same material and it will create a great continuity. Right: This is what the fingerboard should look like when it is done. I need to sand down the wood inserts and get them all glued in but it all looks really good so far! |

The wood inserts look good against the contrast of the black phenolic fingerboard.
|
|

Doing some calculations to establish the best locations for the two pickups and I will then mark wiring channels for pickup wires, battery wires and grounding wires..
|
Left: I have to do a little planning to establish where the wiring channels will exist under the top plate. Once I cut those I can get the top plate glued onto the body! Right: I decided that I will do the headstock and inlay with the same material as the top of the body. A lot of sawing and sanding but I think it will be worth it. |

This wood is so nice ut would be a shame not to do this.
|
|

Just finishing drilling all the side dot holes.
|
Left: Up on the CNC where I am drilling the holes into which the side dots will be installed. Probably doing an amber dot pattern close to the lighter parts of the wood color. Right: I need to decide what types of pickups to out into this bass. I am leaning towards using the more narroe J-Bass style pickups based on available space. |

Have to decide on pickup style and placement before this top goes on!.
|
|

Fingerboard finally machined and ready for inlay work then frets then side dots.
|
Left: The fingerboard is done with machining but it was a lot of work compared to its wooden cousins. I'm going to put matching wood inlay in the recesses I milled in the top. Right: I am using the fingerboard to help lay out the bridge position and establish the best placement for the two pickups. Probably using Nordstrand units. |

Establishing bridge and pickup locations will help me machine wiring channels before the top goes on.
|
|

I have prepared the fingerboard now for further operations by sanding out the machining marks and cleaning up the surface - looks great so far.
|
Left: This is the fingerboard after sanding to remove machining marks. I've never used this material before for a fingerboard but it looks really nice and clean right now! Right: I am now cutting dret slots. This material is much harder to work with than any wood I have put through this operation. Already broken three little end mills!! |

I'm slowly getting the fret slots cut. Because the cutter is so small and the material is so hard to machine I am having a little trouble with this operation.
|
|

Gluing the two carbon fiber reinforcing rods into the neck.
|
Left: Gluing the carbon fiber rods into the slots in the neck. Slightly messy job as I have to use an aerospace grade expoxy applied to the rods before they get installed. Right: I have machined the compound redius on the top of the fingerboard and in the same process established the final thickness. I just have to sand out the machining marks. |

The phenolic board has now been radiused and I just need to sand out the machining marks.
|
|

The fingerboard materiqal is being attached to a strong substrate material that will allow me to get all the machining operations done.
|
Left: The fingerboard is in the vacuum press being glued to a support piece which will allow me to do all the machining for size, radius, fret slots and inlay! Right: The material is now up on the CNC initially so that I can rough machine the fingerboard down to close to the finished thickness. When that's done I will machine the finished perimeter. |

Roughing the material blank down to just over finished thickness.
|
|

Fingerboard looks good with all the frets installed.
|
Left: Got all the frets installed and trimmed the fret ends down closer to the fingerboard edges. Next operation will be installing side dots along upper edge. Right: I'm changing fingerboards and dedication the one for this bass to a follow up project. To replace it I'm making one out of Phenolid materia, Very strong and black!! |

I decided to make a slightly more compact fingerboard at 33 inch scale based on the net position of the bridge. More on this very soon!.
|
|

I need to get the two carbon fiber reinforcing rods glued into the neck of this bass.
|
Left: I have my Carbon Fiber rods in stock so I am going to cut a couple of lengths of that and get it secured into the two slots in the neck that I have already cut. Right: Getting started on the installation of the frets. They are all slightly oversize but when I get them all in I will trim the ends flush with the edges of the fingerboard. |

Fingerboard coming along nicely - getting the frets carefully installed.
|
|

FMachining a relief for the end of the neck so that I can get the top fitted.
|
Left: Top plate up on the CNC where I am cutting out a section the same shape and size as the end of the neck so that the top plate can be fitted down onto the body of the instrument. Right: Top plate fits very ncely onto the body and neck of the guitar. I will be trimming everything to size and moving on to harvesting pickup covers. |

Top not fitted to body - needs some trimming around the perimeter.
|
|

All the shell inlay is now installed and I'll be sealing everything up next.
|
Left: The shell material has now been inlayed into the fingerboard. I need to apply some sealer to bring everything to a nice continuous surface bit looks good so far. Right: Fingerboard is now ready for for the frets to be installed. I will pre-bend the fretwire, cut each fret slightly oversize and install them then trim the ends flush. |

Fingerboard is ready for me to get started om the installation of the frets.
|
|

Fingerboard has had a set of recesses cut for shell inlay.
|
Left: I ran the fingerboard on the CNC to cut out recesses for the inlay pieces. They will be shell inserts with a very slight yellow/brown tint. Right: I'm currently working on getting the shell inserts into the recesses at the right height. I'll get them glued in and then use a special sealer to make sure the surfaces blend nicely. |

Working with the shell inlay to get everything set and flush to the top surface.
|
|

Machining a joint surface on the top of the instrument body.
|
Left: I have the bass on the CNC so that I can machine the top surface of the body and profile the heel end of the neck. This will allow me to prep the top plate for assembly onto the body.Right: The top surface of the body has been machined and also carefully profiled around the heel and of the neck. Will cut wiring channels next. |

Top surface of the bdy has been machined in preparation for the top going on.
|
|

Gluing the top plates together. Should look really nice.
|
Left: I'm gluing the two halves of the top together to create one beautiful bookmatched piece. When this is set I will rough cut the body shape and start work on getting it fitted to the body. Right: Top plates have now been glued together and I can get the shape marked out and cut roughly to size before it gets glued on! |

This material should look pretty impressive especially after the poly-resin finish is applied!.
|
|

This wood will make a very impressive looking fingerboard.
|
Left: This is the very cool looking material I am using for a fingerboard. It has an awesome grain and is very hard material but I can't remember the name/species of the wood. Right: I have trimmed the top material and now have it up on CNC for establishing a couple of clean and accurate joint faces so I can glue the halves together. |

Cutting joint faces on the top halves so that I can join them into one awesome bookmatched piece.
|
|

The grain in this bookmatched top will look very nice on this bass.
|
Left: Based on the body contour of this bass I chose this piece of wood for the top plate. Because of the upper horn the body is a little longer and this bookmatched set was a better fit. Right: The material for the top plate needs a very clean and accurate joint face cut along the edge of each piece of material. will do this on the CNC. |

Just about to machine the joint face so that I can join these two pieces into one awesome bookmatched top..
|
|

Gluing was successful and I will now add the other body half..
|
Left: This is our bass with the upper body half now permanently attached. I'm preparing surfaces to go ahead and attach the lower body half so that it will look like a real bass! Right: The second body half is now attached and I can now get some of the shaping and carving done. Will also be cutting the fingerboard soon. |

Nice to get the second half of the body onto the core section.
|
|

Headstock thickness has been machined. Just needs some hand carving now.
|
Left: I used the CNC to cut the thickness of the headstock leaving an un-machined area where I will carve the neck volute. I didn't want to do this after the body halves were attached. Right: Attaching the upper body half to the core section of the bass. It will soon look like a real bass guitar! Will attach lower half as soon as this is done. |

First of two body halves being glued onto the core section of the bass.
|
|

I'm anxious to get the body parts onto the core and make this look like a real bass!.
|
Left: Testing the revised body halves on the core section. Couple of small adjustments then I may add some decorative veneer and get these parts glued together! Right: I have now glued on two contrasting decorative veneers to the joint face of each of the body halves and they are ready to be attached to the body. |

Added veneer pinstriping to the joint faces - now have to glue the body halves onto the core.
|
|

Getting closer with the shape of the body halves.
|
Left: These body halves are closer to the final body shape for this bass. They still need some machining and sanding before I assemble everything. Right: I had a quick setup on the CNC machine to accurately cut the joint faces on each of the body halves. I'll add a couple of decorative veneers and add them to the body core! |

Body halves are ready to go onto the body.
|
|

Some nice Amboyna Burl for the top.
|
Left: Top is going to be Amboyna Burl wood which goes well with the color of the fingerboard. I need top saw this big piece into two bookmatched top plates. Right: I'm doing some spindle sanding on the body parts to refine the body shape and yield the best body width when attached to a 6-string neck-through core section. |

Doing a little sawing and sanding to get the body parts looking right.
|
|

Working on getting the headstock shape established.
|
Left: I'm using a 6-string headstock template to establish the outline of the headstock on the instrument. I can then go ahead and machine/sand to the finished perimeter. Right: This is my end result as a choice for fingerboard. Not sure of the species but it is hard stuff and should work out fine and look really nice. |

Fingerboard (unknown species) is going to look really nice.
|
|

Core section almost done. With all the fancy laminates it will look AWESOME when the finish is applied!.
|
Left: The truss rod slots has been machined into the core section of the bass and I have the truss rod avaiable in stock. I'm going to refine the body components of the bass and choose a top material! Right: This is the rough concept for the body although it could easily be something else. I'm looking through my stock of top materials! |

This bass deserves a beutiful top and headstock veneer. Will update.
|
|

This is a really nice piece of Gabon Ebony which I may cyt for the fingerboard..
|
Left: I have a very nice piece of Gabon Ebony as a potential fingerboard for this bass. I'm also looking at the body halves to see what works best. Right: I'm looking through my stock of fingerboard materials. I'm tempted to put a super dark black phenolic fingerboard on this beast. Could do some nice inlay on something like that! |
Body halves nect to core to see what thsi bass will look like.
|
|

Core section ready for more work - looking at sides and top plate now.
|
Left: This is the surrent status of the core section. All laminates done, CF and truss rod slots established. Sides top and back machined. Right: One of the nice features of this bass is its decorative pinstriping between the various tapered wood laminates. You don't see this on many basses! |

Detail shot of the pinstriping that went into the construction of the core section.
|
|
Body halves nect to core to see what thsi bass will look like.
|
Left: Although I have been tempted to make this bass a multiscale headless I decided I'll keep it pretty generic and make it a standard scale neck through as originally intended. Right: I'm getting things prepped to get this core section up on my CNC to establish some of the critical dimensions. |
Body halves nect to core to see what thsi bass will look like.
|
|

These are the components I have so far.
|
Left: I'm statring on the machining of the neck section. Just comleted surfacing the top and now moving on to headstock and body angles. Right: All the core machining has been done and I just wanted to take a photo of the bass with the body halves next to it to show what it might look like closer to completion. |

Body halves nect to core to see what thsi bass will look like.
|
|

These are the components I have so far.
|
This photo shows the center core of the bass and the upper and lower body halves. I need to get the core up on the CNC so that that I can establish the final width of this 6-string bass and having done those operations I will be able to attach the upper and lower body halves and have a more complete looking instrument. I still need to get hold of a suitable top for this bass and that will really define it's appearance and character! |
|

The two body halves ready for assembly onto the core.
|
These are the proposed body halves for this bass which are made of Mahogany and already have joint faces machined and decorative veneers added to each. I am planning to get the rest of the core section machined to a condition where I can get these body halves attached and we will have a more complete looking instrument. I still have not decided what the top material will be but I will choose something that looks very impressive. |
|

Adding some extra material for the headstock area.
|
I'm gluing a couple of additional pieces of Curly Maple onto the end of the core section to allow for the wider parts of the headstock area. We will have a pretty stramlined headstock on this bass but it will probably need a little of the extra material at its widest points. Ultimately these will be a maple veneer on the headstock which will match the body in tint color and wood grain. Next will be some machining on CNC. |
|

Core assembly now complete and cleaned up ready for further machining.
|
We now have a completely assembled core section for our bass which has been cleaned up and fully prepared for the next stage which will be some extensive machining on the CNC. I need to select suitable materials for the body halves so that I can keep work moving forward on this instrument. In the meantime I'm going to glue some additional curly maple onto the headsock area of the bass to allow for the headstock geometry. |
|

Last of the seven laminates being glued together.
|
This photo shows the last of the seven core laminates being glued and clamped together. I will now have a complete center section for this bass which will require a couple of maple "ears" to add width to the headstock area then proceed to the CNC for some machining work. Always feels good to get all the laminates for a bass core together - seems like it takes forever because there are upwards of 12 gluing operations! |
|

Getting the last two laminates glued into the core section.
|
In the process of attaching the final two laminates to create our 7-piece neck assembly. I have been working on a body template so I will be able to select some woods to create the upper and lower body halves. Also this bass will have a slightly custom headstock geometry which should really compliment the instrument as a whole. We have some interesting ideas on the top material and the final color of the bass - gonna look nice! |
|

Center 5 laminates glued - only the outside pieces to go!.
|
This is the core of the bass with the Sapele laminates attached. We are now 5 laminates assembled out of 7. So far things look very good. Core seems lightweight and resonant already. I'm going to trim the 5-pc laminate combination a little to bring it closer to finished sizes and then glue on the outer two Maple laminates to complete this part of the instrument. As soon as it is assembled I will start machining! |
|

Now have 6 of the 7 core laminates completed and ready for assembly.
|
Moving along with the veneered laminates - I have 6 out of the seven laminates ready for gluing and the remaining maple side laminate is having its darker wood veneer added. As soo as I have an opportunity I will glue the neck two pieces onto the assembly and we will soon have a 7-piece laminated core that we can start machining. Getting these veneers on is a little tome-consuming but well worth it for the look of the instrument. |
|

Gluing the third of seven laminates together to create the core of the bass.
|
I have already started on the assembly of the core section of this instrument but l don't need to document every glue joint. In this photo I am gluing the third of seven laminates together (wenge) so things are moving along fairly well. As soon as the sapele pieces are ready the will get veneered and go onto the assembly next. This will be a nice looking core and should have great rigidity and resonance and produce great sound! |
|

Outer maple laminates just off the Sander.
|
Trying to stay ahead of the machining process so I sanded both sides of the outer maple laminates. I don't need to machine these outer pieces to a taper so that helps me move along. I will have to add a contrasting veneer to the joint face of each piece but when that's done they will be ready for assembly when I get the preceding 5 laminates glued together. These are very nicely figures pieces of maple which will take color very well! |
|

Sapele laminates ready to be machined.
|
I sanded both sides of the SapeLe laminates and then ran each through my bandsaw to remove some of the excess material. After sawing they were only about .075" oversize which just leaves enough to clean up at the fat end. Both laminates are secured to the adjustable part of the table and I have set thetable to the correct angle to get started on the machining which will create the finished tapered laminate. |
|

Gluing Maple veneer onto the Wenge laminates..
|
I have machined both wenge laminates to the correct tapers and cleaned up the machined surfaces ready for the addition of maple veneer on both sides of each piece. In order to get the earliest possible start on assembling the neck I am now adding the maple veneer onto the sides of these Wenge laminates. This will allow me to start creating the neck and core of the instrument while I am preparing other laminates for the same process. |
|

Wenge laminates now getting machined to their respective tapers.
|
The two wenge laminates are now set up on CNC and ready to be machined down to the correct tapers. I do these in pairs so that the thicknesses between the two are very consistent. Once they have been machined I will be applying a maple veneer to each side of both of these pieces and that will allow me to start assembling the core section from the center outwards. It will be nice to see this take shape. |
|

Trimming Wenge laminates a little closer to finished size.
|
I have the two Wenge laminates rough sawn and now sanded. They are now ready to be machined to their appropriate tapers but before I set them up in the CNC I thought I would saw off some of the excess material to speed up the upcoming machining process. I will now get the two pieces set up on the machine. While this is going on I an busy sanding the Sepele and Maple core components to follow. |
|

Center laminate now cut and ready for veneers.
|
This is the heart of the bass - the center laminate of the core section which has now been machined down to its prescribed dimensions (hard to see in this photo). It is now ready for veneering so I can go ahead and get the dark veneers glued onto both sides of this piece while I am busy cutting the other tapered sets. Next up will probably be the two Wenge laminates so that I can start the assembly of the core once they are veneered. |
|

Starting to cut a taper on the center maple laminate.
|
I have run the core laminates through the drum sander and the next operation is to start the actual machining process which will trim each of these laminates down to a pre-determined taper. In this picture I have the center lam of curly maple in the fixture and have just started cutting material on that piece. Once it's machined I will also do the same operation to the pairs of Wenge and Sapele laminates. |
|

Sapele Laminates have been cut.
|
This maple laminate is the center strip of the seven laminates that will make up the core of the bass. I have sanded it and it is now next up on the CNC for machining to a suitable taper. I have a vector drawing of the bass on my computer where I have calculated the best taper sizes for each of the seven laminates. I will do the center one on its own but all the remaining ones will be done in pairs. Not far from having a complete core! |
|

Sapele Laminates have been cut.
|
These are the two Sapele laminates which have now been rough sawn and are ready for sanding on the drum sander. As with the wenge pieces. I will run these as a pair so that the physical sizes match. The 7-piece core will run from light to dark (Maple, Sapele, Wenge, Maple, Wenge, Sapele, Maple). With three maple laminates in there we will be able to introduce the color tint of the front faces onto the back of the bass too! |
|

Sanding the laminates so that they are ready for machining.
|
I am now sanding the sides of the wenge laminates so that they are ready for machining when I get a chance to run then on the CNC. When they are cut on the CNC they will be exactly the same size and same thickness. The goal at the moment is to get all these laminates machined so that I can add decorative veneers and get the core section glued together. Once I have that in my hands I can start machining! |
|

We now have 5 of the 7 laminates for the core of the bass.
|
Just a quick update to show that I now have five of the planned seven core laminates rough cut and ready for sanding. All of these pieces are still the original thickness of the wood plank they were cut from so consequently they are also all somewhat oversize in thickness. I'll sand both sides and then establish final thickness for each piece when milling the tapers on the CNC machine. Looking good so far! |
|

Setting up to cut the center cur;y maple laminate.
|
I am now marking out and cutting the third maple laminate for the core assembly. I have some really nice curly material on hand so that has two benefits for this bass. One that the grain will look really attractive on the finished instrument and the other that it will take on the color tint of the instrument finish really well. Current concept is that we will use a purple or violet trans tint front and back - should look awesome! |
|

Two of the Maple Laminates have been cut.
|
Here are two of the three Curly maple laminates rough sawn from stock. I will probably use these two as the outer laminates since they came from the same board and share very smilar frain features. I have another piece that I need to sand and once that's done I will cut that too. After that I will mark a coupel of Shedua laminates using my template and get those ready too. The combination should be awesome! |
|

Getting the maple laminates ready to cut.
|
I have three maple laminates to cut out of my curly maple stock material. I want to keep things moving along on this project at a good pace. The curly maple has a lot of nice figure in it and is good for predictable tone! I'm just about to rough saw three maple laminates and as soon as I have done that I need to cut two more laminates from my Sapele stock. I have a beautiful top for this bass coming from Canada which I'll post here soon! |
|

Got the two Wenge laminates cut out.
|
The template was a big help to getting the laminates cut. I didn't want to use an old one because of the slightly extended scale length of this bass. So far I have the two Wenge laminates cut out and I will get these drum sanded first chance I get. I will also use the template to mark out the laminates for the Maple and Sapele pieces. Should see this core section come together fairly quickly. |
|

Cutting out two of the maple laminates.
|
I am working on the rough cutting of the neck laminates and it looks like we will have three maple laminates as the primary neck material. I will also add laminates of Wenge and Sapele which will balence tone - add rigidity and look beautiful. The maple is nice curly stuff so it will look good when we add a color tint as the figure will be very evident. I should have all seven laminates rough cut pretty soon. |
|

Getting the template set up so I can start cutting raw material.
|
I didn't really have a suitable template for the geometry of this bass so I am creating a new one that will account for the scale length and the headstock. Now that I have the profile geometry I can start cutting out the component pieces of the core from the material, most of which I have now in the shop. This neck will be nice and rigid and resonant based on the number of laminates and types of wood we are using. |
|

Some of the Wenge I will be using for the core.
|
I now have the wenge for the components of the core of the bass so I will be cutting these up very soon. I want to get the core section assembled as soon as I can, plus I need to locate some nice light colored topwood - possibly Myrtle. I now have a better idea of how this bass will end up looking so it's time to get the wood chips flying! I will refine body details soon but have all I need now to get the core done! |
|

Curly Maple and Sapele wood for the core section.
|
This is a place to get started on this bass. I looked at a number of options on woods and at this point in time I am looking at two of them being Curly Maple and Sapele. Both have good characteristics for a bass neck and both are very stable woods that work together well. I suspect we will probably add a third wood - perhaps Wenge to bring the recipe to the right combination for the sound we want. More soon. |