|

Lots of sanding going on with this instrument. I'm working on the neck profile and the radius around the front and back of the body contour. Also got the control cavity cover sanded to size.
|
Left: Just finished fitting the control cavity plate and doing some more sanding on the body and on the neck profile. Should be ready for the finishing proces pretty soon! |
|
|

Checking my hardware options. I do have a complete set of chrome - Hipshot Bridge and Tuners and good quality knobs.
|
Left: I'm looking at the hardware options for the bass. I have some top quality tuners and bridge in chrome finish so might move forward with that. Will update. Right: I'm back on the sanding of the body to get it ready for finishing. Also need to sand and fit the cavity cover. Rough sanding some areas right now and then moving to finer grit. |

I'll be sanding the back of the neck and the radius around the body contours first. Once that's done I will graduate to finer grit sanding until it's all ready to go to the finisher.
|
|

I'll be working on the final shaping, sanding and pre-finish cleanup and inspection. Would love to see this one finished!.
|
Left: I am getting back to working on some of my production models. This one needs some final shaping and sanding and should be able to go to finishing soon. Right: I'm trying to decide the best finishing approach for this bass since the natural wood looks so beautiful. To keep costs down I might do a tung oil process. |

I am planning to use Tung Oil on this bass. If it's applied coreectly on wood it results in a ver beautiful finish and brings out all the character of the wood color and grain!
|
|

Working on slimming down the belly cut area and also getting to work on the back of the neck.
|
Left: I wanted to slightly enlarge the belly cut to make the bass as comfortable as possible to I removed some more material in that area, also started on edge breaks and slimming down the neck. Right: I have been sanding the belly cut in the body and also the back of the neck to get that area closer to finished dimensions. |

Lots of sanding going on to smooth out belly cut and get the neck thickness closer to finished size.
|
|

Setting the bass up on CNC to cut the two pickup recesses in the top of the body.
|
Left: The bass is being set up on the CNC so that I can machine out the two recesses for the Bartolini pickups. Tricky beause each pickup is a different length. Right: After testing the two programs on spare material I was able to get the two pickup cavities successfully cut. Bass looks a lot more complete with these features in! |

After quite a bit of work getting all the geometry right I was able to get everything machined. Looks pretty good.
|
|

Ordered a set of Bartolini pickups for this bass. I have used them before and they will sound great!.
|
Left: I decided to put a nice pair of Bartolini pickups in this bass which should give us plenty of sound to work with. As soon as I receive them I will cut recesses into the top of the body! Right: These are the actual pickups I am planning to use here. They should provide a nice clean frequency range and give this bass a great sound. |

I now have the set of Bartolini pickups for this bass. Will get started on the recesses as soon as I can!.
|
|

Working on neck thickness and curve using files and orbital sander.
|
Left: I am busy sanding the back of the neck to get the desired thickness from one end to the other. After that I will refine the cross-sectional curve and body joint. Right: In this photo you can see that I have machined the hole and recess for the Neutrik output jack assembly and drilled and counterbored the holes for controls. |

Nice to get these output plug and preamp control fatures taken care of. Bass will have an Audere 4 band preamp with three stqcked pots.
|
|

Very nice to get the tuner holes drilled. This bass is getting close to completion and ready for the finishing process.
|
Left: I got the five tuner holes drilled through the headstock and I can now spend a little time shaping and sanding everything to their final sizes. Right: I'm getting ready to calculate the positions of the two pickups and get things set up to run a program to cut out the two pickup cavities in the top of the body. |

Plotting out the two pickup cavity positions. I will get these machined asap.
|
|

Headstock looking good after shaping. I will grind out the overspill glue in the truss rod cover recess.
|
Left: I marked out and carved the profile of the headstock and that looks pretty good. Need to machine the back side of the headstock to finished thickness. Right: I have marked out the locations for the tuner holes on the headstock. I will get these drilledso that I can have one more feature established on this bass! |

I am now ready to drill the five tuner holes through the headstock.
|
|

Got all of the machining work done to the headstock veneer so that it can be attached to the instrument.
|
Left: Headstock veneer has been drum sanded down to thickness, then machined to remove truss rod cover. The TR cover has also been engraved in the Laser to establish the logo. Right: Headstock veneer now part of the instrument and looks great. Next I need to carve the profile of the headstock to finish this part off. |

Hearstock veneer is now glued ontp headstock - some shaping coming up!.
|
|

This material will finish off the matching wood between the body, nack inlay and the headstock.
|
Left: This veneer will look great on the headstock. I am just about to rough saw it and run it through the drum sander to create the ideal thickness. Right: The headstock veneer has been rough cut and Will soon be going onto the instrument. First I will drum sand it down to its final thickness then will cut out the truss slotr cover. |

This piece should look really good on the headstock.
|
|

Doing some rough grinding to remove excess material.
|
Left: I sanded the belly cut to a slightly larger size for comfort. While I was at it I sanded more material off the back of the neck too. Right: I located a piece of lacewood that I will probably use for the headstock veneer so that the headstock matched the inlay pieces and the top plate of the bass. Should look pretty good. |

Looking at matching material to complete the headstock veneer.
|
|

I Nice to see this bass gettinga lottle more complete with the fingerboard attached.
|
Left: Fingerboard is now attached to the neck of the bass and I can now proceed to some final body shaping and getting the headstock veneer applied. Also will be cutting pickup recesses soon. Right: I have a very nice Hipshot A-Style bridge that I am planning to use on this instrument. I will get that placed plus cut recesses for the pickups. |

Ready to get some more work done on this bass..
|
|

I am assembling all the tooling to get the fingerboard glued onto the neck.
|
Left: I decided now would be a good time to get the fingerboard glued on to the neck of the instrument. I have a lot of tooling to get together as well as adhesives to have on hand. Right: Fingerboard attachment under way. I will leave this setup overnight so that the adhesives can fully cure. Will be great to have the fingerboard on! |

I had a chance to get this done because I was using the same adhesive for another project!! Hopwfully this will cure nicely overnight and I will have a complete instrument in the morning.
|
|

Good to get the control cavity into this bass, Need to co some body/neck carving soon and get the fingerboard attached.
|
Left: This is the resulting cavity which should work great and provide enough room for the electronics. I have some matching walnut from which I will make a cover. Right: This setup allows me to machine the back of the headstock to a finished thickness. This will let me carve the neck volute leaving room for the matching headstock veneer. |

The goal here was to get the headstock to a final thickness allowing for a matching veneer to be applied to the front face.
|
|

I'm making sure I locate the bridge accurately so that I can establish ground ing to the control cavity.
|
Left: I am now getting the bridge unit situated on the top of the instrument so that I can drill a hole for the grounding wiring from the bridge body to the control cavity. Right: Rather than a chrome control plate on the front I'm putting the control cavity cover on the back and have a nice clean surface on the front. |

I am now machining the control cavity into the back if the body.
|
|

Machining wiring slots on the CNC.
|
Left: Cutting slots in the top of the body for the wiring from the bridge and the two pickups. Once this is done the body will be rady for the top plate to be glued in place. Right: Top has been prepped for assembly onto the body. I'll bet the joint faced glued up and put the assembly into the vacuum press for a few hours. |

Top will soon be part of the whole instrument. Looking forward to that!.
|
|

Wiring channels will be needed for pickup wires, grounding wires and possibly battery cables depending on which system I end up using.
|
Left: I'm positioning fingerboard and bridge so that I can plot where I need to cut the wiring channels in the top of the body. Once that has been done I can glue the top plate on. Right: This is the fingerboard after the side dots were installed. It is now ready to be attached to the neck of the bass (after the top goes on). |

Fingerboard looks really nice - I'll attach it after I get the top plate glued on.
|
|

Drilling holes for the side dots on the fingerboard.
|
Left: I now have the fingerboard up on the CNC so that I can drill out the holes for the side dots. Much easier to do that now than after the fingerboard is on the instrument! Right: Text coming. Right: I'm probably going to use standard Jazz Bass style pickups on this bass. It will yield a good sound and will have a 4-band EQ system too! |

I'm sticking to standard pickups on this project (either Nordstrand or Watson).
|
|

Fingerboard has been separated from the substrate material and looks good on the instrument.
|
Left: I separated the fingerboard from the support material and it looks pretty nice on the top of the instrument. I have side dots to install and thr top and fingerboard will be attached soon! Right: I decided to make the control cavity access from the back rather than the front as I don't want a pickguard or steel plate on the front of the bass. |

I have some spare matching walnut so it will be easy to add amatching control cavity lid on the back of the bass.
|
|

Frets are now all installed and I'll be giving some thought to side dots.
|
Left: I got all the frets cut and installed. Since they had to be sute slightly oversize I trimmed the ends back down close to flush with the edges of the fingerboard. Right: I'm now gluing the two carbon fiber rods into the slots in the neck. It will create a very strong and rigid assembly. After that is will be reafy for fingerboard to go on. |

Gluing and clamping the carbon fiber rods into the neck slots.
|
|

Inserts on the fingerboard have been installed and sanded flush.
|
Left: The Lacewood inserts are now in the fingerboard and I'm hoping to get started on installing the frets very soon. These colors should look really good when the surfaces are finally finished! Right: I wanted to take a photo of how the marker inlay will match the top plate material. It will also be on the headstock. Should look good. |

This photo shows the nice continuity that I will get having the fingerboard inlay and headstock match the top material.
|
|

Machining out a section of the top to allow it to fit onto the end of the neck section.
|
Left: I am now cutting out a section of the top plate that should exactly fit the end of the neck that I recently machined. This will allow the top to fit down onto the body surface. Right: Top fits on the body nicely and now gives me a chance to sand and shape around the body to blend the top and body shapes together. |

Very nice to get the top fitted on the body.
|
|

Machining the top of the body flat and finishing the end of the beck section.
|
Left: On the CNC machining the top surface of the bass and getting a clean end to the neck section so that it is ready for the assembly of the top plate. Right: I'm gluing the lacewood inserts into the recesses in the fingerboard. Once these are all attached I'll be sanding the whole thing flush with the radiused fingerboard surface. |

Gluing the little inserts into the fingerboard.
|
|

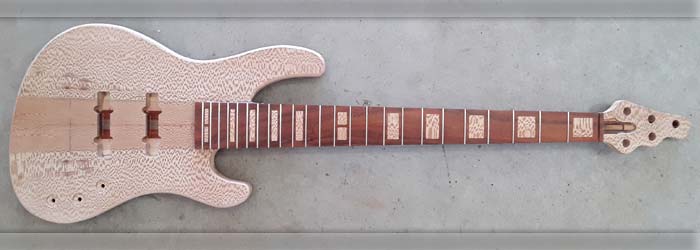
Fingerboard is ready for cleanup, inlay and then frets.
|
Left: Fingerboard machining is now done and I will be cleaning up top surface to remove machining marks and also cutting and inserting inlay pieces into the recesses I cut. Right: I cut a set of Australian Lacewood inlay pieces from the same material as I used for the top plate. I will also use this material on the headstock face. |

I'm running the lacewood up the fingerboard all the way to (and including) the headstock.
|
|

Koa fingerboard being machined.
|
Left: The Koa fingerboard is now on the CNC getting cut to its finished outer profile. As soon as this is done I'll get the compound radius done and move on to the cutting of the fret slots! Right: I have machined the outer perimeter of the fingerboard and the top compound radius. Also just completed the machining of the fret slots. |

KFingerboard moving ahead - have to decide what I am going to do about inlay.
|
|

Had to change to a Koa board - glad I had this stuff on the shelf!.
|
Left: OK - change of plan - because of a power glitch my cnc lost its reference and damaged the end of the fingerboard. I'll use the maple one for something smaller (most likely a guitar) but had to create a replacement in a big hurry. It will now be a very nice Koa fingerboard. It was a piece I have had for at least a decade and was very close to the right size. It's a beautiful color with some nice attractive grain and will look excellent on the finished instrument! |
|

Maple fingerboard should look very nice on this bass. May try to do some fancy inlay.
|
Left: I'm going to put a nice maple fingerboard on this bass with some interesting inlay. I sanded the blank and stuck it onto a support piece so that I can get it machined. Right: The outer profile of the fingerboard has been cut to size to match the neck profile. Next I have to generate a compound radius on the top surface. |

First of a few cnc operations done. Profile of fingerboard has been cut..
|
|

Did some sawing to rough out the top. I'll be working on body and fingerboard next.
|
Left: The top plate has been rough trimmed to the body shape. I will get this plate sanded and ready for assembly. Will have to machine top of body area next. Right: I'm considering making this bass a 33 inch scale which would make it very comfortable to play. Also have a nice maple fingerboard blank which I can use for this one. |

Decided to use a maple fingerboard. Also may make it a 33" scale bass.
|
|

The two halves of the top plate are being glued together.
|
Left: The two halves of the top plate are now being glued together. When it's set I will be able to shape it and prep the bookmatched top for assembly onto the body. Right: Top plate is now joined together and ready to be rough cut to the body shape. I should be able to get this top atached to the rest of the bass pretty soon! |

Top has been glued together and now waiting for a little work on the body so that it can be glued onto the instrument.
|
|

Nice to have the body on the instrument. I'll be sanding and sawing to clean things up a bit.
|
Left: This is the back of the bass with both body halves attached to the core. I can now trim up the perimeter and do some sanding to finalize the body shape. Right: I'm getting the top plate halves ready for machining a nice clean and accurate joint face on each so that I can join them together in a beautiful bookmatched piece. |

NThis is very nice looking wood and I can't wait to see it on the instrument.
|
|

Marking out body positions on core so that I glue the sides on in the correct locations!.
|
Left: Body halves are pretty much ready to be glued onto core section so I am making sure they are correctly placed and marked before the gluing starts. Right: First body half is now being glued onto the core section. Once that has set I will add the second half and we will have something that looks a bit like a bass guitar! |

Gluing the upper body half onto the core.
|
|

Back of core has now been machined in the body section. This is a finished surface which I will use to align the two body halves.
|
Left: I have now machined the back surface of the core section to its finished size and parallel with the reference surface I cut on the front side. Ready for body halves. Right: I'm checking and positioning the two body halves against the core section with the scale length and bridge position in mind. Should look good! |

Body halves pretty much ready to be attached. Just working on marking their optimum locations.
|
|

Starting to look like a bass with the sides in place.
|
Left: Testing the sides against the machined core section to establish body thickness and the exact linear positioning of the two body halves on the core section. Right: Core of the instrument is up on the CNC so that I can machine the back surface. This gives me a reference against which I can glue the two body halves onto core. |

SMachining the back body surface of the core section.
|
|

Right in the middle of several machining operations on the core.
|
Left: I'm in the middle of machining the outside perimeter of the core section with the string spacing at the nut and bridge in mind. Next will probably be headstock angle surface. Right: This is the core section all machined with truss rod slot and two carbon fiber rod slots already established. Will get sides on soon. |

All the features for the neck have been machined.
|
|

Body halves now waiting for the core section to catch up.
|
Left: Body halves have been pre-assembled and I just finished machining both joint face areas so that I can glue these pieces onto the core section as soon as it is ready. Right: Set up on CNC to cut a few surfaces including the neck/core width. I'm using this setup to establish a few J-Bass standards for similar future work. |

Working on machining the neck surface and core dimensions on the CNC.
|
|

Nice figured Walnut for the backs of the instrument.
|
Left: Since I have a Walnut laminate in the center of the neck core section, so I decided to use some walnut I had in stock for the backs of the body wings too. Right: I have one of the body halves of this bass in the vacuum press being glued together. I'll get the other half done too and I'll be able to machine these and fit onto core section. |

NGot started on gluing body parts together.
|
|

This wood came out looking nice - and it will be even more dramatic with a finish applied to it.
|
Left: Now that the top is split and sanded I have to decide which of the two ways I should bookmatch the material. Both look pretty good. Will compare with a body template. Right: I needed some material for the body wings and I had some slightly spalted Alder in the shop which will work prefectly well for the job. Not too heavy! |

I'm using some Alder for the center secion of the body halves.
|
|

Getting ready for a marathon bandsaw job to split the top plate.
|
Left: I decided to use some wood for the top plate I have had in the shop for years, not sure what it is, but could be Granadillo. Very nice grain. Right: I got the board cut down the center and I am now in the last stages of sanding both sides of each panel to create a very nice bookmatched top plate! Should look great! |

Once this material is sanded flat ths grain should look really good.
|
|

Attaching extra material on headstock.
|
(2/24/18) Right: I am now gluing some extra material onto the core to make room for the headstock geometry. I'll trim this up so that it's ready for machining. (2/29/18) Right: Neck/core now ready for machining. It will go on my machine as soon as there is a space in the schedule. I will be working on the body in the meantime. |

Core ready for some machining on the CNC.
|
|

All the core laminates have been cut.
|
(2/15/18) Right: Machining of the two Padouk laminates is almost complete. The chips and dust from this wood is messy! When they're done I can start assembling. (2/16/18) Right: The core laminates have now been glued together into one assembly and cleaned up on the surfaces. Looking like an instrument already! |

All the core laminates have been cut.
|
|

All the core laminates have been cut.
|
(2/13/18) Right: Starting on the cutting of the laminate tapers. The center Walnut piece has just been machined to size and ready for assembly. (2/14/18) Right: Next up are the two Padouk laminates which I am machining together since they will be exactly the same size. Once these are machined I will start assembling the core. |

All the core laminates have been cut.
|
|

Cleaned up the center laminate so that I can get it machined to its tapered profile.
|
Left: Back intop this bass and have a plan to get it comleted soon. Just ran the center laminate through the drum sander to clean up faces. Will now cut to prescribed taper. Right: I also spent some time sanding both sides of the Padouk laminates as they will soon need tp be attached to the center laminate. |

The two Padouk laminates ave been sanded nice and flat so that I can machine their tapers in the very near future.
|
|

Working on the scale drawing for the maincomponents of the bass.
|
This is my master plan for the basic components of this bass and its structure. I'm currently fine tuning it to come up with the best laminate thicknesses at the front and back of the instrument so that everything fits and looks the best it possibly can and also so that I have physical dimensions to work to in cutting each one of them prior to assembly. These will be spending a little time on my CNC machine to have the tapers cut. |
|

All the core laminates have been cut.
|
I have been working away in the background to get the rest of the core laminates cut to the template profile and ready for the next couple of operations. In this photo you can see that I have the Maple and Padouk laminates all cut and I now need to get these tun through ny drum sander and thereafter up on the CNC to have the laminates cut to their tapered shapes. That in turn will allow me to start work gluing the parts together. |
|

Some nice curly maple for the stringers.
|
These are the two Padouk laminates which will be part of the core of the bass. They are currently rough sawn based on my template and will soon be getting drum sanded and then machined to pre-determined tapers so that I can get the core of the instrument assembled. There will be quite a bit of work getting everything cut to the right tapered profiles since we have 7 laminates but the end result will look awesome! |
|
Two of the three walnut blanks - these are the two outside ones.
|
I cut out the two outer laminates that will be part of the core assembly of this bass. Everything is suitably oversized right now so that I can get everything glued together and cleaned up ready for machining. I will also be cutting corresponding pieces of Maple and Padouk to complete the seven laminates that will combine to give us the core of the bass. After that I will review body design and get the body parts under way too! |
|

Template for the cross section of the instrument.
|
I have created templates for the cross-section of the proposed bass and those should allow me to get some basic materials cut and prepped for the instrument. I will leave them a little oversize so that if we decide to alter dimensions we should have some extra material to allow for that. The goal for me right now is to get the basic pieces together and create the assemblies so that we can keep the project rolling forward! |
|

Rough idea of what my customer has in mind for this bass.
|
We have been discussing ideas for the design of this bass and this is one of the styles we are interested in using as inspiration. I would definitely change it around enough to make it unique but at least it gives us a general idea. I'm collecting materials so that we can move things ahead as soon as we settle on a body style and configuration. No matter what - we will have a goal to make it look and sound amazing! |
|

This i sthe walnit that will be the outer edges of the core section.
|
I got hold of some very nice dark and consistent grained walnut for the outer layers of the core section we will be building for this bass. This combined with the Curly Maple and the Padouk will create a visually impressive core section and one that will combine to create a great tonal range too. Although we are still working out design details on this bass I know it will end up being a very impressive instrument! Can't wait! |
|

Now have Padouk for the core section.
|
I purchased enough Padouk to create the stringers all the way through this bass. I will have Walnut here very soon for the remainder of the core materials. I also want to work up a template suitable for this bass so that I have a reliable reference for the profile shape based on our choices of body style and headstock shape and angle. Once that is done I will cut out all the 7 blanks and get started on the manufacturing work! |
|

Some nice curly maple for the stringers.
|
This is the curly maple I will be using for part of the laminate structure of the core section of the bass. Maple is a great ingredient because it tends to add a good amount of upper end frequency resonance in the instrument. It's always easier to dial out the high frequencies than to try to dial them in! I have most of the core sectionmaterial on hand, just need to check with my customer on some of the construction details! |
|

Walnut, Maple and Padouk - nice looking combination.
|
Getting started on what will be a very impressive and unique bass. I had a meeting with my customer and we decided that although top material and fingerboard materials were still up for discussion, the core section should be a combination of Maple, Walnut and Padouk. This will provide a well balanced assembly for good tone, sustain and rigidity. This is a shot of a recent bass I built using the same formula for the core. |