
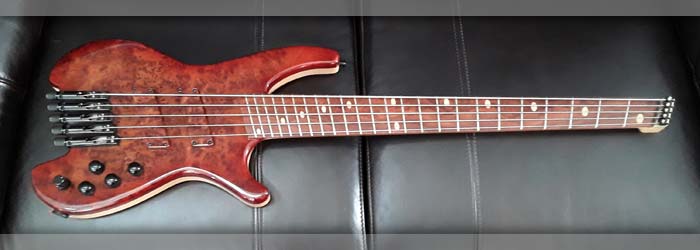
I am happy that the home made string retainer using the ABM clams worked out in the end. Payed the bass this evening and it has LOTS of different tones built into that Nordstrand setup!.
|
Left: Headstock fits nice and snug in the top of the case. Once I got the strings tightened up I snipped them off flush with the end of the retainer. Will get more photos. Right: Back of the bass with the covers on. The whole instrument looks very nice and has a lot of active & passive sound options built into that Nordstrand preamp! |

Took a pic of the back of the instrument while I was getting things ready for packing in its case and being ready for its customer.
|
|

Doing the late shift working on the last few details and we'll be DONE.
|
Left: All the physical setup work is done. Since I have to visit my electronics guru in Palm Desert tomorrow I am bringing this bass with me to get his final blessing on the electronics setup. Right: Mark confirmed electronics are doing their job and I am back to the finishing details and testing everything out before I call it complete! |

Fitting the bass in its Protec case - just made it on this bass in a GUITAR case!.
|
|

Just making sure I have shielded everything on the bass and may do a quick modification to the battery cover to make it easier to remove. Got sound out of it today but need to check preamp manual to make sure all these inbuilt features work!
|
Left: Final inspection on back. I'm going to add a little finger access to the battery cover to make it easier to remove. Played the bass today and got sound - need to figure out preamp controls! Right: Replacing strings after a little fret leveling and polishing and the application of fingerboard sealant/conditioner. Nice bass!!! |

Should be the last time I have to remove strings - just leveled and polished frets and added conditioner to the fingerboard wood.
|
|

Strings are on and the bass is in a condition where I can test out the pickups and preamp options.
|
Left: Bass looks much better with the strings on! Apologies for the dust - it will get a good clean when all the setup is done. Ready to sound-test everything next. Right: I did eventually get the nut set where I wanted it so I will do a little cleanup here - trim off the ends of the strings and move onto bridge and truss rod adjustments. |

Finally got the nut slots done - more work than a standard bass because of the proximity of the retainers but seems looks like this part is done.
|
|

Has to do a few engineering adjustments but seems like everything is working as planned. Strings are going on for testing..
|
Left: I had to raise the retainer assembly a tiny bit to make it easier for the strings to pass from the nut through the ABM clamps. I think everything is good to go now. Right: Got all the strings on and will be in setup mode next to make sure everything works as expected. I can also go ahead and test electronics systems. |

All strings on - fine tuning nut and will be making many other adjustments.
|
|

Getting very close here - I will have the nut finished and string retainer assembled soon plus I'll be able to get the strings on and test out the preamp etc..
|
Left: Now re-inatalling the string retainer baseplate. I will be using the strings to determine the best depths for the slots in the nut and will then add all the ABM string clamp units. Right: Got the set of Kalium strings out and I am working on getting this bass strung up! I am re-assembling the string retainer hardware as I go. |

Working on getting the strings on the bass. Almost done.
|
|

I cut and installed the nut and will be shaping the top surface and establishing the string slots.
|
Left: Nut is now installed and I will be cutting the five string slots into it and blending everything in nicely. After that I can assemble the entire string retainer assembly and get the strings on! Right: Nut has been shaped and I am now marking out and filing the five string slots into the nut. Once that's done I can attach retainer hardware! |

The not is now having its string slots established. They'll be finshed for depth once the strings are on.
|
|

Just drilled mounting holes in the retainer so it can now be attached to the headstock area.
|
Left: This is out little piece of string retaining technology right before it goes on the bass. I drilled four countersunk holes so that it can be firmly attached to the neck wood below. Right: I drilled the holes in the headstock (very carefully) and I am now in the process of installing the string retainer block into the headstock. |

JHeadstock has been pre drilled with pilot holes and I am now attaching the retainer block. So far so good.
|
|

Got all five of the ABM units secured on place. Now to get the securing holes drilled.
|
Left: Quite proud of this assembly so far. All the ABM parts fitquite solidly in place. I want to either paint the brass or add a film of black material to make it all blend. Right: I added the knobs to the cobtrols and the bass is looking really nice! I am anxious to get the strings on so that I can do a sound test of the preamp system. |

Black knobs have been added and I am currently working on the final details of the string retainer attachment.
|
|

String retainer block almost complete - I'm cleaning up the surfaces and will add two holes for attachment to the neck.
|
Left: getting there - this is the block with one of the ABM string retainers sitting on it. Almost done machining it all and it will be attached to the bass very soon! Right: I had to do a bit of work to the retaining screws but finally succeeded in getting the first of the five ABM units bolted in place! I'll find a way to make that brass black too. |

It's been quite a lot of detail work but I was able to modify the screws to successfully bolt the ABM retainers in place. There's nowhere you can buy assembles like this so they have to be custom made.
|
|

PLate perimeter is machined out and I now have to establish three sets of holes.
|
Left: Part way through the manufacturing of the baseplate for the string retainer assembly. This plate will only be about 3/16" thick and the ABM parts will be bolted onto it. Right: Got the main set of holes drilled in the retainer plate. Next step is to tap threads through the larger set of 5 holes and remove the plate from parent material. |

Main set of holes has been drilled. Will now tap the threads into the retaining holes. Lastly I will drill two holes for screws that will hold the whole thing onto the headstock area of the bass..
|
|

Working on the arrangement of the ABM string retainers and getting a couple of programs done to do the work.
|
Left: This is the layout based on the geometry of the ABM string retaining units. I am busy writing programs and choosing cutters so that I can get this task done. Right: First stage in the retainer assembly is to clean up a reference surface. I will now cut the outer profile of the plate to a little deeper than needed. |

This plate will serve as a location plate to attach to the headstock. It will also provide threaded attachment holes for the ABM units.
|
|

Have all the critical dimensions drawn out so I will be assembling the components next.
|
Left: My last jobs on this bass will be at the headstock end where I will be adding a nut and a set of string retainers. Going to try and incorporate the german ones I bought. Right: I have a brass bar on the CNC from which I need to machine a string retainer baseplate. Once this is cut and drilled & tapped etc the ABM retainers will fit into it. |

This base plate will hold the five ABM string retainers. It's basically my last job on this bass and should no present too many problems.
|
|

A little bit of work but I got all the pots installed, output socket installed and wired up and cleaned up the mess of wiring to make it took neat and tidy.
|
Left: Pots have been switched and wiring has been competed and tidied up. It's a fairly busy but well organized control cavity. Can't wait to try it out once the strings are on the bass! Right: I fixed the magnets into the inner faces of thetwo cavity covers and now they both snap in place without the need for ugly screws! |

Cavity covers have now been fitted with their magnets and can be installed on the back of the bass.
|
|

Just being careful to connect numerous wires to the correct places, shortening some of them that are way too long, and getting the output plug connected to everything else.
|
Left: Connecting up several components in the cavity right now - all of which need to be done in a certain order so that the wiring is manageable at the end! Almost done with this part! Right: OK, My mistake - found that the stacked knob for bass/treble, which is slightly taller than all the other knobs, got in the way so moved it to the end. |

I swapped the two-frequency push-pull mid control with the stacked treble/bass control. The stacked pot slightly restricted easy access to the other four non-stacked controls. Feels much betted like this.
|
|

Just a quick illustration of what the controls do and how they are most likely to be arranged in the cantrol cavity.
|
Left: Based on Nordstrand wiring and preamp features I am probably going to wire the controls up this way. May swap Tone and Mid controls but don't really want to mess too much with existing wiring. Right: I had to connect the wires from the two pickups first before installing the pots, they aqre now connect to the blend pot and the ground. |

Got the pickup wires connected and tie-wrapped inside the cavity. Now adding the pots with the longer cables and the wires that run to the output jack assembly.
|
|

Starting with the battery power connector and getting that run to the control cavity.
|
Left: I have the battery power connector attached to the wiring that runs through the body to the control cavity. These will eventually be connected to the preamp power input and to the ground. Right: In the middle of installing and wiring up the preamp. Hardest part is making sure everything fits without putting stress on the wiring. |

Installing output plug, preamp components and required wiring etc.
|
|

Adding recesses in the top for the nut and washer on each pot. Will also make the bottoms of the knobs more flush with top surface!
|
Left: Turned out the threaded areas of the preamp pots were just a little short so I decided to recess the pot retaining screws and knobs to resolve that. Will look better anyway! Right: OK, recesses done. They cut nice and clean and I sealed the exposed bare wood so I can now proceed with the preamp installation. |

Recesses fopr knobs has been successfully done and I will now be moving on with the preamp system install.
|
|

Bass looking a lot more complete with tuners and pickups installed. Moving on - I need to get the string retainer assembly and the nut done next.
|
Left: I now have all five tuners permanently installed and I was also able to get the two pickups installed in their respective cavities too. Bass is looking really nice! Right: Wiring under way so that I can get the pickups, grounding, power, preamp and output jack all connected together. I;ll need to do one pot at a time and shorten wiring. |

Internal wiring process is started. More on this very soon!!
|
|

Now working on the placement of the holes for the five grounding wires.
|
Left: All the tuner holes have now been established. I removed the outer two so that I could calculate where I need to drill the holes for the grounding wires that will connect each tuner to the cavity ground. Right: Got my ground holes drilled for the tuners and also ran wiring from each unit through to the control cavity. |

Grounding wires for the five tuner assemblies has now been established and I can permanently mount the five tuners.
|
|

The outer 2 tuners are the most critical. Got these attached and will now work on the center three.
|
Left: I attached the outer two tuner assemblies and with thise secured I can get the center three units evenly spaced. I will repeat the process at the backs of the tuners. Right: With the outer two tuners secured I am working on the inner three to get their spacing and relative positioning set and the screw holes marked out. |

Working on positioning of final 3 tuners. Once they are set I will do that individual grounding and this part of the work will be done.
|
|

Pickup recess grounding done. Now working on the 9v power supply.
|
Left: I added grounding wires that connect the shielding in the two pickup recesses to the cavity shielding. Now also running wire through body for the power supply for the preamp. Right: Time to very carefully place the tuners for spacing and scale length and mark out the retaining screw holes and the holes for grounding connections. |

Being very careful to mark and drill so that I can get these five tuners attached to the top of the instrument.
|
|

I made two paper templates to fit the cavity recesses and then dropped magnets on them. The magnets automatiocally bond with the ones in the body. I then mark the positions and flip the paper over on the lids to mark the magnet locations.
|
Left: I needed to make two templates so that I can accurately place the magnets on the undersides of the two lids accurately. One more job out of the way!! Right: Got the control cavity fully sealed with copper shielding which means I can add the grounding wires and move on to installing some of these preamp components. |

Control cavity is now fully shielded. I have grounding wires from pickup recesses and the 5 bridge/tuner units to set up. Then I will run battery power through the body from the battery recess..
|
|

Pre-drilled the control hole positions so that I can verify everything. All being well I will open them up to the diameters that suit the potentiometers.
|
Left: I committed to the hole locations and went ahead and drilled each center with a small drill. This leaves me a little adjustment latitude if I want to move any of them slightly. Right: The 5 control holes have been established at full size and ready for pots. Also marking out tuner positions on the body so I can get ground wires established. |

I got the five control holes to finished size. I'll probably do the copper shielding in the control cavity next and also get the grounding wires from pickup recesses through to the common cavity ground.
|
|

The inter-connected stacks of magnets allow me to place pot positions on the outside based accurately on inside space restrictions.
|
Left: I decided to use two stacks of neo magnets to allow me to co-ordinate inside and outside hole locations. I'll work through all the positions and that should be fairly accurate! Right: Re. control layout - my best plan. Volume, Blend, Mids, Treble/Bass(stacked) & Tone (lower center). This would keep them far enough apart for comfort. |

I think this distribution would look best from the front of the instrument and stull be functional inside the cavity.
|
|

Controls need to be arranges in a logical order. I'm thinking Volume, Balance, Treble/Bass, Mids and then Passive Tone.
|
Left: I made cutouts of the potentiometer assemblies at actual size so that I could get a start on the instrument layout inside the control cavity. Spacing needs to be accurate as it needs to look good on the front! Right: The five neo magnets have now been installed into the two cavity recesses. I'll add mags to the two covers also. |

Neodymium magnets installed for the two cavity covers.
|
|

It can be done - it's just a lot of hardware and I will need to be very careful about placement of everything. More news on this soon!
|
Left: The Preamp has a module and five fairly complex potentiometer assemblies and a lot of cabling. I'm looking at the logical layout and best use of the internal space so I can get these all installed. Right: I worked on the jack socket recess overspray to get the hardware to fit and got the two strap lock buttons attached to the body. |

Neutrik jack soccket is now fitted and the strap locks are on.
|
|

NGetting this job done late in the evening so that the glue can dry overnight.
|
Left: Just gluing a couple of wood plugs into the two areas. When glue is dry I will level everything off and we'll be back to normal!! Testing tuner placement while that's going on. Right: Got the screw areas fixed so that we can have a full thread in those two positions, got that all cleaned up and also go the copper shielding installed in recesses. |

Repairs on recesses complete and the copper shielding in now installed. Moving on..
|
|

I cleaned out the holes and recesses in both covers so that they are ready to go into the bass.
|
Left: Pickup covers are ready for the bobbin assemblies so I will be assembling those and getting them ready to be permanently attached to the bass as soon as I get copper shielding in the recesses. Right: As luck would have it - two of the pickup screws aligned with the end of the string recess I cut. Gonna have to do a small plug job. |

Not a big deal - I just have to drill and plug so that those two pickup screws get a full length of operating thread.
|
|

This is the battery area where I will be installing two magnets. Also will install 3 in the control cavity area.
|
Left: Magnets are going into the cavity recesses and the backs of the battery and control cavity covers. This will fit the two covers firmly in place on the back of the body. Right: I just recently picked up a Protec Contego case for this bass. Because it is a fairly compact and headless bass, it actually fits in a GUITAR case! |

These Protec Hybrid cases are strong and light and I really like them.
|
|

Working on grinding out excess finishing resin from the recesses in which the covers will fit.
|
Left: Started work on the cleanup of overspray in the back cavities. Should not take long I just have to grind the excess out very carefully. When done I will get the copper shielding in there. Right: Now installing strap locks which gets one more assembly task done. I will also be drilling and installing neo magnets in cavities for lids. |
Working on grinding out excess finishing resin from the recesses in which the covers will fit.
|
|

Neck pickup recess required a lot of cleanup inside until I was able to fit the cover in place. All good now..
|
Left: The bridge pickup cover fit in just fine, but I had to work a lot to get the neck pickup cover to finally fit into its recess! Anyway that is now done so moving forward! Right: I will be installing the pickup bobbins into the pickup covers soon so just making sure these fit nicely together. Will probably take care of the retaining screws first. |

The two bobbins that we had custom wound fit nicely in the finished covers. I'll make sure the screws fit the corner holes and counterbores and when that's done these will be secured together and installed into the body of the bass.
|
|

I've had a lot of success with Kalium strings on the multi-scale headless basses.
|
Left: I have a set of Kalium strings coming designed for multi-scale basses like this. Thought I better have them on hand as we get to the end of the work on this instrument! Right: I'm ready to break out the set of black Schaller strap lock buttons that will be going on this instrument. They are not too complicated to mount into the bass. |

Black Schaller locking strap button assemblies. These are the higher end of strap lock options in the marketplace.
|
|

Waiting for the fringerboard wood conditioner to dry before moving on.
|
Left: I treated the whole fingerboard and now waiting for the first coat to dry. Next step will be grinding out overspray from pickup recesses to allow covers to fit in. Right: I'm very carefully grinding out the extra overspray in the two pickup cavities to allow the covers to fit in place. Once that is done I will line them with copper. |

I'm gringing the pickup recesses to remove about 1/32 inch overspray buildup so that covers can fit inside each.
|
|

Getting ready to do final finish on fingerboard.It will end up just a little darker with the conditioner in the wood.
|
Left: Lots of tasks to complete on this bass now - I'm getting ready to do a final finish and sealer to the fingerboard and get all the frets dressed to finished condition. Right: After carefully fine-sanding the fingerboard I'm now adding conditioner. What an awesome match in color. Will put a couple of coats of this on. |

Prepped the fingerboard with fine sandpaper and then steel wool. Now applying a protective conditioner to the Pau Rosa wood.
|
|

Back of the bass looks very impressive and all the wood colors work really well together.
|
Left: The Koa on the back looks beautiful - can't even capture that in a photo. Got the two covers to fit although some overspray needs to be removed inside (almost always happens)! Right: This pic shows some of the great Koa grain and the fact that the body is gloss and the neck is a silky smooth satin which feels great. |

The satin finish on the neck is a great feel. The whole instrument is pretty lightweight and should end up very well balanced.
|
|

The bass came out looking spectacular - they put a subtle trans tint around the perimeter which enhances both the color and the body shape. Gloss on body - satin on neck.
|
Left: I picked up the bass from my finisher today and I have to say it looks really awesome. I will be adding several photos to show it off! Colors are really nice!! Right: I also went to Nordstrand and picked up the preamp for the instrument. I will need to carefully work out the best placement for the knobs on the bass body. |

This preamp looks like a great and flexible product and I am anxious to see it installed as part of this very unique instrument.
|
|

I ordered a custom preamp from Nordstrand which I just heard was complete. I'm hoping the finisher will be ready with the bass soon so that I can get both of them in the same trip.
|
Left: Nordstrand are building me a custom preamp for this bass. It will give us plenty of sound options and I can;t wait to hear the results. Should know pretty soon!! Right: I just heard that the finishing will be complete and cured by Thursday this week so I will go and pick up the instrument AND the Preamp system all in one big trip. |

Driving to Norco and Redlands Thursday for Bass and Preamp respectively!.
|
|

Bass heading to my finisher. It will come back an entirely different animal!.
|
Left: Bass is now going to finishing and it will be getting a beautiful finish with a subtle matching translucent sunburst around the body perimeter. Gloss finish on body - satin finish on neck. Should look awesome! Right: I may (possibly) use some new hardware from ABM for the string retainers. They look good and should work fine! |

BThese string retainers are new from ABM in Germany. I ordered 5 of them in black to see if they would fit and work on this bass - won;t know till I have them here - if not I will still use my original string retainer concept.
|
|

Working on the fret ends to get them dressed before finishing. Some sanding left but only the smooth stuff. Bass feels good already.
|
Left: I'm dressing the frets which is easier done before finishing than after. I'll do a final fret dress when it comes back. Just checking it 100% to make sure it's ready! Right: Looks like I have prepped and sanded everything - including the pickup covers. I'll drill holes for the preamp controls when I get the bass back from finishing. |

I think everything is ready for going to the finisher!.
|
|

Last round on the lengthy sandpapering stage. Thw whole instrument is silky smooth and ready for the next transformation!.
|
Left: Doing the final sanding at around 220 grit paper. The while instrument feels smooth and light so I expect it will be pretty amazing when I get it back from the finisher. Right: I drum sanded the two back covers to get them to the exact thickness and they have now been sanded and are ready for the finishing process too! |

The two back cavity covers have been sanded and fitted in place.
|
|

Cutting a seat to the optimal depth to suit the string retaining block.
|
Left: Machining the headstock area to match the geometry of the string retainer body. This way I don't have to do this after the bass returns from finishing! Right: Finishing of the instrument technically stating here as I have a few areas where the grain of the burl wood has a few small voids and I would like to get those filled first. |

Couple of small areas I wanted to fill and resurface - just the way burl wood is. My finisher will take care of the rest.
|
|

Machining the string retainer block so that I canhave that ready when the bass comes back from finishing.
|
Left: Got everything pretty much where I want it in the shaping and sanding department. I'm machining what will be the string retainer block at the end of headstock. Right: The string retainer will fit nicely in the end of the neck. I just have to machine a seat for it. I will drill and tap holes and machine slots while the body is at the finisher. |

I will be doing a quick machining operation to seat the string retainer into the end of the neck. I will work on the details while the instrument is baing finished.
|
|

I'm now working with finer grit papers to get the whole body down to about 220 grit or better for finishing. This is always a work intensive phase of building.
|
Left: Big push in the sanding department to get this bass to the finisher so that we can get that done and be able to get the electronics and pickups and hardware installed. Right: In this photo you can see the serial number has been added to the body. This instrument now has an official identity! Back to final sandinng! |

Lost a little production time to family events over the weekend so back with a vengeance to get this bass to finishing.
|
|

Nordstrand is building us a preamp that will be a great addition to this instrument More news on this very soon as I will be driving out there to pick it up!.
|
Left: Our preamp for this bass is being assembled at Nordstrand Audio. Since it's almost ready I may wait so that I can place the control holes in the best locations before finishing! Right: Lots and lots of sanding going on to complete the surfacing and edge breaks all over the instrument. It looks and feels really good already!! |

Sanding the body and I will also be adding a serial number insert that I am cutting in thelaser right now.
|
|

Lots of shaping and sanding going on right now.
|
Left: Working on the edge breaks all the way round the front and back of the body. Also working on the neck-to-body joint area and the "headstock" area to get them to their final geometry. Right: I have the neck just about down to finished thinkness - feels pretty good - also working on edge breaks around front and back of body. |

Getting the neck to acondition where I will be happy to see it go to finishing. Sand and test, sand and test.
|
|

Pickup bobbins have been wound and potted and tested.
|
Left: Pickups have been wound and potted and tested and I now have to go pick them up. I will test fit them in the wood pickup covers before the bass goes to finishing. Right: These are the two wound and potted pickups which have now been sucessfully test-fitted in their continuous grain covers. Should be awesome! |

Completed pickupssuccessfully fitted in their wood covers.
|
|

It's actually easier to drive through the mountains than to tackle the freeweys.
|
Left: I had an opportunity to drive the pickup bobbins to my electronics partner in La Quinta so I took the opportunity while I had it. Right: Removed a lot of material from the back of the neck and I am a lot closer to final dimensions in that area. Some careful carving going on at the neck/body joint area but looking good! |

Almost there with the neck thickness and profile!!!.
|
|

Working the neck dow to size and refining the joint areas at the same time.
|
Left: Back to work on the back of the instrument neck, headstock area and body/neck joint areas. This is really the biggest chunk of work left before the bass goes to final finishing. Right: I resumed work on the string retainer unit that has to be custom machined for the fanned fret layout. I'd like to have this ready for post-finishing work. |

Bobbin assembly under way. Should not take long.
|
|

Bobbin assembly under way. Should not take long.
|
Left: I have started the bobbin assembly and will get all the pole pieces in instages as the glue sets. I will then re-test the fit inside the covers and if all is good will take these to my electronics guru for winding and potting. Right: I am done with the pickup bobbin assembly and these pickups are now ready to be taken to get wound and potted. |

These came together well and should end up being good powerful pickups.
|
|

Ongoing carving of the belly cut, neck and headstock area.
|
Left: Started carving work on the back of the bass for the belly cut. I'm carefully removing material and testing as I go for the best fit and comfort. Right: Talking to Nordstrand Audio about getting a 3B custom preamp for this bass. I sent them all the specs and will get this ordered and picked up from their shop asap. |

Talked to Nordstrand Audio about a 3B custom preamp.
|
|

Ready to assemble bobbin flatwork and magnets.
|
Left: Getting the pickup bobbins assembled with their magnets so that I can have these copper wound and potted while the bass is at the finisher's shop. Right: Working on the spindle sander to get the harder to reach areas finished up and ready for final sanding. joint areas between neck & body are always hard to do! |

Getting into some of the hard to reach areas with the spindle sander.
|
|

Fingerboard attachment went according to plan and I will now be moving ahead working on the body and neck etc..
|
Left: Fingerboard on and all looks good. I will now focus on shaping and contouring the body and neck to get the instrument ready for finishing. Right: I'm busy right now carving away at the back of the neck to get that close to a finished shape. Also will be shaping the belly cut into the back of the body and adding a comfortable body radius. |

Getting into the final carving of neck and body features. Kinda dusty work so doing it outside.
|
|

IThis is the truss rod in position and waiting for me to apply the adhesive mix and clamp everything together.
|
Left: I am now most of the way through the process of carefully positioning the fingerboard on the neck, inserting truss rod, applying the glue and going through the elaborate process of clamping with the rubber bands! Right: To anyone who thinks this is easy I extend my traffic finger!!! It's on and glue is curing - will update! |

The fingerboard is being glued onto the neck - a bug step in the final progress of any instrument. Will know in the morning if all is well - should be OK.
|
|

The two pickup covers have had their height adjustment screw holes drilld and counterbored.
|
Left: I have now drilled and counterbored height adjustment screw holes in the twp pickup covers and can consider these components complete for finishing. Right: I'm ready to glue the fingerboard onto the neck. I have to assign some free time to do this as I have a lot of tooling to use and glue to mix and work has to be done fast! |

I will mix some special adhesive to do this and then add a LOT of rubber bands to apply even clamping pressure all over the joint area.
|
|

Got the insides of the pickup covers machined. Will now test fit the bobbins.
|
Left: Machining successfully done to the two pickup covers. I need to drill adjustment screw holes in the corners but otherwise these are finished! Right: I have the tooling out now for the attachment of the fingerboard onto the neck. Once that's done it should just be a bunch of carving and sanding and it'll be off to finishing!!! |

Almost ready to attach the fingerboard.
|
|

I will have these side dots done as soon as the adhesive sets.
|
Left: Installing the side dot markers in the fingerboard. Once this is complete I will glue the fingerboard onto the neck of the bass. We're getting close to finishing!!! Right: I'm working on removing the inside material from the pickup covers. I will then test fit the bobbins and if everything works I will get those assembled & wound soon. |

Want to get these covers done as they have to with the bass to the finisher along with the cavity covers.
|
|

THis bass will look really good with the fingerboard attached. Just getting all the tooling together for that job.
|
Left: I'm getting the fingerboard ready for assembly. I have the sleeves ready for final installation and will be filling those as they get installed. After a cleanup the fingerboard will go on. Right: Testing the compatibility of the bobbin patterns with both the pickup cover blanks and the recesses in the body. Will be cutting the covers next. |

Doing the prep work to not only cut the pickup bobbins but also machine the rest of the pickup covers so thqat we can get this bass to finishing!!!.
|
|

Sleeves for the side dots have been inserted into the side of the fingerboard.
|
Left: I have rough cut an inserted sleeves into the side dot holes on the fingerboard. I need to select the right material for the inner areas - I have black red and white. Probably the one that yields the best visibility. Right: The pickups have been finished on the outside and I will now set them up to be machined out on the insides. |

Pickup covers fitten in top - just need to be machined on the insides.
|
|

PBattery cavity hole has been machined, also holes for magnets and slot for serial number.
|
Left: I machined out the battery cavity to hole two 18v batteries and also machined holes for the neodymium magnets and the serial number insert. Right: I ran the program on the CNC which cut out the inside of the control cavity. Very glad to be done with these operations and I am now looking at preamps fron Nordstrand. |

The control cavity has now been machined out of the back of the body.
|
|

Fairly tricky operation dialing in the recess sizes to make sure the accurately match the pickup geometry.
|
Left: The two pickup recesses are being machined out of the body material to match the pickup blanks I am creating. Being very careful to make sure the geometry matches that of the pickups! Right: Two pickup recesses machined and done and no I need to flip the instrument over and cutthe two cavities on the back of the body. |

Pickup holes came out fine despite their non-standard geometry.
|
|

Next is sanding the outsides of the covers. When that's done I'll machine the insides on the CNC.
|
Left: I sawed off the extra material and now I need to sand the outsides of the covers flush with the tops. When that is all done I have a program ready to machine out the insides for the bobbins. Right: Program written for cutting the two pickup recesses to final size. I'm setting up the CNC to get this job done then the two back cavities. |

Setting up CNC to carefully cut the two pickup recesses. Once that's done I'll machine the battery and control cavities.
|
|

I will be gluing these two tops onto this material and machining the pickup covers from the resulting assemblies.
|
Left: These are the two pickup cover top pieces I harvested out of the body top material. I am going to attach them to material that will be the bodies of the covers. Right: Gluing and clamping the harvested pickup tops to material that will become the bodies of the pickup covers. I'm also ready to cut pickup bobbins. |

Gluing pickup body material to the two pickup top pieces.
|
|

Top went on nice and clean and had plenty of time to cure. Next will be some sanding work around the perimeter.
|
Left: This is our bass with the top attached. I left the top a tiny bit oversize so I will be refining the edges of the instrument to finalize the perimeter of the body outline. Looking good so far! Right: Working on the spindle sander to resolve the curves around the body perimeter to a close to finished condition. We're getting close! |

getting the perimeter edges shaped and finished on the spindle sander.
|
|

Once the top goes on I can machine cavities and get the fingerboard attached!.
|
Left: Body and top both ready to be glued together in the vacuum press. I'll do it later in the evening and let it run overnight to make sure we have a first class joint between the two surfaces. Right: Gluing of top onto body in under way. When this is all set I will have several machining operations to get done on the body area. |

Bass is in the vacuum press getting the top plate attached.
|
|

All the requires channels for power, grounding and pickup wires have been machined into the top surface of the body.
|
Left: Channels for internal wiring have been machined so I can start preparations for gluing the top plate onto the body! Big step towards a finished bass!!! Right: Test fitting the top plate so that I can get everything ready for attaching the top onto the body. So far looks good just have to get vacuum press ready! |

Testing the fit around the neck area before I commit to gluing the top on.
|
|

Plusg machined and fitted. They will be glued in place and sanded flush. When the top is on I'll center the cuts to the recesses I created on the front.
|
Left: I machined the two plugs and fitted them to the back of the top plate - I will now have to glue them in place and when dry I will sand flush with the rest of the back.. Right: I have the body of the bass set up on the cnc so that I can machine a set of (battery, pickup, grounding) wiring channels into the body before the top plate goes on. |

These wiring channels will provide space through the bopdy for me to run grounding wires, battery power and pickup wires all to the control cavity.
|
|

This back cut will eventually meet the front cut and release the harvested pieces.
|
Left: The top plate has now been flipped over and I'm carefully machining from the back side of the top with a different cutter to release the two pickup pieces. Right: Pickup cover pieces have now been successfully harvested. I need to make a couple of plugs for the back to seal the cutouts but looks good so far. |

Now have pickups harvested which means I can also machine wiring slots.
|
|

The locations and sizes of the pickups must be established before I cut into the top plate.
|
Left: I spent a good amount of time finding the best compromise for the pickup locqations and I am now willing to get the top plate on the CNC and commit to cutting out the continuous grain pickup covers. Right: Pickup cover harvesting under way. Have to be careful not to break a cutter since this is such a thick top plate! |

I'll go as deep as the cutter will permit and finish the removal from the back side.
|
|

Making sure placement of the two pickups is in the correct place on the top plate before I commit to cutting them out!.
|
Left: Just about to plot the final pickup locations on the top plate. Once that's established there will be a few machining operations to make this all happen! Right: The fingerboard is now set up on the CNC so that I can drill all the holes for the side dots. Plan is for metal tubing with colored centers which should look very classy! |

Drilling the holes for the side dots on the CNC.
|
|

The program will remove the continuous grain tops of the pickup covers from the top plate .
|
Left: Not a particularly exciting photo but just to say I programmed the toolpaths that will harvest the pickup material out of the top plate of the instrument. Will run that as soon as possible. Right: Looked everywhere in shop for Luminlay for the side dots but unfortunately don't have any more. Comes from Japan so no tsure we want to wait!! |

I was thinking as an alternative to use aluminum tubing with a white or colored filler. That would really stand out on the side of the fingerboard.
|
|

I will be making custom pickups and creating the physical bobbin assemblies and carefully setting those into special continuous grain pickup covers. I will then have them wound.
|
Left: Working on pickup geometry. Some of it is dependent on relative neck and bridge placement and angles, also placement on scale length, preferred space from end of neck and room for copper windings inside. Right: Made several refinements on the pickups to the angles, bobbin shape, physical sizes etc. Now I can start cutting. |

Pickup geometries have been finalized allowing me to harvest material from top plate, create covers, create bobbins and a few other things.
|
|

Since the top was cut slightly oversize I am now running around the perimeter sanding everything down flush.
|
Left: I'm using the spindle sander to run around the body perimeter and reducing the top perimeter down to match that of the body. Once that's done I can place the pickup positions. Right: I'm using the ABM tuners to plot some important dimensions so that I can plan to harvest the material for the continuous grain pickup covers. |

Neck position, scale length and intonation compensation being considered so that I can accurately place everything and plan the locations of the pickups.
|
|

Glueing two carbon fiber rods into the neck structure. Makes for a very rigid assembly.
|
Left: The two carbon fiber reinforcing rods are being glued into the neck section. I use an aerospace-grade epoxy to do this so I get a very strong bond with the neck material. Right: I sanded the neck surface to make sure the carbon fiber and the wood are all flat and even. This neck is now ready for truss rod and the attachment of fingerboard. |

The two CF rods are now part of the neck structure.
|
|

Carbin fiber rods have been cut and fitted.
|
Left: I cut two pieces of carbon fiber rod to match the slots I had previously machined into the neck. I have some special adhesive I use to bond these inside the slots and will make that one of my next tasks. Right: Very happy to announce that the ABM tuners arrived from Germany and I now have them ready and in stock for assembly!!!! |

I was worried because ABM told me they had a 90 day waiting list and no items in stock!.
|
|

I did two test cuts just to be sure - easier than replacing the top!!!!.
|
Left: The test cutting for the top plate relief worked out fine and I can now use this program to make the same cut in the front of the top plate. Right: Top plate is set up on CNC and I am getting ready to carefully position and cut and remove the relief shape into the top material. Once this is done I can fit the top plate onto the body. |

Lots of new things on this particular bass, I have never worked on a top this thick before but so far everything is going to plan!!.
|
|

Fingerboard now needs to have the frets trimmed flush with the sides.
|
Left: Frets are now installed in the fingerboard but not yet trimmed flush to the sides. This should look really good alongside the burl top which is going on this bass. Right: Before cutting the actual top I wanted to test cut in spare wood so that I can verify the fit. I used measurements from the end of the neck to program the cutter path. |

With a multi-scale neck it's always much safer to cut a test piece before risking anything on the actual top.
|
|

End of the neck has now been machined so that I can get the top plate fitted.
|
Left: Second operation has been done where I finished off the angle on end of the neck with the same geometry as the end of the fingerboard we created. Right: I am now installing the frets into the slots in the fingerboard. I pre-bent the fret wire and carefully working from one end to the other. Looking really nice so far! |

Frets are going into the fingerboard. Will trim them to finished width after they are all in.
|
|

On the CNC I will be surfacing the top of the body and creating a matching angle to the fingerboard on the material at the end of the neck.
|
Left: The body of the instrument is going back up on CNC so that I can machine the top surface of the body flat and shape the end of the neck section based on the fingerboard geometry. Right: Up on CNC again firstly to remove the extra core material and get it flush with the outer nody halves. After that I will cut the end of the neck. |

Almost finished leveling the top surface of the body.
|
|

The birdseye inserts look pretty good on the fingerboard. Nice contrast with the Pau Rosa too.
|
Left: I sanded down selected pieces of birdseye and then cut them all from the best areas on the laser. They are just placed in the recesses right now but I will glue them in and sand everything flush. Right: Working on getting the top plate rough trimmed close to size so that I can get it up on the CNC and remove a section for the neck heel. |

Top is rough cut and now will go up on the CNC for some machining so that I can fit it onto the body of the bass.
|
|

Happy that my suppliers are still shipping products out to me!.
|
Left: My delivery of carbon fiber rods came in today which is good timing as I need to get a couple of these installed in the neck of this bass before the fingerboard goes on! Right: I'm selecting the most compact bridseye maple grain for creating the individual fingerboard inlay markers. This bass will certainly be one of a kind! |

Hand selecting birdseye maple grain for fingerboard inlay.
|
|

I'm busy cutting the fret slots.
|
Left: I'm in the process of cutting the fret slots. The cutter is omly .023 inch diameter so I have to be a little careful since the wood I am cutting is quite hard. Right: I got all the recesses for the fingerboard inlays machined and I now have to find an inlay material that will work as a nice contrast. This wood will end up just a little darker. |

This is the fingerboard with the fret slots and the inlay recesses cut.
|
|

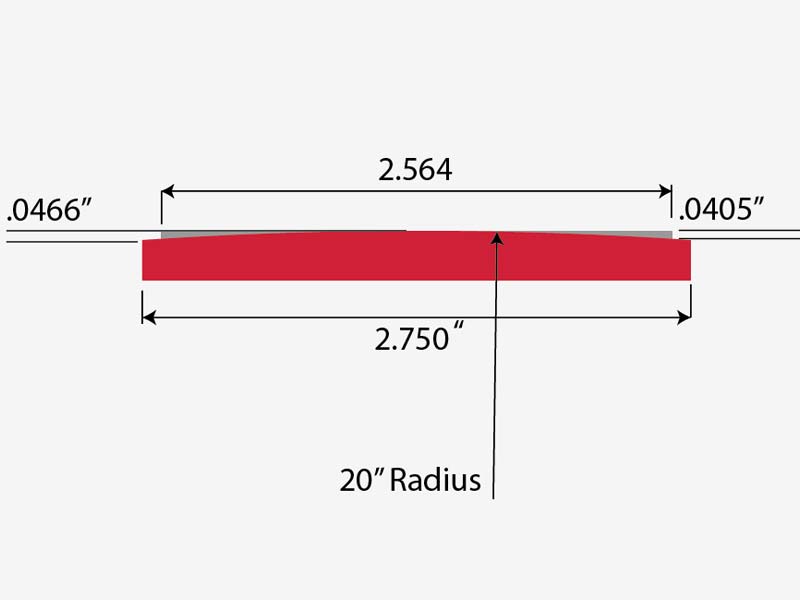
Fingerboard cut to size - now going to machine the radius on the top surface.
|
Left: Fingerboard has been successfully cut to its finished size. I will now run another program with a different cutter to generate the compound radius on the top surface of the board. Right: The top surface of the fingerbpard is being machined and as soon as that is done I will clean the machining marks off the surface and cut fret slots. |

Almost done with the top surface radius.
|
|

Programming outline and fret slots.
|
Left: Need to write a couple of programs to get this fingerboard machined. First operation will be cutting round the perimeter to the finished dimensions. Right: On the CNC and ready to be machined. It should end up being a beautiful fingerboard. Also ordered carbon fiber reinforcing rods and a truss rod for this bass. |

Ready to get this fingerboard machined.
|
|

This fingerboard will now be going up on the CNC for a few operations. Cutting profile to match neck, establishing the top radius, cutting fret slots and nut slot and also inlay recesses.
|
Left: I'm attaching the fingerboard to a 3/4" mdf baseplate to support it through the next few machining operations. Makes it a lot easier to clamp and align like this. Right: I glued the fingerboard onto the substrate and put the assembly in the vacuum press so that I get a nice clean joint. Will be easily removed when board is done. |

TDecided to use the vacuum press to get a good bond with the baseplate.
|
|

This piece of Pau Rosa is definitely hard enough for a good fingerboard and will look impressive on the instrument. I'm going to get it shaped and ready for installation.
|
Left: The fingerboard on this bass is a tiny bit longer than standard. It was fortunate that I had a nice piece of Pau Rosa long enough to do the job. Actually a good match for the other woods too. Right: Material for the instrument top has now been glued into one piece. I can now get it marked out and trimmed close to finished size. |

Top material will now be nmarked out using the body profile and I will rough cut the shape. After that I will need to machine a clearance area for the end of the neck section.
|
|

Just getting ready to establish joint edges on the two top pieces so that I can glue them together into one piece.
|
Left: The two halves of the top are being set up on the CNC so that I can cut a nice accurate joint edge along each to yield a super clean joint when I bookmatch these together. Right: Joint faces machined and I am now gluing the two top halves together. Once this is glied I will clean up and rough cut to match body profile. |

Top halves being glued and clamped into one bookmatched piece.
|
|

Getting the exterior perimeter shape established around the body area.
|
Left: I'm doing some cleanup to remove extra material around the body perimeter. Once that's done I will machine the top of the body to prep that for the top plate to go on. Right: I have sanded both sides of the top plates so the next step is machining a nice clean joint face so that I can bookmatch these two pieces together into one. |

I will be setting up CNC to cut a clean and square glue joint on each of these pieces so that I can get them joined together.
|
|

First body half attached successfully. On to the second one.
|
Left: First body half went on very well so we now have a half-bass. I'm cleaning up the back surfaces and will be setting up to attach the lower body half onto this assembly. Right: The second body half has now been fixed onto the core section. Looking pretty good so far! Probably going to clean up the perimeter neck areas next. |

Both body halves were attached successfully and will now spend some time cleaning up body and neck geometry.
|
|

Sawed off a few un-necessary pieces of wood, sanded down the body half edges and now checking placement so that I can glue them in place.
|
Left: Trimmed the core sides and back and positioned and marked the two body halves so that I can correctly place them whan I am gluing them to the core section. Right: I'm now gluing the forst body half onto the core. Needs to sit in this clamped condition most of the day but as soon as it's done I will attach the other half. |

First pf the two body halves being attached to core section.
|
|

Another very involved clamping procedure but this will give me both body halves ready for assembly.
|
Left: Working on the second sub assembly where the Koa back plate is being attached to the central piece of Swamp Ash. Once this is done I can get them attached to the core piece. Right: With both body halves assembled I can test fit on the core and plot out the linear locations so that I can get these permanently attached. |

This is starting to look a bit like a bass guitar now.
|
|

Working on a gluing fixture to guarantee that these parts get joined together with perfectly flush joint surfaces.
|
Left: I have to glue the Swamp Ash and Koa body components together so I am working on a setup that will allow me to do that and get the joint edges to line up perfectly. Right: I'm gluing the Koa back plates onto the swamp ash back material on each body half. It's a tricky setup but should work out fine when done. |

WoDoing a fairly involved gluing operation to get the two back plates neatly and accurately joined together.
|
|

MLooking good so far - this thing is starting to look like a real instrument!.
|
Left: Now that core has been machined I can test fit the side pieces. This is what it looks like from the top. I added a couple of decorative wenge pieces to give me a tiny bit more body width. Right: This is the view from the back pre-assembly. All looking good, I need to glue the Koa and Swamp Ash body half pieces together next. |

Throwing the pieces together to see how it all looks, will have all this glued and assembled soon.
|
|

I cut matching material to create the required steps to house the lids. Now to get them glued together.
|
Left: Net result of all this work is that I now have plugged the holes I cut to harvest the lids with other pieces of Koa. I'll glue these together and they will be ready for body half assembly. Right: Back on the CNC and this tome locating on the angled surface we machined earlier in order to machine the back of the core to finshed thickness. |

Machining the final back surface of the core section.
|
|

Machining from the back of the plate to release the cover.
|
Left: This is the second part of the cover harvesting where I cut the same cover profile from the back side to release the cover from the parent material. Right: Both Koa back plates have now been cut to harvest the continuous grain covers. I now need to machine a plug for each that fits into the machined recesses in the back of each. |

Covers have been harvvested, now need to fill from the back.
|
|

I have to machine the back of the core parallel to the top surface I recently machined. I'll also be establishing body thickness in that machining operation.
|
Left: Checking the two body half shapes against the core of the bass so that I can establish a machined thickness for the body end of the core. Back on the CNC soon! Right: Getting started on harvesting out the cover for the control cavity from one of the back plates. I cut its shape with a very small milling cutter to a certain depth. |

No cutting the control cavity lid from the lower Koa back plate.
|
|

Setting up to cut the joint faces for the body halves.
|
Left: I'm now set up on the CNC to remove the remaining material off the two sides so that the body halves can be attached. It's a tricky setup because it's a tapered section that has to blend perfectly. Right: Both sides of the body area of the core have now been machined parallel to the core perimeter I recently machined. |

Core section has both sides machined and is ready for sides to be attached.
|
|

Core section with all of the initial machining done.
|
Left: The core section of the instrument has had most of its critical dimensions and features established. Next task will be to machine joint faces on the back end for the body halves. Right: Doing some calculations using the body template to mark out the extent of the areas on the core section I need to machine as joint faces. |

I'm marking out the areas on the core where I need to machine joint faces for the upper and lower body halves.
|
|

The perimeter of the entire core has been cut to size. Moving on to other machining tasks.
|
Left: The perimeter of the core has been established based on nut and bridge widths etc. Moving on to the next task which will be cutting a reference angle on the top of the body. Right: I cleaned up the top of the body area at the correct angle to the neck for the bridge units. This will help later when machining back. |

Third machining operation done cleaning up to establish neck to body angle. Now I need to get a truss rod slot cut.
|
|

Up on the CNC for several operations to create the core geometry.
|
Left: Time to do some machining on the core section of the bass. I'm starting by machining a flat joint face for the fingerboard and will then machine the outer profile of the core. Right: First operation done - cleaning up the top surface of the neck to create the area onto which the fingerboard will be attached. So far so good. |

Top surface of the neck area is now cleaned up top a nice flat surface. NExt I will establish the core perimeter..
|
|

Getting a little closer with the body components.
|
Left: These are the components for the center and back of the body. Shapes have been refined a little and I will be machining out covers for battery and control cavity areas very soon. Right: I'm measuring the back plates so that I can run a program on the CNC where I carefully harvest out the battery and control cavity lids from these plates. |

I will be removing cavity covers from these pieces so that we end up with continuous grain covers held in place by neo magnets.
|
|

Gluing the last of the core laminates onto the assembly.
|
Left: Now gluing the fifth of the five core laminates onto the assembly. Once this is set and cleaned up I can start some of the machining operations and get the fingerboard work started. Right: While the construction of the core continues I am also working on the various components of the body halves. Lots more assembly coming soon. |

I'm sanding a lot of body parts to get them ready for assembly and machining.
|
|

First two pieces of the core have been glued together.
|
Left: This is techinically the birth of an instrument when the first wood to wood joint is established! From here on it's a case of more glued joints and machining and the bass will take shape. Right: Center three laminates have been glued together and I am now getting ready to glue on the two outer Maple laminates to complete. |

Starting to look like part of a bass. Ready to glue on the two outer Maple pieces.
|
|

I now have all the five core laminates cut and sanded and ready for assembly.
|
Left: I just finished drum sanding the two Maple outer core laminates. They are now ready to be glued together with the other three laminates I have cut and sanded. Right: I am now gluing the center core laminate to one of the Koa laminates to get things started. I'll continue gluing and clamping until I have all 5 laminates together. |

Glued joint integrity is very inportant so I use plenty of clamps in this gluing process.
|
|

We ended up choosing 35.5" to 33.5" scales with the square fret at Fret 9.
|
Left: We looked at 4 different scale combinations and square fret scenarios for this bass to compare resulting fret angles at both ends of the fingerboard. Right: These are the five components of the neck thru assembly which have been rough cut and aside from some sanding are ready to be glued together. Should look very nice! |

Maple, Koa and a central strip of dark brown hardwood for contrast. They should look really nice together.
|
|

I'm machining the two koa laminates to create the tapered core section. Should look awesome when complete.
|
Left: This bass benefitted today as I have a fixture I need to get off the CNC but it made sense to get this job done first. Cutting laminates to a pre-defined taper. Right: This is what the 35.5-33.5 multiscale would look if the square fret was #7. This looks to be the most balanced arrangement for this scale formula. |

I tried a few different options but this seemed to be the best. Not too angled at either end.
|
|

I'm creating a full scale drawing of the bass (as I usually do) to help place features and facilitate CNC programming.
|
Left: Time to create a 100% scale vector drawing of this bass since I have not done one with this specific string scale variables. This drrawing helps with upcoming machining tasks. Right: Since this bass has new (to me) scale lengths I had to recreate all the geomerty that defines the positions of the 24 frets. |

I have to accurately plot both scale lengths relative to the nut, then compensate with an offset based on which fret should be the common square one (most likely 7 or 8) and then plot the actual paths for the CNC to cut the fret slots..
|
|

Second gluing operation to finish up the blank.
|
Left: I'm now gluing the second piece onto the back plate for the upper body half. I will know soon how this all works out - if it's good I will go ahead and cut each piece to size Right: This is the end result of all that jointing and gluing and I think we will have enough raw material surface to be able to use these pieces as back plates. |

One of the nice things about doing this is that the back plates will match the Koa laminates in the core section because they ALL came from the same original piece of wood..
|
|

I'm hoping this all works out - had barely enough Koa for the job but if I slice and dice it well enough it may work!.
|
Left: I don't have a lot of Koa material to play with but I'm trying to make sure the upper body half gives me enough length to fit the upper body profile. Right: I'm doing a couple of creative gluing setups to get the best out of the Koa that I have to work with. Once I get all three of these pieces together I will know if it will work! |

Koa for upper body half needs to be carefully assembled.
|
|

Mechining joint faces on teh two Koa back plates so that I can get them glued together and see how they look.
|
Left: I have 4 pieces of Koa that I need to convert into two bookmatched pieces. I'm machining joint faces on CNC so that I can get perfect joints on each pair. Right: I'm now gluing the Koa back pieces together so that I can yield two pieces that will become the back plates. Will know soon how they look and if they'll work. |

I'm gluing the two saets of back pieces together. If all goes well this will look cool and I can plan on using it for the back plates.
|
|

Top plate cut and sanded and ready to be glued into one bookmatched piece.
|
Left: I carefully sawed the top plate blank into two pieces and sanded those flat We now have two niecely bookmatched pieces which will become the top plate. Right: I split the Koa that was left over after cutting the core laminates. These are going to be individually bookmatched to become the back plates. |

Something I have never done before - using two bookmatched plates for the backs of the body halves. Should look very nice though.
|
|

Two of the core laminates rough cut . These are a nice curly Koa.
|
Left: This is the Koa wood cut to length and then split down the center so that we will have two nice matching Koa laminates running through the neck-thru core section of the bass. Right: I wetted the surface of the Amboyna top plate material to get an idea what the color of the wood looks like when finish will be applied. |

This will be the top plate material on teh instrument and I'll use a little on the top surface of the headstock/string retainer area. I'm wondering of I should also use it as inlay on the fingerboard for continuity...???.
|
|

Marked out the top plate material and I'm ready to trim it - then split in two and sand to a nice clean flat finish.
|
Left: The Amboyna burl blank is wide enough to yield about a 10mm top plate thickness if I saw the raw material carefully enough. Will make a very classy looking bass. Right: I decided to use my thicker piece of Amboyna since it will yield a slightly thicker top plate. I trimmed the blank to body size and drum sanded both sides flat. |

Drum sanding the top plate material so that I have a good reliable flat surface to run through the bandsaw.
|
|

This is one of our candidates for top wood - should look really nice. Getting ready to saw it up.
|
Left: This is the chunk of Amboyna Burl I have in my shop which should make a very ornate top for this bass. I will split it and see how the bookmatched set looks. Right: I have assigned Koa and Maple for the core laminates and I have a template for this headless bass which I am using to cut blanks from the Koa material. |

Since I know the Koa is a definite choice I am setting things up to get some blanks cut for the core section.
|
|

This is the Swamp Ash with the body profile marked on it. Koa and Maple blanks in the center.
|
Left: I'm starting this bass with what will be a 5-piece laminated neck through core section. I will split the maple & koa pieces to create tapered laminates. Right: Swamp Ash body halves have now been rough cut and I'll get these sanded closer to final size and thickness. Nice solid but lightweight material for a bass like this. |

These two pieces will be the body halves attached to the multi-laminate core. The top plates will be bookmatched and cover the whole top area of the bass. .
|
|


