|

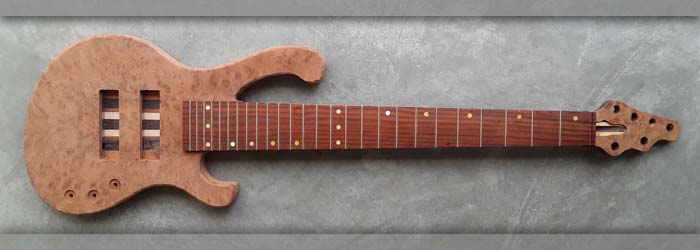
The bass fits very nicely in the new case. Work continues on body shaping and sanding. Also looking at color options for my customer and will post more on those results very soon!
|
Left: Just wanted to show the instrument as it sits happily in the new case. It's a good fit and I'm busy working on shaping the whole bass and sanding to prep for finishing. Right: I will be cutting two custom cavity covers for the back cavities of this bass. After that it's just working on surface preparation prior to going to finishing. |

Text coming!
|
|

I'm in contact with Protec Cases and hope to be able to run up to their facility in Fullerton to pick up a Contego Bass case for this instrument fairly soon!
|
Left: I have been using ProTec cases for a couple of decades and I really feel that they are the best compromise of good protection and design, and not weighing too much! Right: I went to Protec Cases today and picked up this Contego Bass Case for theinstrument. Will update with more photos when I get a chance to unpack it!!!! |

The Protec Contego Bass case is now in my shop after a road trip to Fullerton and back and quite a lot of traffic!! Easier than having it shipped though!
|
|

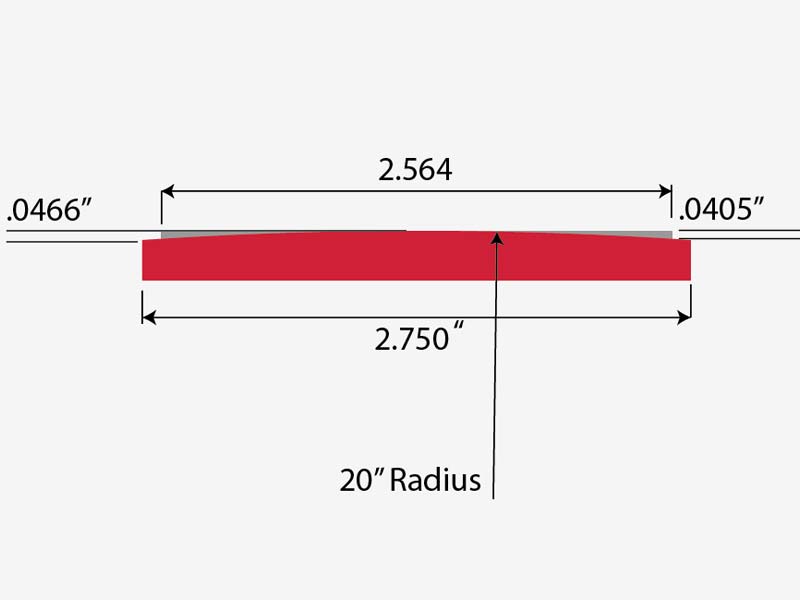
The neck on this bass was only roughed out so there is about 1/8 inch of materil to remove to achieve the ideal thickness and profile. I will post an update and pictures soon when this is all done.
|
Left: I have been working on the back of the neck to reduce it a little in thickness and modify the profile so that it feels really comfortable. Pictures coming! Right: Getting started on creating the radii around both the front and the back of the body. Filing ro rough out the shape and then several grades of sandpaper to finish. |

Busy with lots of filing and sanding to create radii all the way around the front and back of the body contour. Also working on other areas - will update more soon as we move forward!
|
|

I got the machining done on the body to create a recess for the serial number. I fitted the laser engraved number into the slot and that all worked out. Bass now has it's official number and now moving on.
|
Left: Laser engraved serial number now installed and the bass finally has its own identity! I'll be spending some time working on body shaping but will keep updating! Right: The set of tuners arrived so it will be helpful to have those on hand while I work on the headstock area and also the bridge positioning on the body! |

I now have the full set of tuners for the instrument, so I will be test-fitting these on the headstock and using them to help set up some other alignment requirements for the hardware on the instrument body.
|
|

Tuners have been ordered so that will help me get headstock and nut worked on. I'm still busy filing and sanding the details of the body contours and transitions.
|
Left: Just a quick note that I ordered the tuners from one of my trusted suppliers and will have these in a few days. I'll be attaching the bridge this week while I continue shaping and sanding of body. Right: Just got the serial number tag cut on the Laser so will be installing that in the bass body material very soon!! |

I was able to cut the Serial number tag on the laser this morning - it will be glued into the instrument body very soon.
|
|

While I am working on the neck profile I decided I could also go ahead and create a serial number for the instrument which I typically set into the battery cavity recess at the top. I will laser the number on a lighter material and machine a little recess for it in the top area of the battery cavity.
|
Left: I'm cleaning up the back cavities and I need to create a serial number plate on the laser and embed it in the top of the battery cavity. Also working on neck and body! Right: Bass is up on the CNC so that I can cut a recess for the serial number. Will get that sone this afternoon and cut the insert on the laser and install it. |

The bass is up on the machine for a quick recess cut for the addition of the serial number. Will post a pic of the finished task once the glue has dried.
|
|

I have chrome hardware ready for this bass and the Nordstrand DC6 pickups will be a great sound source. I will be doing some shaping and sanding to the body, neck and headstock to get this instrument closer to a condition ready for finishing. Will be posting photos of ongoing work!
|
Left: Current plan with this bass is to use chrome hardware and we're looking at an Aguilar active preamp for the sound system. I will be doing some work on the body shaping. Right: Back of the neck is roughed out but still has some material to remove to achieve the ideal thickness and profile. That's my next task so getting that started! |

I need to finalize the thickness and shape of the back of the neck so that's my immediate task! Once that's done I'll be shaping the neck-to-body transition and some of the geometry around the headstock.
|
|

Next task is grinding, filing and sanding to create nice rounded edges on front and back sides of the body.
|
Left: My task now is to start rounding off the edges of the body on front and back with the goal of getting the whole instrument ready for the finishing process! Right: Now working on edges of body contour and also creating a nice comfortable belly-cut in the back of the body. Will also be refining neck thickness and contour! |

Next task is grinding, filing and sanding to create nice rounded edges on front and back sides of the body.
|
|

I have a killer pair of dual coil pickups going into this bass.
|
Left: I ended up getting these DC6 pickups from Nordstrand which have the correct string spacing for this bass and will give the instrument and awesome sound source! Will be cutting recesses soon! Right: This is how the bass looks now with the two pickup recesses machined out. Looks much more like a real instrument now! |

Pickup recesses have been established and I can now get back to body shaping and prepping for finishing!
|
|

Working on neck thickness and creating the perfect neck transition to the body to provide access to the upper frets.
|
Left: I have a lot of extra material on the neck which I am in the process of grinding and sanding off. Also involves carefully refining the neck-to-body transition area. Right: I am planning to install Nordstrand pickups into this bass. I need to get hold of them so that I know what size of pickup cavities to cut into the body. |

Looking forward to installing a set of Nordstrand pickups in this bass.
|
|

Ready to get the bass set up on the CNC for the battery and control cavities.
|
Left: I now want to get the two back cavities machined. I will be setting the body up on the CNC table and using a couple of already established program sets for the machining work. Right: A big step forward for this bass. I machined both the control cavity and the battery cavity into the back of the body. Looking good! |

Got both cavities and their respective lid recesses machined into the back of the instrument body.
|
|

Headstock trimmed to final shape and size and now shaping the neck volute.
|
Left: Headstock front plate is successfully attached and I am trimming the headstock to final size and rough shaping the neck volute. Can drill tuner holes soon. Right: The six tuner holes are now established and I cen move on to the next task which will probably be neck shaping to remove excess material in that area. |

Get the tuner holes drilled through the headstock.
|
|

Headstock cover plate has had the truss rod cover machine out so itr is ready to be glued onto the instrument headstock.
|
Left: I now have a nice matching cover plate for the headstock and have machined out the truss rod cover so that I can now glue the plate onto the headstock. Right: Now in the process of gluing the headplate veneer onto the headstock. Once this is set I can trim down the headstock to size and get the holes drilled. |

The matching headstock material is now being glued onto the headstock.
|
|

These are two covers for the control and battery cavities from another similar bass I am building. Hopefully will get a chance to machine these cavities into the body fairly soon and will use the same geometry to create the two covers we need for this bass.
|
Left: I am planning to cut the two back cavity covers in the near future because I was working on a similar bass recently. First I will be machining into the back of the body. Right: I cut and sanded a headplate for the headstock that matches the wood on the body top. I will now cut the truss rod cover from this blank. |

I sawed, machined, glued and sanded a nice bookmatched plate for the headstock. Next job is to machine out th etruss rod cover from this new plate.
|
|

Gluing the fingerboard onto the neck. Once this is done there will be a bit of cleanup but after that I will probably start getting the back cavities machined.
|
Left: The fingerboard is now being glued onto the neck of the bass. The adhesive will probably need most of the day to set but looking forward to having this bass in one piece! Right: Fingerboard is now a part of the bass construction and I now plan to move ahead with neck shaping and getting the two back cavities cut. |

Great to have the fingerboard attached, now onto some more machining and shaping..
|
|

Sanded the back face nice and smooth and results are very good.
|
Left: I removed the instrument from the CNC machine and ground down the 4 areas where I had clamps, then sanded the whole back to a nice smooth surface finish. Looks pretty good! Right: I am now ready to get the fingerboard attached to the rest of the bass. Should look really nice when everything is glued together. |

I will have this fingerboard attached to the neck very soon.
|
|

Body of the bass was just a little thicker than I wanted so I am going to skim a little material off on the CNC.
|
Left: I need to slightly reduce the thickness of the body before any more work gets done so I decided the best and quickest way was to do that on the CNC. Right: Machined the body down to my preferred thickness and nill take this off the CNC and clean it all up. Should be a bit lighter in weight after taking some of the wood off. |

Took anout .200 of material off and everything went well.
|
|

Attachment of top plate was successful and once the body is cleaned up to a finished shape I can add the fingerboard.
|
Left: Top plate is now attached and as soon as I have an opportunity I will clean up all the way around the body perimeter to create the finished profile. It's slightly oversize in this photo. Right: Now that the top is on I can work the perimeter back down to a nice looking finished size. Once that'sdone I will attach the fingerboard! |

I'm working around the perimeter on the instrument body to get it slightly smaller and to the shape that I like.
|
|

Cutting the ground wiring channels now allows me to get the top plate attached onto this bass.
|
Left: I have now cut the channels in the top of the body for the wiring of the two pickups, power supply from battery cavity and ground wires from the bridge units. Right: I am now gluing the top plate onto the body of the bass. Because my vacuum press is busy I am doing it with regular clamps but I think it should be OK. |

Big stepforward for this bass to get its top plate premanently attached to the body. Fingerboard will be next.
|
|

Establishing bridge unit and pickup locations on the top plate and also on the top of the body. This will allow me to cut wiring channels in the correct locations.
|
Left: I think I'm going to use Hipshot single bridge/string retainer units on this bass. This gives me the opportunity to set the string spacing perfectly based on neck dimensions and scale length. Right: I need to establish the bridge and pickup locations so that I can cut wiring channels in the top of the existing body. Then I can glue top on. |

I figured out where the two pickups were going to be and as a result was able to mark the best placement for the wiring channels.
|
|

Top surface of the body has been cleaned up as a joint face for the top plate. End of neck has also been machined to final size.
|
Left: I machined the top surface of the body and the perimeter of the end of the neck to its final size based on fingerboard placement. Will have the top plate on soon. Right: I just machined out theslot at the front of the top plate so that it will fit onto the top of the instrument body. Will soon have it glued onto the bass! |

I cut out the neck relief out of the top plate sop that I can go ahead and assemble this onto the body.
|
|

Top plate assembled and ready to go onto the body once I have done a few more machining operations.
|
Left: Top plate has been glued together, cut out from the blank and sanded to remove excess glue. I need to machine the body top so that I have a clean surface onto which I will glue the top plate. Right: This is the fingerboard I will be using on this bass. Just checking its end positioning before I cut the top of the body! |

I'm checking some machining details relative to the fingerboard before I machine the top surface of the body.
|
|

I have machined straight and square edges on the two plate halves which will be my joint surfaces.
|
Left: Just finished machining a nice clean joint face along the centerline of the two bookmatched top place pieces. If this looks OK when unclamped I will go ahead and get the two halved glued together. Right: Clamping the two halves of the top plate together. Should end up being a really nice looking top. Will try to match headstock too. |

Gluing top plate into one bookmatched piece. Hoping to have enough left over to veneer the headstock too.
|
|

Just trying to keep the ball rolling on this one - fingerboard will soon be ready to go on the neck. Need to order a truss rod and also get the top material cut.
|
Left: I'm cleaning up the bottom of the fingerboard where it was previously glued. It will not be attached to the neck until I get the top on the instrument body. Right: Next challenge for this bass is cutting up the top plate material so that I can create a complete bookmatched top.I will be doing some initial sanding to prepare the material. |

Top plate material ready to be cut. Once I know the finished thickness I can machine the body to match that.
|
|

Second body half going on. Looking forward to seeing this instrument looking a little more complete!.
|
Left: Second body half now being glued onto the instrument. Once this has set I will have sereral machining operations on the front surface of the body. Right: Second body half is now on the bass clearing the way for a lot of upcoming machining operations. Will start by removing some excess material and then get headstock shaped. |

Great to have a more complete looking nstrument. I need to do some grinding on teh neck area to remove some of the extra unwanted material.
|
|

Gluing the lower half of the body onto the core section. We;ll soon have something that looks like a bass guitar!.
|
Left: I am now gluing the lower body half onto the core section of the bass. As soon as the glue has set I will attach the upper body half. Right: This bass is taking shape with the lower body half glued onto the core. I will now set up and glue the top half onto the assembly and we'll have something that looks like a bass! |

Got a nice clean joint on the lower body half - now onto the top half.
|
|

The two body halves have been prepared for thickness and I now need to sand the two parts and prepare the joint faces so that I can assemble them onto the core section.
|
Left: Today I cut 1/4" of this body material off the back of each body half so that I could use it for the continuous grain battery and control cavity covers. I will now sand the body halves. Right: I am now machining the back of the core section to its final surface, parallel to the neck angle cut I made on the front face of the body. |

This will be the final surface of the back of the core section and I will be gluing the two body halves onto the body flush with this machined surface.
|
|

Started cutting the two body halves. The bass will look much more like a real instrument when these are attached to the existing core.
|
Left: I split the mahogany board to suit the sizes of the upper and lower body halves. I will get these rough sawn closer to the finished dimensions so that I can do the work they need to be attached to the core section. Right: I have now rough cut the back halves of the body from the mahogany block. Should look good when done! |

The two body halves have been rough sawn from my template. I think these pieces are thick enough that I could saw off enough to create matching wood covers.
|
|

The core section is now assembled and ready for whatever body I will out on it. Will know soon.
|
Left: Have a full headstock shape and I also trimmed the extra material along the sides of the neck. This core is now ready for a body and I will dig out some suitable materials and get that going! Right: I will be using a nice piece of Mahogany for the back body halves on this bass. This will help keep the overall weight on the low side too! |

I have a nice chunk of mahogany which I will be using to create the two back body halves.
|
|

This is an older body design of mine but I always liked it and felt like it was quite elegant. I'm going to try to work this into this project and see how it looks!.
|
Left: I decided that I should bring back an older body style with this bass. I like the elegant look of this one and I will try to emulate that with this 6-string monster! Right: I am gluing additional wenge onto the sides of the headstock area so that when it has all set I can rough cut the entire headstock shape. Will look more like a bass!!! |

Gluing additional pieces of wenge to complete the headstock width.
|
|

Drilling for side dot installation. Will be using a light amber colored side dot material.
|
Left: Time to get the side dot holes drilled. I do this on the CNC because it's the quickest and most accurate way to position the dots. Right: All the side dot are dilled and I also cut all the tubular insert pieces that go into the side dot holes. I have whit dot material that goes inside that tubing and shoul dresult in very cool side dots. |

Working on the side dots. They will be while dote with a solver ring around each one.
|
|

I will split this piece of burl wood to make a beautiful bookmatched top.
|
Left: I was able to find some material I can use for the top plate of this bass. Nice Amboyna (I think) burl wood which will look great under a finish and will match the fingerboard well also. Right: Machined the truss rod slot and also the profile of the neck/core while I had it set up on the CNC. I'll trim off the excess material on the bandsaw. |

Got a couple more machining operations done to the core of the bass. I'll need to find some material for the back plates soon!.
|
|

Headstock front face has been machined and now I can work on the body end of the core.
|
Left: Second operation on the core was to generate a nice smooth surface on the front face of the headstock. I will be gluing a matching veneer on here using the same wood as the top plate. Right: I have now machined the body-to-neck angle which is a reference surface for machining operations later on. Next is truss rod slot. |

Body angle machined out nice and clean. I'll use this surface as location when machining the opposite face.
|
|

The completed core section looks good already!.
|
Left: All the core laminates are now together in one piece and as soon as I have a chance I will start machining this core and getting it ready to be a bass guitar. Right: The core is now up on the CNC for some machining work.Right now I am surfacing the top of the neck area and when that's cleaned up I will create the body angle. |

First stages of machining the core - looking good so far.
|
|

So far so good - three of the seven laminates have been assembled so far.
|
Left: I now thave three of the seven laminates firmly glued together. I'm moving on to the next pair of laminates hope to be done with this assembly process very soon! Right: I'm now gluing the last of the seven core laminates. Once this is done I will be able to do some machining work to the assembly and see what I can find for body materials! |

Making progress here - last of the 7 laminates of the core section being glued together.
|
|

New center laminate is wenge. It's a bit thicker than the old one.
|
Left: It turned out that the center laminate was just a little too slim to net the required width at the bridge area so I cust a new center laminate out of wenge and machined it to a taper. Right: Now gluing the first two laminates together. There are a total of 7 laminates in this core section so there will be a lot of gluing! |

Got started on the core laminate gluing.
|
|

I'm machining the center laminate to a precribed taper based on the bridge/nut and fingerboard dimensions.
|
Left: I will be building the core from the center out so my first job is to machine the required taper on the center Padouk laminate on a special setup on the CNC. Right: This is the center laminate after machining the taper. It's 1/2" thick at one end and 1/4" thick at the other. I now have to maching two Maple laminates to the same sizes! |

This is the finished laminate for the center of the core of this instrument.
|
|

I have the two outer core laminates to cut from this Wenge stock material.
|
Left: I marked out the profile shapes on two pieces of wenge. I will get these sawn up and these will be the two outer laminates of the core section of the bass. Right: All the pieces are now rough sawn and ready for sanding and other subsequent operstions. This photo gives you a very rough idea of what the finished core will look like. |

These are all the laminates together - look quite nice..
|
|

This fingerboard was initially made for another project but I wanted to try something different on that one so this board became available. Don't know what species but it is hard and has an awesome color and figure in the grain.
|
Left: One advantage for this bass is that I have a fingerboard from another project which I can dedicate to this bass thereby saving me a lot of time in that area! Right: Sorting out wood that I can use and also checking a template I have that will work for this bass design. Should see a lot more happening to this instrument soon! |

So far I have Wenge, Sapele, Padouk and Maple. I will make an interesting core out of all of this.
|
|

I had to buy a minimum quantity of wenge for another project and had enough left over to start a new bass.
|
Left: Not much planned on this bass yet except that it will have Wenge core laminates. I also have some Sapele and other woods that will allow me to build a core. Ideally I want to build this bass from materials I currently have in stock. It will be neck-though in contruction and I want to make the top in a lighter colored wood so that I can introduce some custom color on the finished product. Will also make it as light and comfortable as possible.
I had to buy a minimum quantity of wenge for another project and had enough left over to start a new bass.
This beautiful fingerboard is now going to be dedicated to this bass. It's really onld and very hard material I have had in the shop for years!! Don't know what it is but it has great color and figure.
I had to buy a minimum quantity of wenge for another project and had enough left over to start a new bass.
|
|


