|

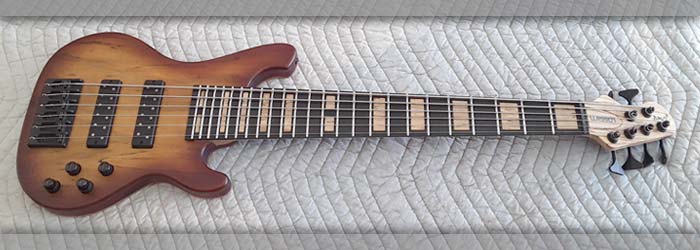
Now that the bass has had string son for a day or two I'm doing a final check and dressing all the frets for a final test.
|
Left: Pretty much done - bass plays very well and sounds good. Tweaking truss rod and bridge settings and dressing frets. Getting ready to get the instrument safely packed! Right: Most of final testing is now done. I will test again through and amp and then try to take a few glamour shots for posting. Then will start on packing!! |

Bass is looking good. I need to give it a final live test through and amp and if all is well the next challenge is getting it carefully and safely packed for shipping!
|
|

I was playing the bass through and amp to check the output and controls. Sounds great - pickups are far enough apart to create a lot of mixable diversity in the tone of the instrument. All good in the electronics department.
|
Left: I have been testing the sound output while I am making adjustments elsewhere - the bass sounds good, clean and powerful!! Right: Pretty much the last thing I needed to do was a general fret level and polish to the frets and fingerboard. Nut slots have been carefully set up and now I have to find some packing materials! |

Did a fret leveling and final fingerboard clean so that the bass is ready for playing.
|
|

Nut slots established but I can't finalize the nut slot depths without the strings being on the instrument. I'll be making numerous adjustments to get everything dialed in correctly.
|
Left: Got strings on this bad boy and I'm in the process of adjusting bridge saddles and refining the individual depths of each of the nut slots. Looking like a real bass! Right: Got the pots tightened in and the control knobs on, also applied some conditioner to the fingerboard. Working on nut slots and final setup so should be done soon. |

The whole instrument is looking really nice - I just ant to get the setup done and consider it complete. Working on nut slots - bridge saddle heights, truss rod tension, pickup height placement.
|
|

Working on setting the outer two strings on the bass - after which I can place the middle four. Need to set bridge saddles and also cut slots in the nut.
|
Left: Now working on getting strings set up on the instrument. I'm placing the top and bottom strings carefully on both the bridge and the nut. That allows me to calculate the remaining four. Right: Now working on the six nut slots so that we can get strings set up on this bass. Spacing is important so I cut a template on the laser. |

I cut a very accurate template on the laser to allow me to accurately place the string slots in the nut.
|
|

I got the recesses jack output socket installed in place and grounded. All I have left now is the connection of the two pickup cabling to the Audere input wires.
|
Left: The Neutrik output jack has been connected and grounded and I just got it installed into the body. We made it flush mounted and I created a small relief for the lock switch. Right: Pots are in and pickups are connected to the preamp circuitry. I now need to add strings so that I can test the output and controls. |

The preamp is now fully connected and next step is to test everything. To do that I need to add strings and test through an amplifier.
|
|

Have all the wires pretty much in the right places and I am getting ready to start soldering everthing together.
|
Left: Getting everything organized inside the control cavity. need to cut some wires and then start soldering things together. Want it to look nice and neat in there. Right: Got the output jack hooked up to everything - trimmed and prepped pickup wires, connected power cables and now ready to connect pickups to preamp. |

Almost done with the electronics. I have to connect pickups to the system and make a couple more grounding connections and should then be able to test.
|
|

I needed specialized foam inserts which I made on the laser to provide the right base for the two pickups to be well supported and still allow for vertical adjustmenrt. Also drilling two holes in each cavity for the adjustment screws.
|
Left: Two things going on here - one is inserting and securing padding to stabilize pickup seating and permit easy adjustment, also drilling holes for the vertical adjustment screws. Right: Working on fitting the preamp into the control cavity. Should work out ok just a lot of wires to deal with. Want to make it nice and neat looking! |

I resized the holes to fit the controls and now I'm planning how the wiring is going to layout inside the control cavity.
|
|

Bass is back to one piece again with the neck bolted on. Bridge is grounded and attached to the body. Picup cavities also grounded and I will try to get the two pickups set up into the body next.
|
Left: I re-attached the neck onto the body and I also got the bridge bolted on to the body. Pickup cavities are grounded and ready for the pickups to go in. Right: The pickups are now in their cavities and I have created packing and selected adjustment screws. Just need to drill adjustment screw holes! |

This thing is starting to look like a real bass guitar! I'm working on the pickup installation and setting up the adjustment screw holes. Next will be fitting the preamp.
|
|

Tuners are now part of the whole instrument. I want to get the neck back on the body as soon as I have pickups and electronics installed.
|
Left: Back view of the Hipshot tuners after they have been installed. One more task behind us! I'm currently working on getting the pickups installed. Right: Got all of the copper shielding installed and now working on grounding of bridge and the two pickup cavities. After that probably pickups then preamp installation! |

Making sure everything is set up for a successful pickup and preamp installation.
|
|

Most importantly I achieved rotation on the top two pegs to make them as accessible and the lower set. I'll do some final adjustments but this approximates what we will end up on this smaller headstock keeping the player's access to tuning knobs as a priority. I think we did well based on our other work reducing some of the sizes on this bass with a goal for maximum compactness!!!.
|
Left: After some fairly intense work on the headstock I was able to reposition some of the more critical positions to create more flexibility in the positioning of the tuners. Right: Now looking at the Nordstrand pickups and getting them installed and ready for work! Looks like a very nice set so this bass sould have ome tone! |

I'm testing the fit of the two pickups so that I can get these two installed into the instrument body.
|
|

Back of the bass looks good with the two cavity covers fitted.
|
Left: I got the copper done in the control cavity and the two covers fitted into the back. Now I can start on the pickups. preamp and related wiring. Right: I am able to increase the spacing of the two upper holes a little bit without compromising proximity to the logo or other features on the headstock. Updates coming. |

I moved both the upper tuner holes outward from each other. Can't go far with the end one as it is close to the BMC logo but this should help a lot.
|
|

Working on getting the power supply ready for the preamp system. That way I will have everything ready for the Audere preamp and the Nordstran pickups to go in.
|
Left: I'm finishing up the battery compartment and running cabling through to the control cavity to provide power for the preamp system. Also fitting the two back covers with their magnets. Right: While I am looking at tuner layout I'm also finishing up cavity copper shielding and starting on the pickup and preamp installation. |

I need to get the rest of the copper shielding into the cavity so that I can get the electronics installed. Just finishing it up around the top edges.
|
|

Strap lock hardware now part of the instrument body. Moving on to pickups and electronics, plus fitting bridge to the front of the body.
|
Left: I got the two locking strap components assembled into the body of the bass. Going to start on getting the two pickups fitted and installed next. Right: Double checking the placement of the ABM bridge so that we have good intonation adjustment. Working on grounding it and then installing it in position. |

Getting the ABM bridge gounded and then installed in place. Probably install the Nordstrand Pickups next.
|
|

Will update on all of this - might be easier to plug them all and use the CNC to establish positions that will allow enough tuner flexibility to place them very close to my customer's preference. Stay tuned.
|
Left: OK - the plugs I made for tuner holes fit great - I'm now in the process of calculating what can move and by how much. Most likely will involve the CNC. Right: While I am working on the headstock I decided to get the flush mount strap locks installed on the body. I'm also getting ready to start on pickups and electronics. |

I'm taking an opportunity to get the holes drilled for the two flush mount strap locks installation. We're getting there!
|
|

These plugs are cut to just the right size to fit tightly in the existing tuner holes. I will get things set up to make a final decision on how far they can mbe moved and then set things up on CNC.
|
Left: Right now I am cutting a set of plugs that will fit snugly in the tuner holes. May not need all 6 but playing it safe right now. Right: I'm able to move the lower 4 tuners a tiny bit, the upper two I can move just a little further and we'll be able to move on and get this bass done. Will update on the final results. |

Because of the BMC logo and other features requiring space I can only move the 4 lower tuners a small amount. Top two can be plugged and re-drilled to yield a little more adjustment options so we should be fine after that's done.
|
|

I am setting the bass up on the CNC in such a way as to place the headstock parallel with the table surface and with the tuner holes in line with the x and y axes of the machine. That way I can re-machine the hole positions pretty accurately and achieve a small amount of extra space which will help with tuner placement.
|
Left: I have done a lot of homework on this - I'm planning on carefully machining the six tuner holes to slightly modify their positions. This combined with a few more adjustments should help tuner layout. Right: OK - I am machining accurate wooden plugs to fill the existing holes, once done I will re-drill in slightly different locations. |

The goal is to plug the existing holes with accurately cut blanks - let the adhesive set then re-establish the holes to achieve slightly modified placement. Tricky work and I don;t want to damage the exuisting finish or stray too close to the BMC inlay on the front!!!.
|
|

Got the tuners configured for bass and treble sides and I just need to open up the holes in the headstock a tiny bit so that I can get these fitted.
|
Left: Getting the Hipshot tuners ready for installation onto the headstock. These are great quality components and lightweight too. More pics coming. Right: I'm looking at the possibility of increasing the saparation between tuners. Need to keep string path straight but if I am really careful might be able to do this - will update. |

In the effort to keep overall length as short as possible we have a slightly smaller headstock and by necessity the 4 tuners are slightly closer together. I'm looking at making some small adjustments so give us more options on tuner positioning. Might have to be a CNC job though.
|
|

Copper shielding going into the control cavity and I will also do the same thing to the two pickup cavities.
|
Left: I got started on the process of adding copper shielding to the cavities. Should go fairly quickly and it will be nice to have that done so that I can install electronics. Right: Drilling holes in the lid recesses of the two cavities to hold the neo magnets that will end up holding the covers in place. Most of the copper is in. |

Got almost all of the copper shielding applied, and before the last pieces go on, I want to install the neo magnets that will hold the two cavity covers in place.
|
|

Just wanted to clean up the inner surfaces of the pickup cavities before I lined them with the copper shielding.
|
Left: In order to line the pickup cavities with copper shielding I needed to grind the inner surfaces a little bit due to a little overspray in there. Right: I now have a hole drilled throught to the control cavity for the bridge ground, also marked out retaining screw hole positions to attach the bridge to the body. |

Getting ready to install copper shielding in the pickup recesses and aldo to get the bridge attached to the body.
|
|

I am moving on to the installation of the bridge. Has to be placed right for intonation and string alignment.
|
Left: The neck attachment was successful and alignment looked good so I am now getting the bridge placed so that I can mark out screw hole pattern and one for the grounding wire. Right: Two things done this morning - got the truss rod cover fitted with neo magnets so it could be attached, also bot the nut glued in place. |

We now have a fitted truss rod cover and a nut set in the fingerboard. Once the glue is set I can shape the nut and then get the string slots cut into it.
|
|

Nut is almost ready to be installed into the fingerboard. It will be shaped tp match the curve on the fingerboard surface and slots will be cut for the strings.
|
Left: Got the nut shaped and ready to insert. Still have to profile the top and of course cut the string slots, but one step closer to being done! Right: Got the neck bolted on so I can now do some final testing and positioning for the bridge. Bass feels good so I am looking forward to seeing its progress and we addhardware and electronics. |

Neck has now been fitted and bolted on. Doing some final checking on bridge saddles and bridge positioning and will have more photos very soon.
|
|

As soon as I get these neck retainer washers fitted I can attach the neck.
|
Left: I am now grinding out some of the overspray in the insides of the 5 recesses for the neck mounting washers so that they fit nice and neatly. Right: I installed 3 little neo magnets in the headstock today which will hold the truss rod cover in place once I get matching magnets installed into the back of the cover. |

3 of 6 little magnets that will hold the truss rod cover in place. I have to install matching magnets in the exact same locations in the little cover too.
|
|

Neck now fits correctly into body but before finalizing and bolting it in place I want to test alignment for strings between nut and bridge.
|
Left: I got the neck fitted nicely into the body and I'm currently checking alignment with bridge saddles in case I need to do any physical adjustments. Right: Working on installing the nut into the fingerboard. I'll make a template for cutting the nut slots and get those done too. Tuners are also ready to go on the headstock! |

Getting the nut cut and shaped for installation. Then nut slots and tuners.
|
|

Working on dressing the ends of the frets and then rounding and polishing them so they feel nice and smooth.
|
Left: Now working on the dressing of the fret ends so get this neck closer to completion. It's easier to do with the neck off the body! Will be attaching it pretty soon! Right: Got all the frets dressed, now fitting the truss rod cover and will also be adding a nut into the nut slot. Will also add neo magnets to attach the TR cover. |

Getting the truss rod cover to fit nice and snug. I'll add neo magnets to attach it to the headstock.
|
|

There's always a little work after finishing to get the neck pocket and the neck heel to fit properly - just a little removal of buildup..
|
Left: Working on re-fitting the neck onto the body - but wanted to show how nice these body/neck tapered laminates look. You very rarely see this on a bolt-on instrument! Right: One of the first shop tasks was to clean the fingerboard from small areas of overspray so that I end up with a nice clean surface for conditioning. |

TNot a horrible job - the finishing on the neck sometimes bleeds under the masking onto the fingerboard. Doesn't take too long to resurface the board and get it ready for final treatment with conditioner.
|
|

Neck and headstock looking good. I'll be working on this pretty soon to get the frets dressed and the fingerboard surface conditioned. Then will add nut and tuners.
|
Left: Here's a shot of the headstock end of the neck. I still need to dress the frets and polish and conition the fingerboard surface but neck looks and feels great! Right: Here's a quick shot of the front of the instrument body. It's going to look impressive and I can't wait to get hardware on it and all assembled into one piece! |

Body is satin finish with a trans tint around the edge. Looks and feels really nice. Will be posting more photos.
|
|

Got my Audere 4 band Preamp today complete with a set of black stacked knobs!
|
Left: Just received the Audere 4 band preamp for this bass in the mail so I have that plus the stacked knobs ready to be installed when I get the instrument back! Right: Not long back from the finisher and I wanted to get a few pictures of the instrument after finishing has been applied! Looks and feels great! |

This is the back of the instrument and includes the two continuous grain covers - everything looks very nice!!!
|
|

Sanding included all of the body and neck plus the two bridseye maple back cavity covers and the truss rod cover!
|
Left: I got all 5 individual pieces final sanded for the finisher and the bass is ready to go and get it satin finish with the brown trans sunburst! Right: I have spent a lot of time sanding the body and neck of the bass to get it nice and smooth for the finishing process. I'm planning to head to the finisher tomorrow! |

I will be taking this instrument to my finisher for an all-satin finish with a matching trans finish to accent the edges. We are pretty confident it is going to look beautiful!
|
|

Working on a nice logical placement for the four knobs on the top of the body. Just about to run a program for holes and recesses.
|
Left: I set out the positions for the controls on the bass - now have to run a program to cut holes and recesses for the preamp potentiometers. Right: Body is complete I'm just doing some final detail sanding on body and neck so that the finisher can take over. we have a pretty good finishing plan for this bass!! |

Doing a final inspection on all the parts of this bass so my finisher can get started - should look pretty awesome when done!
|
|

The two back covers are currently thicker than they need to be so I am getting ready to sand those down to their final thickness.
|
Left: Next I am going to reduce the thickness of the two back covers to match the recess depth in each cavity. They will then be flush with back surface and ready for finishing. Right: Back cavity cover plates have been successfully machined and sanded to final thickness and just need some final sanding! |

Back of the bass looks good with the two cover plates sanded to final thickness! I need to get started on sanding everything in preparation for finishing.
|
|

Neck is being attached to the body so that I can finish up the carving of some of the details.
|
Left: I am now working on the attachnemt of the neck to the body. Once this is properly set I will finish up the carving of the neck/body transition and verify bridge height versus neck angle. Right: Time to test the bridge height versus the neck height and angle to make sure everything is properlu aligned. Looking good! |

I want to be sure at this stage that the alignment between the neck, strings and the vertical saddle adjustment on the bridge are set up properly.
|
|

Now that the neck retainer ferrules and screws are ready I can attach the neck and get this bass into one piece!!
|
Left: I got the recesses for the neck retaining inserts cut so I will now be able to mount the neck onto the body so that I can finish the detail shaping and sanding etc. Right: I cut the serial number for the instrument and I will be setting that into its dedicated recess first chance I get. The bass now has its own identity! |

I cust the little serial number insert for the recess in the battery compartment.
|
|

Now have a set of strings on the way for this bass. I think I have everything else hardware-wise!
|
Left: Ordered an awesome set of strings from Kalium Music which will sound great on this instrument. We kept the scale length in mind to optimize the fit! Right: I used ebony dust to create a custom fill compound for the BMC3 and Watson logos. This should look really nice against the natural color of the wood. |

Got the inlay work on the headstock filled. As soon as I get a moment I will lelek that off and post a photo of the finished inlay!
|
|

Did some sanding and shaping to break the edge of the body where the player's arm would normally rest on the instrument body.
|
Left: I rounded off the top edge of the upper body half where the player's arm would sit just to create some comfortable relief. Right: Have been sanding and shaping both the body and neck. I'm going to get the neck attached and get the control holes established in the body. Then we'll prepare for the finishing process. |

Working on the final shaping and sanding of the body and the neck.
|
|

Belly cut and the slightly shorter upper horn of the body have been roughed out. Might take a little more off the horn, but right now sanding everything back to a nice smooth finish!.
|
Left: Did a couple of things to the body - one was to rough out the belly cut and the other was to shorten the upper horn. It is a lot smaller but I might trim it a little more. Right: Some more grinding and sanding done to the back of the neck. I'm measuring thickness as I go and also testing with my left hand for the best profile. |

Neck almost ground down and sanded to size - feels pretty good and will re-evaluate thickness and profile after I bolt the neck and body together.
|
|

Tuner holes are now done and I will need to dremel out the excess glue from the inside of the truss rod cover recess. When that's done I will seal the wood and fill the inlay recesses.
|
Left: Got the tuner holes drilled out to final size and I will now clean out the recess for the truss rod cover and move on to filling the logo engraving. Right: I was able to get the back of the neck ground and sanded down to close to finished dimensions. I'm also working on the belly cut on the body and some final body shaping! |

The neck of the bass is now a lot closer to finished size.
|
|

I trimmed the edges of the headstock veneer down to match the perimeter of the headstock itself.
|
Left: This is a slightly cleaned up version of the assembled headstock. I'm getting ready to drill the six tuner holes and then the inlay detail. After that the whole neck will get a cleanup. Right: Two things being planned here. One is the shape of the neck joint to maximize access to upper frets. Other is the outline for the belly cut. |

If you look at the pencil lines you will see the rough ides of how I am planning to cut for the bottom of the neck heel area and the belly cut area. These can be modified as I progress and we'll see how everything feels from the player's point of view.
|
|

Almost ready to get this headstock veneer stuck onto the headstock. Need to machine a clean joint edge with fingerboard first.
|
Left: The headstock veneer has been engraved and I have also marked out the final locations for the tuning pegs. Will do some machining next around the joint and it can go on. Right: Got the headplate ready to glue on - obviously it is a little oversize right now - safer to trim it after it has been attached. should look really nice!! |

Just about ready to glue the veneer plate onto the headstock! Have to make sure it is accurately aligned as these tuner holes are critical.
|
|

Collection all the supplies and tools I need to attach the fingerboard onto the neck!
|
Left: Preparing now to glue the fingerboard onto the neck of the bass. Always have to have everything I could possibly need at my fingertips to get a job like this done properly! Right: Gluing is now underway on the fingerboard! This is a very strong glue but needs to sit overnight to fully cure. Next will be headstock veneer. |

I spent a lot of time setting up and then got the whole thing glued up. Looks good at this stage and will pull it all apart in the morning and see what we got.
|
|

The truss rod cover plate has neen machined out of the headstock veneer. Next will be the inlay work.
|
Left: The cover for the access to the truss rods has now been machined out of the hreadplate veneer. Next will be the engraving of the recesses for the BMC 3 inlay and the watson logo. Right: I am using a laser cut template to make sure all the features on the headstock are correctly placed. I need to get the BMC3 engraved! |

Having an accurate template helps a lot. I need to make sure there is no conflict with the engraving and the rings around the tuner posts.
|
|

Spent some time carefully sawing most of the support material off the fingerboard - I will do the final cleanup on the belt sander and the fingerboard will then be ready for assembly onto the neck.
|
Left: Got the fingerboard carefully sawn off the support material and now I have a clittle sanding and cleanup to do after which I will be attaching this fingerboard to the neck! Right: Getting started on the detail work on the headstock veneer. First job is to cut out the truss rod cover access plate. After that will plan the engraving. |

I want to get the headstock plate attached to the neck but have to cut out the truss rod cover first and get the inlay recesses established.
|
|

Close to finishing up with the fret installation. I'll get the ends cleaned up and separate the fingerboard from the support material. Also have side dots to put in.
|
Left: Only 6 frets left to install. I'm being careful with the frets since the fingerboard material is a bit harder than Ebony would be for example. Right: Happy to announce that I have finished the fretting process and I can now get the frets dressed. remove substrate and insert the side dots to complete the fingerboard. |

Fingerboard looks pretty good already. I need to separate the board from the support material and get all the fret ends dressed flush with the sides.
|
|

Frets are doing in to the fingerboard - should be done with this soon. Looking good.
|
Left: Getting through the fretting process - tales a little more time to establish frets in this material. As soon as they are all in I'll clean up all the ends flush to fingerboard edges. Right: I created an accurate template of the revised headstock and used that to rough saw the headstock to the new profile. |

I have now rough sawed the profile of the revised headstock. Next move will be to apply the headstock veneer material.
|
|

I decided to get the side dot holes drilled before installing frets so ready to get that rolling.
|
Left: Time to get the side dots established in the edge of the fingerboard. I have just set up the CNC to get the set of holes drilled in place. White dots on the black background should work well! Right: Getting started on the fret installation - got the first two frets in. on 22 to go! Should be a very nice looking fingerboard! |

Moving on to the fret installation. Will have this done soon and at that point I can remove it from the support material.
|
|

I have to be careful that we have enough space between E and A strings to clear the E tuner!.
|
Left: Doing some critical adjustments on hole placement for the revised headstock so that we avoid string and tuner interference as much as possible! Right: I did a little testing to see if that A string would be far enough from the E string tuner post and it looks like it will clear with enough space. I will move forward with caution. |

I plotted out the string and tuner placement in a vector program and then used that to cut a template on the laser.
|
|

Quite a lot of work to level all the maple inserts but got that done level to the existing compound radius of the fingerboard. I followed that up with some fine sanding to get us a nice smooth and even finish.
|
Left: I have been sanding the inlay pieces down flush with the fingerboard radius and then sanding again to create a nice smooth and consistent black surface. Looking good. Right: Next step is the bending, cutting and installation of the frets. Need a good amount of fret wire but it's all ready to go. More pics as I progress. |

I have enough bass fret wire to get this fingerboard completed so I am busy setting up the tooling for that. Fretwire needs to be bent relative to fingerboard radius, then rough cut, ground, installed and then cleaned up flush to the edges.
|
|

It's still a good amount oversize but this will make a beautiful headstock veneer for this project.
|
Left: I selected some really cool spalted maple grain for the headstock veneer. It has been rough cut - split and bookmatched and now sanded down to the required thickness. Right: I am now gluing the headplate pieces together so that I can then trim down the entire headstock closer to finished size/shape! |

Lots of clamps involved to get the headstock place assembled. Once this is done I'll clean it up and add a dark veneer to the bottom. After that's done I have to machine out the lid for the truss rod access.
|
|

In this photo you can see the extra material that I glued onto the headstock in order to handle the revised headstock 2/4 shape. Just need to trim this up and carefully sand it to the final geometry.
|
Left: I have now machined a flat surface on the headstock and also glued on a matching maple piece that is large enough to cover the new headstock shape. Will trim and finish asap. Right: Working on the leveling of the matching spalted maple fingerboard inserts so that we can start preparing for fret installation. |

Working on getting all the inlay inserts sanded down flush with the fingerbord surface. Once that's done and sanded to a nice clean finish I will get started on the fret installation.
|
|

I want a nice clean cut so that I can attach a matching piece of maple to enlarge the rough headstock area. Have a very nice piece of Spalted Maple for a headstock veneer.
|
Left: Update on headstock - I managed to shrink it enough to meet my customer's overall length target so I am now going to replace a section of maple to widen the headstock first. Right: Machined a section of the existing headstock off so that I can glue on a little more material that will accommodate the new geometry. |

I will be gluing a larger piece of maple onto this section of the headstock which will then allow me to create the revised headstock shape.
|
|

If I remove the upper area of maple from the headstock and replace that with a larger matchin piece I will have enough raw material to creat the desires 2/4 tuner headstock. Working on that formula right now.
|
Left: This is the template for an earlier 2x4 headstock and I will probably machine off the upper section of headstock maple and replace it with a larger piece. Right: Now gluing the matching Spalted Maple inlay pieces into the recesses in the fingerboard. Once they are all in I will sand them all down flush with fingerboard. |

Getting the first three inlay pieces glued into the fingerboard.
|
|

Now ready tpo machine the recess for the Neutrik jack socket assembly. One more task out of the way.
|
Left: The body of the instrument is now set up on the CNC so that I can machine out the recess for the Neutrik locking output jack assembly. Takes some careful setup but not too long to run. Right: The recess for the Neutrik socket has now been established. I made it deep enough that the outer part will be flush with sides. |

Got the recess for the Neutrik output machined into the instrument.
|
|

Glad to get the fingerboard inlay pieces all cut. I'll be working on getting them all glued in place next.
|
Left: Got all the insert pieces cut for the fingerboard so now I can work on getting them glued in place. May add a detail to frets 12 and 24 just to make then stand out a little more. Right: Doing some quick checking on bridge placement and other alignments as we move forward with this bass. Starting to look kinda cool! |

Measuring some critical features to make sure everything is aligned. Moving forward and starting to look more complete!.
|
|

Started machining the Spalted Maple inserts for the inlay on the fingerboard.
|
Left: Now getting started on cutting out the inlay pieces for the fingerboard from the same material I used for the body top. Will get these fitted and installed asap! Right: Starting to get the inlay pieces cut and fitted into the fingerboard recesses. When I am done with the machining I will post a photo of all the inserts. |

These Spalted Maple pieces look pretty good against the black fingerboard.
|
|

Fingerboard is ready for inlay and once I get that done I will do the fret installation and the side dot work.
|
Left: I'm going to use spalted maple (same as the instrument top) for both the fingerboard inlays and the veneer on the front of the headstock. That should look really good. Right: Been working on reducing the body length as much as existing features will allow. Probably got a good half inch off it! |

The back of the body has been carefully ground down to a slightly different end profile in order to reduce the overall length as much as possible.
|
|

Battery cavity has been successfully machined and I also cut a recess for the serial number insert.
|
Left: I got the battery cavity successfully cut and while I was in there I also cut the slot for the serial number insert which will be part of the finished instrument. Now moving on to control cavity. Right: I have now machined the control cavity into the back of the instrument body. Next will be Neutrik output jack. |

Got the control cavity machined and I will try to now get the recess for the Neutrik jack output machined into the side of the body.
|
|

Programmed the two back cavities and will be machining those out very soon. Also making plans to do some additional body contour shaping where possible.
|
Left: Got programs done so that I can machine out the battery cavity and the main control cavity. As soon as my machine is free I will go ahead and get those tasks done. Right: CNC is now free and I am setting up the body of the instrument so that I can machine out the battery and control cavities in the back. |

Getting started on machining the two back cavities (battery and control cavities).
|
|

Planning for cutting the two cavities on the back. I already have continuous grain cavity covers which I harvested from the back material earlier!
|
Left: Next step on this bass will be to cut the battery and control cavities. Will also be adding a comfortable "belly-cut" to the back of the body and refining the neck-joint area. Right: Roughing out the back of the neck to get it a bit closer to finished thickness. I'll end up using a rotary sander and hand tools to finish. |

Grinding off some of the excess wood on the back of the neck to move this instrument forward a bit. The wood laminates will look awesome whan complete!
|
|

All the support pieces for the inlay are leveled and all the fret slots have been finished manually. Now have inlay and side dots to take care of.
|
Left: Inserts are all leveled and I used a manual tool to make sure that all the fret slots were cut deep enough for fret installation. Now need to work on the actual shell inlay! Right: The inserts for the inlay are now sitting in the fingerboard recesses without the thin wood spacers, leaving just anough space for the shell inlay! |

Yes I could have just done simple dots - but I had a vision of big fancy bold shell inlay on this fingerboard.
|
|

These veneer spacers stay in the recesses until I have sanded the support material flush with fingerboard radius. When the veneer pieces are removed the supports will drop down about .030".
|
Left: Next step for inlay is cutting a set of veneer pieces that sit in the base of each of the recesses. I will then insert the support pieces and sand those all down flush with fingerboard radius. Right: I'm leveling the insert material to match the radius of the board and at the same time I'm cleaning up fingerboard surface finish. |

I need to get the surface of the fingerboard material sanded down to a nice clean finish so I am busy doing that with the inlay inserts in place.
|
|

Lots of work done on this fingerboard. Will now have to work on some inlay ideas I have - more on that very soon.
|
Left: Machining on the fingerboard is now complete. Got the fret slots cut and then the recesses for block inlays. Also cut the slot for the nut. Right: I used the laser to cut a set of inserts which will become the radiused supports for the shell inlay. I now need to carefully sand them to match the radius of the fingerboard! |

These inserts will be the bases of the shell inlay on the neck. They will be sanded to the finished radius and just a little lower than the top surface. Shell will be applied once these are installed.
|
|

Ready to cut 24 fret slots in this board. Also making plans for what I will do for fingerboard inlay..
|
Left: Fingerboard back up on CNC and this time I will be carefully cutting the slots for the frets. I use very small end mills and have to be careful they do not break! Right: Got started on the cutting of the fret slots - this is the first pass to make sure everything works right. I'll run a couple of more times to achieve full depth. |

Got started on cutting the fret slots. I am also thinking of making red shell inlay - more to come on that.
|
|

I'm ready to machine the neck pocket into the body of this bass.
|
Left: Next task with this bass will be to machine a neck pocket into the body. It will need to achive the correct neck-to-body angle to match the adjustment height of the bridge. Right: I was able to get the neck pocket and the two pickup recesses cut into the body in one setup. This moves this bass on quite a bit forward! |

Neck pocket and both pickup recesses have been machined into the instrument body.
|
|

Feels good to get one more machining operation done on this bass. Fingerboard is now finished width and length. Next will be the radius on the top.
|
Left: I have now machined the finished perimeter of the fingerboard to match the dimensions of the neck. As soon as I have a chance I will then machine the compound radius on the top surface of the board. Right: The compound radius has now been machined on the top surface and I have cut the fingerboard to finished thickness. |

I have now machined the top radius down to a point where I have also created the final fingerboard thickness.
|
|

NJut got the pickups for this bass and as soon as I have the neck fitted I will machine the two pickup recesses into the body!
|
Left: Pickups on this bass will be Nordstrand Big Rig 6 which I just purchased. Now that I have the pickups I can cut the pickup recesses into the body with confidence! Right: Started the machining work on the fingerboard. Right now the main task is reducing the thickness down to close to the finished size, close to 1/4 inch. |

Just got started on machining the fingerboard material down to close to finished size. When that's done I can machine the actual perimeter of the board to its final width and length.
|
|

I don't think this bass will be very heavy but I always try to mitigate weight where ever possible. I will cut ourt some of the mahogany in these areas.
|
Left: Not a lot of room for internal chambering. I might remove some material from these areas just to help keep overall weight down. Right: Got the body slightly chambered and then got top plate glued onto the existing body. Everything went quite well and the whole thing looks and feels good. Now trimming the perimeter. |

Now have a nice solid instrument body. Looking pretty good and will probably look impressive with a color tint or sumburst!
|
|

I guled veneer into the two back plates and them machined the joint faces so that I could glue the to plates together. I am now ready to glue the top onto the body.
|
Left: Got the top plates veneered and the joint faces carefully machined. I then glued the two top plates glued together into one piece! I will now get everything ready to get the top glued onto the body. Right: I will probably be installing Nordstrand pickups into this monster once the body is completed. Great sound source! |

Probably setting this bass up for Nordstrand pickups.
|
|

Took some material off the top plates to get them closer to finished sizes. Will have then glued together soon.
|
Left: Doing a little refining to the shape of the top plates. I now need to machine the joint edge on each piece to get them ready to be glued together. Right: Before the top halves get glued together I need to add a maple veneer to the bottom of each panel to match the rest of the decorative veneers on the instrument. |

Gluing white maple veneer onto the joint faces of the two top halves.
|
|

I don't have a piece of wood fingerboard material on hand for this bass so I am going to use a recycled paper based product.
|
Left: Planning to try out some wood substitute for the fingerboard of this bass. It's actually a hard paper-based material. I think it will look good when done. Right: I cut out a blank for the fingerboard and I am gluing it onto a substrate piece of material so that it is stable during all the upcoming machining operations. |

Fingerboard is rough cut and being attached to an MDFboard for support.
|
|

Gluing process went well for the body and I can now move ahead and work on the final perimeter shape.
|
Left: Got all three of the body components glued together and sanded on the main surfaces. Now have to trim off excess and do some shaping on body perimeter. Right: I am now gluing a rectangular carbon fiber rod into a slot into the center of the neck which will provide a lot of rigidity to the finished neck structure. |

Nice to get the CF rod into the neck because I can now look at getting a fingerboard added to this neck!.
|
|

Got started on gluing the body parts together. Then I will work on neck and the top plate.
|
Left: Now gluing the top body bout onto the center section of the body. Once this sets I will clean up and repeat the process with the lower body bout. Right: Neck is up on the CNC so that I can do a cut for a special carbon fiber rod insert between th etruss rods. This will create a very strong and rigid neck for this 6-string! |

Machining a slot for a custom carbon fiber insert along the center of the neck.
|
|

I made the body halves a little bit narrower to minimize final body width. Now I have to machine nice clean joint faces so that the three pieces can be accurately glued together.
|
Left: I have been measuring and marking out the body halves to achieve the best body width for a 6-string bass. The upper and lower halves have been trimmed a little to achieve that. Right: The edges of all three body components have now been machined flat and square and are ready for laminating and gluing together. |

All the body joint faces have been machined flat and square and I will now apply a coupl eof decorative veneers to each joint before I assemble everything together.
|
|

I now havetwo continuous grain covers and I filled the back of each cover area withapiece of similar maple. Now I can attach these pieces to the body halves.
|
Left: I cut out the covers and created a relief step in the back of each area and also cut maple fillers to install into those recesses. Mission accomplished, now I can assemble! Right: I now have the two body halves assembled and have also rough sanded around the edges. They will soon be able to be glued to the center section. |

The two back pieces have now been glued onto the two mahogany center pieces. This gives me two body halves which will soon attach to the center section of the body.
|
|

Although it takes a bit more time and work I really like the effect of having continuous grain cavity covers on an instrument with nice wood. I'm getting started on the process of cutting out the lids from the back plate material.
|
Left: I want to create continuous grain cavity covers for the back of this instrument which means I have to first harvest the two lids out of the back plate material. Right: I got the back cover process started by machining the shapes of the two back covers into the two back plates. Next I need to flip them over to cut them out. |

First step of harvesting out the two continuous grain back covers has been done.
|
|

I'm just pushing to get some of this veneer work done because there is so mch of it! It will be nice to get this body glued together.
|
Left: These are the two front plates getting the first of their two decorative veneers attached in the vacuum press. I'll repeat the process with maple veneer as soon as possible. Right: These are the pieces for the upper and lower body halves which have been veneered and are now ready to be glued together. |

These pieces are ready to be assembled into pairs to create the upper and lower body halves.
|
|

I will be adding at least one veneer stripe between wood joints - maybe two if that works better. Time to do some gluing!.
|
Left: I plan to add some decorative veneer betweel all the layers of wood on this bass. Checking right now to see if I have enough dark stuff on hand! Right: Have several pieces of the body being laminated with decorative veneer. I'll do a contrasting light and dark pinstripe all over which will look great on the finished instrument! |

Getting started on the multiple gluing operations required to prep the body parts with decorative pinstriping. Will be worth it though.
|
|

I just sanded the center section of the body material so that I can continue assembling the body parts.
|
Left: I am machining down the thickness of the laminated center plate to match that of the two back body panels. That way I can go ahead and start building the body assembly. Right: Checking bridge size related to scale length and string spacing so that I can plan the next machining move on this instrument. |

All the parts look nice together, my next task is to machine all the body parts accurately so that they will fit together.
|
|

Redy to do some cutting to complete all the body parts and get them assembled.
|
Left: I'm ready to do some sawing and machining to prepare the center section of the back of the bass for assembly. Once that's done I'll add the center mahogany block to it. Right: I cut and sanded the center mahogany piece of the body material so that it matched the thickness of the two body halves. Starting to take shape. |

I just sanded the center section of the body material so that I can continue assembling the body parts.
|
|

This ABM bridge seems to be the best choice for this bass. The string spacing is a good match for the neck geometry.
|
Left: I am fairly sure I will be using this ABM bridge for this bass since the string spacing will probably work very well. May chamber the body to keep the overall weight down as much as possible. Right: Rough cutting a piece of mahogany which will be part of the center structure of the body of the bass. Need to get it all glued together. |

This chunk of mahogany will allow me to get most of the instrument's body assembled.
|
|

I rough cut some birdseye maple which will be the back panels of the body parts..
|
Left: Decided to use this birdseye maple for the back panels of the instrument body. Will get busy on creating a mahogany (probably) center to the two sides and get the body assembled. Right: I cut some material for the center of the body sections and sanded that to create a 3 layer body thickness. Will need to cut one more core piece. |

I am trying to use up quality stock material so I created two center pieces for the body halves..
|
|

I have this piece of maple in the shop - not a crazy grain but has some nice natural color. Will split the piece in half and see what we are really dealing with.
|
Left: I am experimenting with this piece of maple to see if I cen create an interesting top plate for this bass. We will see ehat it looks like after it has been split and bookmatched. Right: The wood came out looking pretty nice. If I select just the right tint and sunburst I think we could have a very nice looking top on the final product! |

Looks pretty nice - especially when you imagine what it would be like with a custom finish!.
|
|

Since I am using some maple stock I am making sure that the body geometry works for both front and back sets.
|
Left: Doing some planning to make sure the back plates and the front plates match in size and geometry before I do any final cutting. Should look pretty good when done! Right: While I have some available CNC time I am going to trim the center section of the back just a little on each side to get it closer to the actual neck dimensions. |

Quick machining adjustment to the widthe of the center section of the back plate.
|
|

I have curly maple for top and bottom body halves and bridseye maple for the center. Should look impressive with a finish and tint to bring out some very nice grain.
|
Left: These are the woods I have located for the top of the bass. The outer ones are curly maple and the center is birdseye maple.I'll probably do a nice colored tint but the grain will look good! Right: I'm establishing what will be the body width and the relationship between bridge, scale length and the placement of the neck. |

Doing some experimenting with the linear placememnt of bridge neck and body. Once I am happy with that I can cut the pieces and start to get them assembled.
|
|

This bass entirely depends on what materials I have in the shop to create the various parts. Found some nice curly maple which could be used for the top.
|
Left: I am looking through some top and back wood options from which I can create a 6 string bass. Right now I am looking for the best wood matches to go together. Right: I rough cut a couple of nice maple pieces which I am planning to use for the upper and lower top plate. I'm inventingthis bass as I go so will update.. |

THis maple grain should respond really well to either a natural finish or perhaps a transparent color tint when the bass is done.
|
|


