|

Tested the actual Guyker bridge outline and profile on the guitar and so far things look good. If bridge location works well for the scale length I will go ahead and cut the neck pocket and get the neck fitted to the body.
|
Left: I created a scaled outline of the Guyker bridge assembly and cut that on the laser to test for fit. Looks pretty good so I will keep things going based on that! Right: I'm looking at the relationship between bridge location and neck depth into the body. May make a few adjustments and will update!!! |

With the Guyker bridge set to the scale of the guitar it looks like the neck is a little too far into the body for access to the higher frets. I will make a couple of adjustments to the body contour and that should balance things out nicely.
|
|

Getting things set up on the CNC to machine out the neck pocket in the body.
|
Left: Working on getting the neck pocket cut into the body of the guitar so that we can deal with the instrument as one assembled piece. Right: I need some physical data from the bridge I might be using in order to finalize some other body shapes & sizes. I have ny eye on this Guyker setup which might work well for this guitar! |

I may be adding this bridge assembly to the formula for this guitar. Liiks like it may be a good option!
|
|

I will be putting the body onto the CNC and cutting the neck recess soon. It will be nice to get it into one piece.
|
Left: Getting things ready to fit the neck onto the body of the instrument. It will be good to get this guitar into one assembled piece and I think it will look really great! Right: Just machined the heel end of the neck down to its finished thickness. This allows me to now fit the neck and body together with a neck recess. |

Machined neck heel down to finished size and I can now set up to cut the neck recess and get the neck and body fitted together.
|
|

Gluing the fingerboard onto the neck blank. Once the glue has cured I will remove all the rubber bands and clean off the excess glue.
|
Left: I am now gluing the fingerboard onto the neck using a rubber band fixture. This will need to set overnight and I'll post a photo sfter it's all cleaned up. Right: Fingerboard now securely attached to neck. Needs a bit of cosmetic cleanup because the glue makes a little bit of a mess. Will get ths attached to body soon! |

Nice to get the fingerboard glued on - I will clean everything up and start working on cutting a neck pocket and attaching the neck to the body.
|
|

Fingerboard came out looking good after the installation of the pearl dots.
|
Left: I have now trimmed the fingerboard support and glued in and leveled all the peral dot inlay pieces. The fingerboard is now ready for frets to be installed. Right: Side dot holes have been drilled and I'm currently in the process of installing the 24 frets into the fingerboard. If all goes well I will attach this board to neck soon! |

Frets are now going into the neck. Making progress.
|
|

Got all the basic machining done on the fingerboard. I will add the dots and get those leveled off, then probably install frets. Also have to add the side dots along the edge of the board.
|
Left: Fingerboard is taking shape. Got the fret slots established and also decided to machine in the recesses for the fingerboard dots. Should look very nice when complete. Right: I'm just about to trim the substrate material around the fingerboard, then install the dots, and when that's done I will set up to install the 24 frets. |

Lots of work going on with the fingerboard right now but that will move the whole instrument forward a long way.
|
|

Just finished roughing down the material to a thickness close to the actual fingerboard. Next I will cut the finished length and width.
|
Left: Looks rough right now because I just machined the thickness down closer to finished size. I will now change cutters and cut the finished profile of the board to match the neck. Right: Cut the fingerboard perimeter and them generated the top surface radius and the final fingerboard thickness! Making progress here! |

Did some final machining to get the perimeter of the fingerboard and also machined the top radius.
|
|

Gluing two carbon fiber rods into the neck structure. Once this is done I can start crving the back and can also add a fingerboard!.
|
Left: I cut the carbon fiber rods to length and I am now gluing them into their channels in the neck so that they are a permanent part of the neck structure. Right: I decided to use phenolic for the fingerboard as the hardware will all be black and this way the whole thing will look awesome! I'll get started on this asap to complete the neck. |

This fingerboard will be dense black to match the hardware. Probably put dot markers on the board.
|
|

Getting the ebony for the fingerboard set up for machining. Will have serveral operations on this once I start!.
|
Left: Fingerboard blank is now attached to substrate and ready to be machined on the CNC. I will cut thickness, perimeter, top radius, fret slots and nut slot. Possibly inlay if I decide on something before then! Right: I machined the truss rod slot into the neck and also the two slots into which I will glue the carbon fiber rods. |

Carbon fiber slots and the truss rod slot now successfully machined into the neck.
|
|

This combination of bridge and string retainer looks like my best choice. I have used these before and they are great!
|
Left: After some thought I am going to use the Hipshot Headless bridge pictured here, also using the smaller of the two string retainer options they offer builders. Right: Working on calculations for the neck pocket. Headless demands that the tuner knobs are accessible at back of body so neck position has to take that into account. |

Working on the placement of the bridge and the neck pocket.
|
|

Neck has been shaped to final size. I have too many jobs for CNC to do slots right now but will set up again very soon to do that. In the meantime I will finish the neck heel and possibly use those dimensions to cut the neck socket into the body.
|
Left: Machining on top surface and perimeter of the neck has now been done. Top surface needs 3 slots (Truss rod and CF rods) but may have to do that in another setup. Right: I have trimmed off the excess wood on the neck and once that is all cleaned up at the heel end I will be cutting the neck pocket in the front of the body. |

Now that I have a finished neck heel I can machine the neck pocket to fit..
|
|

Relief for tuners has been rough cut and I am working on some other features around the perimeter of the body.
|
Left: I rough cut the relief at the back end of the guitar which will provide clearance for the tuner knobs at tha back of the bridge. I have some final body shaping to do once I get the neck piece shaped. Right: Now machining the neck blank on the CNC. I surfaced the top and will also machine the perimeter and square off the ends. |

Starting work on shaping the neck of the instrument. If I have time I will add truss rod slot and carbon fiber slots.
|
|

Working right now on cleaning up around the body perimeter using the spindle sander. I will be moving back to the neck soon so that I can get that closer to completion.
|
Left: Body now looks a bit more complete as I have sawn out around the lower horn area and done quite a bit more spindle sanding around the entire body perimeter. Right: This is the really nice piece of Ebony which I will be machining for the fingerboard. I will be machining the neck to size on the CNC very soon! |

Have this awesome piece of Ebony for the fingerboard. Getting that ready to be machined and cutting the fret slots.
|
|

Top plate and body being glued together in vacuum press.
|
Left: Top is now being glued onto the body in the vacuum press. It will remain in there for most of the day but will bevery solidly attached when it comes out! Right: Top plate is now glued onto body (although you can't see much in this photo). I will be trimming the material round the adges to create the finished body profile. |

Succesful gluing of the top onto the body. It will look much more like a guitar body when I trim off all the extra material!.
|
|

Getting ready to attach this beautiful yop plate onto the body of this guitar!.
|
Left: I'm now ready to glue the top plate of this guitar body onto the pre assembled and machinedbody blank. When that's done I can finish up the body profile and start work on the neck. Right: I have the neck blank up on the CNC ready for machining.I'll be cutting the top joint surface and machining the neck profile to finished size. |

I have several machining operations to do to the neck blank to move it forward.
|
|

There arenot many produers of headless guitar hardware but this Hipshot stuff is great and I have used their products for many years.
|
Left: If we happen to go with a tremolo this is the Hipshot Headless setup in black. Their quality is excellent and they are based in NY so not too hard to get hold of. Right: I machined the three wiring channels in the topof the body (2 pickups and bridge ground) and I can now get things ready for gluing the top onto the body. |

Three wiring channels established in the top of the body - I can go ahead and glue the Lacewood top on.
|
|

Placing the bridge allows me to also place neck heel and pickup locations. I need to do some machining for wiring channels before gluing the decorative top on.
|
Left: Need to plan for pickup placement which in turn allows me to route wiring channels before the top plate goes on. I'm using ABM bridges for reference - they are also a candidate for bridge units. Right: Wiring channels have been marked out so I can go ahead and get these all cut. Should have the top attached very soon! |

Marked out the necessary wiring channels.
|
|

Hipshot headless hardware - probably chrome finish.
|
Left: This is most likely the Hipshot headless bridge units I will be using for this guitar. Very solid and it also looke great on the instrument. Right: I'm ready to start machining both the neck blank and the fingerboard blank so that I can move this guitar a little further forward. The fingerboard is a nice dark ebony! |

I will be doing some more work to the neck of this guitar and once that is complete I'll be able to get the body finished up too.
|
|

Fingerboard will be ebony - this blank is a little rough right now but will clean up very well and end up as a perfect addition to this guitar.
|
Left: I have some ebony on hand that I can use for the fingerboard of this guitar. I'll need to machine and sand it to get it thicknessed but it should work out perfectly for this instrument. Right: Calculating optimum bridge position and extent of the neck pocket. This allows me to define pickup locations and internal wiring channels. |

Will most likely use Hipshot tuner hardware - but since this is a headless the bridge/tuners will be a little different.
|
|

Bookmatched Australian Lacewood top plate looking good!.
|
Left: The top plate of the guitar has now been successfully glued together. I will need to spend a little time on the body to get it ready for the top plate to go on. Right: I sanded down the extra material in the core section of the body so that the whole top surface is nice and flat. I will machine wiring channels into this surface. |

Top of the bopdy is now sanded flat and I'll be able to add the top onto it soon.
|
|

Back of the body completed. Will soon be able to put the top on.
|
Left: This is the body right after gluing the second half onto the core. Needs some cleaning up but the joints are good and I can move on to other tasks on this one. Right: This photo shows the back of the guitar and also the top plate which I need to bookmatch into one piece. Should be a very nice looking guitar when we're done. |

Body assembled and I'll be working on the top plate so that I can get that attached too.
|
|

Just waiting for joint faces to be machined.
|
Left: I have the body halves roughed out and waiting now for CNC time where I will machine the joint faces for assembly onto the body core. Should look nice when done. Right: Bottom body half has been successfully attached to the core. I will now move on to attaching the top half and we will have something that looks like a guitar. |

One body half attached - one more to go.
|
|

Up on the CNC for some cavity cover machining.
|
Left: Before the back goes on the body I have to harvest out the control cavity plate and machine a recess for it in the lower plate material. Right: I have machined the cavity cover out of the back plate, inserted a flush filler plate from the back and then glued that onto the lower walnut body half. Just needs trimming and machining now. |

Both body halves are now almost ready to be attached to the body.
|
|

Using walnut body halves and some very bice looking curly walnut for back plates.
|
Left: I had some very nice looking bookmatched Walnut which I will be adding to create the body halves and back plates. This should look really cool! Right: I am using the vacuum press to glue the decorative figured walnut back plate to the core of the body. After gluing I will machine a joint face so it can be gled onto the core pieces. |

The fancy walnut back plate is being glued onto the upper body half.
|
|

The two center Koa pieces are now cut to a continuous taper.
|
Left: Ran the the center sections on the CNC to create a nice accurate taper on both sides of each piece. They are now ready to be glued to the maper outer pieces. Right: I have 2 sets of tapered laminated pieces which will now be glued together to create the neck blank and the core of the body. Should look like a guitar soon! |

Koa and Maple laminated ready to be glued together.
|
|

Center components of the neck and body will be Curly Koa .
|
Left: Started work on the center sections of the instrument by machining a nice flat side on the center laminates of the neck and body. These will be machined to a taper. Right: I have sections of neck laminates and body core pieces rough cut from Koa and Curly Maple. The center Koa pieces will be tapered to match neck taper. |

Rough cut meck and body pieces ready for more machining and sanding.
|
|

The Kahler bridge is a well thought out and built unit that provides some flexibility in the adjustment of linear travel of the saddles. I'm going to be making a few adjustments to set it up for this instrument. I'll post a phoo of the adjusted unit.
|
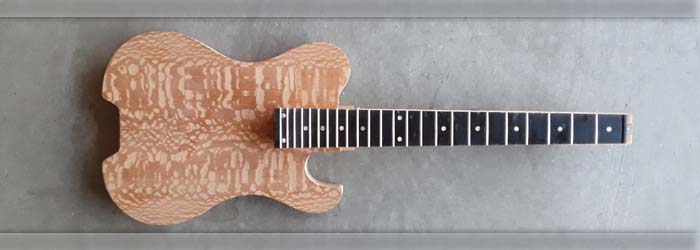
Left: This is the top of the guitar - a really nice piece of Australian Lacewood which I have had in my shop for a few years and never used. Right: Drum sandng the two top plates down to the right thickness. I will then machine a joint face and get them glued together in an impressive bookmatched top. Also have neck laminates ready. |

I will be moving ahead with this guitar creating the laminated neck assembly first.
|
|


