Lightest bass tuners on the marketplace. They made a big difference to the balance.
|
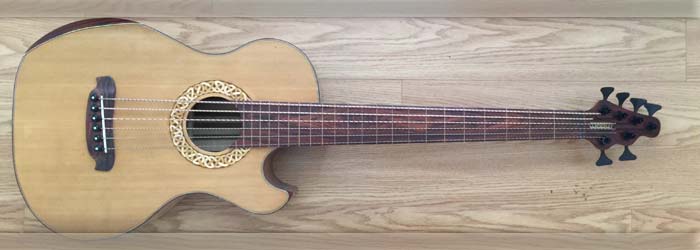
Left: The new Hipshot tuners arrived - a little delayed by the delivery service so I have to hustle a bit. Tuners are on and it made a noticeable difference - feels MUCH better. Right: I am now doing some adjustment to bridge saddle and nut and also need to tension up the truss rod but it sounds good! |

Bass is strung up again and I'm doing some basic adjustments.
|
|

Excited to get the strings on the bass, now I have to do a bunch of adjustments to get it playing properly.
|
I got the strings on and played the bass!! I need to work on the bridge and nut and truss rod to get everything working the way it should. Also the bridge pins are designed for 4-string bass so I am going to have to modify the upper 2 or 3 to accommodate the larger strings. Overall things are good. The bass sounds clear and with decent volume - will know better when all the variables are tuned in a bit better. More photos soon! |
|

Strings going and I will then get the nut and saddle finished.
|
The strings are being test fitted right now - and I was able to get some sound out of this instrument - very exciting. I have to refine the nut slots and get the saddle adjusted to the right height but so far it all seems to be doing its job. I have a good amount of fiddly filing work to do but I should have this instrument in a playable condition very soon and I will then add the electronics and test them so I can send to my customer! |
|

Adding string slots in the nut.
|
I'm now cutting the strings slots in the nut and as always, spacing is critical. I usually establish the two outer slots first based on their optimum distance from the edges and then take care of those in the center. Also, singe there's such a variation in the string widths, I like to manage the spacing so that the distance between the strings is considered too. Best way is to make small cuts and when you are happy, bring to full width! |
|

SCompleted headstock with nut and truss rod cover - now to cut string slots.
|
Tuners are installed, nut is shaped and flush and ready for string slots, magnets have been added to the truss rod cover and that is now in place. Next job will be to establish string slots in the nut and when that is done I will put strings on the instrument to allow me to get the saddle set up and cut and shaped to the right height. I hav ethe electronics package ready and that will also happen soonLooking good so far!!! |
|

So happy to be adding hardware to this amazing bass - tuners are being added and strings will be on really soon.
|
I'm putting the the hardware on the bass now in an effort to get this bass done and into my customer's hands. Right now the first stage is getting the tuners oriented and installed so that I can get strings on this bass and thereby get the string slots filed into the nut. I have to file the nut down to the right height which is probably my next task. I checked the preamp package today and was working on the installation plan. |
|

Was delayed a but because the tapered reamer I THOUGH was the right geometry for the bridge pinns turened out to be otherwise - had to scramble to find suitable cutters.
|
After much ado and looking for the right tools in many different vendors I was able to get the holes reamed out to the right shape and size. The bridge pins now fit in the holes nice and snugly and the seem strong and rigid enough to handle the string tension. With that done I can now apply a couple of coats of finish to the bridge because it's just bare wood right now. I will continue with the assembly process and keep posting here. |
|

Cutting and shaping nut and fittingh the tuners on the headstock. Magnets are in the truiss rod cover.
|
I have machined down the nut to a width that fits the slot in the fingerboard and I am now shaping it to the appropriate height and will be filing in the six string slots. I'm also fitting the tuners so that I can get the headstock area completed. I had a hard tim finding a tapered reamer for the bridge pins, it's a very small taper and it was very difficult to locate a custom reamer to match. Just got one so hoping all will be well there. |
|

Drilling holes for the nmagnets that will hold the truss rod cover on.
|
Getting down to the detail work now. I need to drill three holes on the headstock to hold magnets that will retain the truss rod cover shown in the picture. These 3 holes are easy, the correponding three on the back of the little cover plate are a little more demanding. I will then install the nut and get all six slots carefully established. I'm also testing the tapered holes for bridge pins in a separate piece of material, then I will do the bridge work. |
|

adding some finishing touch-up and ready to ream string peg holes.
|
This photo shows the bridge installed in place and all that now needs is a coat of tung oil and then I will taper-ream out the six holes to fit the string plugs. I'm also working on a nut that I will soon have cut for string spacing and installed in the neck. Right now I am adding some finishing compound to the harder-to-get-to areas around the sides (that recess under the neck). So far so good. |
|

A look at the back of the bass - Koa and Maple grain looking nice.
|
Just another look at the back of the bass as I am giving it some final rubbing down with steel wool. Next task is attaching some of the hardware - I will probably start with the tuners and nut. Once these are set I will fit the pegs for the string holes and add the saddle. I also have a hole to drill at the bottom end for the output from the electronics package but that should not present a big challenge. Can't wait though! |
|

Final finish coat going onto sides and neck.
|
Get a load of this Koa grain. I will NEVER get this good a quality curly Koa again - it's now so rare you can't find any good stuff on the marketplace. This bass is worth a lot just because of its materials! Wait till you see the back too - that is going to be impressive. I'm working my way round the body in thin coats and then runnbing down with steel wool to repeat. I will know when we're done but should not take more than 3 or 4 coats. |
|

After many hours with very fine grit sandpaper and steel wool, body is ready for finish coat!
|
I arrived at a very good moment on this bass. After not hours, but days of sanding I got through the 320 and 400-grit sanding stage and then followed through with #0000 steel wool all over the instrument. I can now get a couple of coats of my very hard exterior coat on there and we'll be done with the surfacing! That took way longer than I expected. Bridge is on and hardware ready to instally as soon as finish is rubbed down! |
|

Gluing and clamping the bridge to the top of the body!
|
After finding all the right tooling, drilling fixture holes, and testing the assembly for proper pressure points I went ahead and applied glue to the underside of the bridge and started the slow and progressive clamping procedure so that I felt that the bridge was being held down with even and well distributed pressure. My internal clamping block worked veru well giving me an even surface for clamping. This will stay like this overnight! |
|

I now have a bridge with a saddle so I can go ahead and glue the bridge to the body!
|
I now have an accurately machined saddle slot in the bridge and I can now glue the bridge onto the body with a healthy degree of confidence! I have created most of the tooling I need to get the bridge glued on so my next step is to get that done so that I can use my tapered reamer to re-size the holed for the bridge pins and get the nut on the other end of the neck. I am almost ready to permanently attach hardware and get strings on! |
|

Setting up bridge so that I can sut the slot for the saddle.
|
It occurred to me overnight that is would be very wise to cut the saddle slot into the bridge before the beridge was permanently attached to the body of the instrument. To that end I am setting up the bridge so that I can create a slot for the saddle that is positioned not only for accurate placemebt for the c-string but also w3ith the appropriate compensation for the lower strings also. I worked it all out on the computer! |
|

Small height adjustment to the bridge block.
|
I decided it was mathematically prudent to take about 1/16" off the bottom of the bridge plate just so that I can guarantee that I have enough space about the bridge block for the saddle. I used the existing holes to clam the bridge upside down and clean off just the right amount of material. I will now remove it and sand off the material around the two screws and I will have a nice flat surface which will then attach to the top of the instrument. |
|

Cutting some material to facilitate clamping under the bridge area.
|
After measuring the braces below the top around the bridge and the spacing between them I cut these blocks which I will locate under the bridge to provide a solid and even surface for the clamps to hold. I will pin the bridge in plave using the string holes and hopefully everything will go as planned. I'm going to skim a little bit off the bridge height for a better relationship with the neck itself and then get things glued! |
|

Top surface scraped clean and I am ready to glue bridge onto top plate.
|
This is the footprint of the bridge with the initial grain filler scraped off within the bridge shape. This was done pretty carefully so that I would have true wood-to wood joint surfaces that would guarantee me the best possible joint integrity between the top and the bridge. Next step is to get the bridge glued in place so I am collecting all the tools and accessories I need to do that. I will post a photo soon! |
|

Doing the prep work for gluing the bridge onto the top plate.
|
I am now scraping the surface of the top under the footprint of the bridge so that I have a true wood-to-wood connection when I glue the two pieces together. I will then pin the bridge to the top using two of the peg holes and glue and clamp the bridge onto the body. It feels good to be doing these final operations to a bass I have been working on for some time - I'm looking forward to getting this project sent to my customer! |
|

Finish is completed on the top plate - now moving on to the rest of the body!
|
Last coat is on the top and I like how it feels. It's a nice hard finish and should hold up very well to the rigors of use on an acoustic instrument. I am now able to remove the tape protecting the bare wood below the bridge and I will be getting that glued on as soon as I have an opportunity. For the rest of the instrument I am going to move forward and get the same finish applied to all the other surfaces so that I can consider that complete! |
|

Sanding and rubbing down between coats.
|
I now have a couple of coats on the top and I am very impressed at how hard and bullet-proof the finish is. I have been sanding and using 0000 steel wood between coats and things seem to be building up very well. I think the next coat will be that last one and I can get the bridge attached! The rest of the instrument is well sanded so I can move on to the sides, neck and back. The compound dries fairly quickly (best overnight) so that helps too. |
|

Applying the final finishing solution to the top of the bass.
|
The finishing process on a bass like this is a remarkable amount of work. I had this bass to the point weher I was ready to apply finish but my first attempt, following the rules and brushing the final finish on lightly, didn't result in as consistent finish as I was hoping. I had to remove the top coat and rebuild the undercoats so I could try a different application method. Fortunately this is looking good and I'm moving ahead! |
|

Quick shot of the Koa sides before the final finish gets applied.
|
As I was working in my shop, partly on this bass, I happened to notice the way the Koa sides caught the light. It's hard to capture this in a photograph but it looks really impressive and this is before the final finishing coats go on! I can see the ligt at the end of the tunnel and I am very excited about this bass being a complete working musical piece of artwork that has had more of me in it than any other instrument! |
|

Getting the finishing touched done around the soundhole.
|
After what seems like 50 coats on the top and around the surround I am on my last application and once this is sanded down I will apply the surface finish. I'm liking the way it is coming out though, the colors in the inlay are beautiful. I found the perfect paper grade and type to rub down the dried coats so I now feel a little better about getting predictable results. Another small step for mankind... |
|

Located some ideal strings for this bass.
|
Just a quick update on the peripherals that are waiting to go on to this bass. Thanks to a friend in the industry I was able to locate the ideal strings for a bass like this. Not only do they suit the playing profile of the instrument itself but they qualify perfectly for the type of strings my customer would like. They are not bu any means the cheapest strings on the market for a 6-string but they are tapewound stainless core and very high-end! |
|

Doing some filler work to guarantee a flat surface over the soundhole inlay.
|
I'm using a mixture of clear fillers to add several coats to the area around the soundhole to fill any tiny gaps between the inlay pieces. I typically put a couple of coats on and when dry I scrape the high areas off with a very sharp blade. I have found that 15 minitues in the sun, even though it isn't very strong right now - speeds up the curing process quie a bit. A few more coats and I should have things ready for top coat. |
|

This is my hardcoat finishing compound waiting to go onto the finished instrument.
|
This is the magic formula that I will be applying to the surfaces of the instrument. It's worth the money because it sets very hard and once it's on it is relatively easy to level and finish to a nice surface. I have been able to get all the nunerous coats of filler and basecoat and I'm pretty happy with the overall surface. Before I put this compound on I want to level off the inlay around the soundhole so that we have a nice flat surface. |
|

Bridge area is shielded so that I can keep hat covered area finish-free for gluing.
|
In this photo I have carefully drawn around the perimeter of the bridge footprint and then cut off and removed the blue tape just inside that area. This leaves a shielded area just slightly smaller than the bridge itself which will now be protected from the final few coats of finishing compound. The objective is to leave this covered area in a condition where I can scrape back to bare wood to get the best possible joint integrity. |
|

Shielding off the top wood under the bridge to allow me to finish top.
|
Time to get that bridge on the top plate. In order to do this I have to apply tape and then picn the bridge in place on the top. I carefully mark around the perimeter of the bridge and then cut off and remove the tape on the outside leaving onbly the footprint of the bridge. This allows me to get the rest of the finishing done to the top without compromising the gluing area under the bridge. Getting closer to a finished bass here! |
|

Doing some headstock work prior to final finishing!.
|
This is the headstock area before I add the nut. I pre-fitted the tuners to make sure everythubnf fit nicely. Now I am adding neodymium magnets to the truss rod cover area to secure that piece in place. I'm also doing some final sanding on the headstock before we start adding the final finishing compound. I'm looking forward to seeing this instrument with the finish applied as it will bring the whole instrument together. |
|

Tail end of the finishing process - lots and lots and lots of sanding!.
|
In this photo I have spend most of the day doing the final sanding before finishing. The sun is going down but I had enough good sunny weather to apply a few more coats of sealer and get the entire instrument sanded down to a point where I can now look at applying the KTM9 final finishing coating which will technically bring this project to a close. I am really looking forward to getting this to my customer. More details to follow very soon. |
|

Doing some final measurements and alignment checks on the cocobolo bridge which I will be permanently attaching to the top..
|
I have to now take some careful measurements of the bridge location. I have already drilled the through holes fopr the string retainers but I want to be sure everything els lines up as I will be permanently attching the bridge unit soon. The cocobolo I used on the bridge blends very nicely with the fingerboard, headstock, arm relief and binding - all of which are also cocobolo. Moving ahead with sanding and finishing, tuners go on soon! |
|

More coats on the top plate.
|
Two coats later and I am basically rubbing the whole instrument down with super fine paper and adding filler as I go. The top is just being prepared for another coat and I think I'm getting close to switching to the final finishing compound. I have to wprk a little bit at filling the anticipated tiny gaps around the celtic knot inlay but that seems to be working out just fine. This has been a huge project for me - a big chunk of my life - but I'm proud of it! |
|

First coat of grain filler goes on the top plate.
|
I was able to set several things up on a dedicated workstation today - get all the right checmicals and applicators out and apply the first coat of grain filler to the top of the bass. This is the one coat that has to be applied carefully and with the right mix of ingredients. Now that I have done this the other coats required are basically repetitions of appliying and sanding. Looks really nice considering this is a very thin coat just to soak into the surface. |
|

Sanding to a very smooth finish to prepare for the sealer on the top surface.
|
I am sanding the top of the bass now with some of the finest sandpaper I have so that I have a very consistent surface for the sealer. This area is the most porus of the woods on the guitar and therefore the surface that I have to treat with the greatest of care so that I yield a nice even finish. Finishing this top will also make the greatest visual change to the appearance of the instrument and I can't wait to see that! |
|

Giving the back of the neck and parts of the body some final sealer.
|
In this photo I am putting the sealer and finishing prep on the back of the neck and the remaining parts of the body. I will probably have to repeat this a couple of times to get the desired surface but it certainly makes the woods look nice. I'll wait for this to dry - sand it off and repeat and make a decision at that point. The instrument looks much more one-piece and complete with the treatment on the wood. |
|

Sanding on the heel of the neck and bass is now ready for the last dose of sealer.
|
One of the toughest parts of my recent work has been the sanding of all the different geometries on the body of the bass. i have been working round it progressively and the last part was the hardest, which was the heel of the neck where it meets the body. I have that now in a condition where i am pretty happy with it (I'm a bit of a perfectionist) and I'm going to apply the surface threatment to this area and see how it looks! |
|

Final sanding before finish on neck and headstock.
|
I have now completed all pre-finish sanding on the neck and I'm now ready to apply finishing to the neck and headstock. I'm pretty happy with the overall finish on the rest of the instrument and the neck and headstock should be comparatively easy based on the materials (Maple and Rosewood). This will also bring out the true beauty and color of the neck materials and I'm anxious to post a photo of that soon! |
|

Bridge mounted pickup system waiting to be installed.
|
I have known of K&K sound products for some time and have been hearing that they are considered the icing on the cake as far as acoustic instrument transdcers are concerned. They were kind enough to set up an account with me and I was able to get the system the recommended most for this type of bass. This sytem is well adapted for the frequency range of a six string acoustic bass so very excited to get this. |
|

Tuners are ready to go on the headstock.
|
I have a set of 6 of these high-ratio bass tuners which are ready to go on the headstock as soon as I am happy with the finish. I am also working on a nut for the bass and will be installing that very soon. Furthermore I was able to locate a Protec case for this bass which I am in the process of embroidering at the moment. It's actually a cello case, much more expensive than a similar bass case but a surprisingly good fit! |
|

Going to be adding a K&K sound transducer system to this bass.
|
I have been in contact with the highly renowned pickup company K&K Sound who specialize in high-end acoustic transducers. I'm planning to use their pickup system in the instrument to bring out all the frequencies that a 6-string bass can produce. This will give the bass a strong natural sound that should work very well in any situation. As soon as I get the finishing complete I'll be able to add this system. |
|

Carving and sanding the back of the neck and the neck heel.
|
Sometimes the jobs you think are going to be the easiest turn out to be the most challenging. I spent numerous hours carving away at the heel of the neck and carving and sanding the back of the neck profile. I am finally now in a place where everything feels close to where it should be. Aside from some final sanding to generate a nice smooth and even surface I am happy with the profile. This will allow me to get the surface treatment finished!! |
|

Doing some minor adjustments to the geometry of the neck heel.
|
I discovered through handling the instrument as a finished and almost playable piece that the heel of the neck was a little large and intrusive when the player's hand is up at the higher frets. I decidrd to carve quite a bit of the mass of the heel out of the instrument to make that upper fret access more comfortable. Feels much better now. I am also thinning the neck down a little bit to the point where that feels just right too. |
|

Sanding all over the bass and adding grain filler as I go.
|
The back is has had a few coats and is currently sanded back down. Sides are just behind that so all surfaces (even the top plate) are currently being sanded. It's fairly work intensive but I can see it getting better with every application. The whole instrument feels smooth and complete now, very different than the uncoated bare-wood version! I am also moving the process to the neck and headstock. |
|

Working on the sanding on the sides of the bass.
|
I am now working on the sides of the instrument so that I can keep things going. I want to get the sides done so that I can take care of the top. Once the top is finished the bridge goes on and that's basically the last joint I need to make on this instrument! So far things look really nice - I love the color of the wood although I can't get a true and accurate photo of the color and depth of the grain. Look beautiful. |
|

Most of the saning all over the body and neck is now done.
|
I have done a lot of detail sanding on every area of the surface of this bass. I managed to get it all in a condition where i think it's pretty safe to apply the mixture that will serve as a grain filler and foundation for the remaining surface finishing work. All the surfaces have to be really flat and smooth and I am now (after many hours of sanding) just about at that point. The bridge dfoes on after the top is treated. |
|

Back got some filler today - looking awesome.
|
I sanded the back for a couple of days to get it smooth enough to do a test. I then applied some grain filler to check to see if there were any areas where glue need to be removed. In the process - it really showed up the beauty of the wood. You can rarely get Koa like this any more and the little that is left costs a fortune! I do have 3 or 4 areas that need glue marke sanded out but overall not much! |
|

Applying some of the grain filler on the upper side of the bass.
|
I have been able to take care of almost all the surfacing issues on the upper side of the bass. Mostly these were from glue contact with the wood which prevents it absorbing a finishing product. I have to sand and scrape those areas to expose the bare wood before the actual finish can go on and do its job. Here you see the first grain filler coat applied to the upper side of the bass. It only gets better from here! |
|

The bass in on teh bench getting coats of grain filler and being scraped and sanded.
|
I'm working mny way around all the binding areas to make sure they are flush and clean. It's a delicate job because you don't want to scratch or ding any of the existing surfaces. As I go round I fill any areas that need extra grain filler, the objective being to have a good consistent surface over the entire instrumant before the final finishing coats go on. The wood you see in the picture is still bare, but not for long. |
|

Applying a littl;e shellac shows up the awesome wood grain.
|
While I am trimming and sanding my way around all the edges of this bass I'm applying a little shellac to check whether there are any areas of hard-to-see glue buildup that would prevent the filler from penetrating the wood. If I find any I have to scrape and sand any witness of the glue off the wood so that we get an even color when the finish is applied. In the process, I was very impressed with the way the figure of the wood is showing up! |
|

Sanding the back surface of the bass.
|
It's time to get started on the finall sanding of this beauty. There is a lot of body surface to work on but I am anxious to get the surfaces smoothed down and prepared for the coats of grain fillier and finish that will bring out the true nature of these beautiful woods. Right now I am sanding the back and making sure all the binding is leveled. I will progress to the sides and the neck and when it's all smooth we'll get the finihs applied! |
|

Attaching the end of the binding that butts against the little cap.
|
Left: I added a cap to the bottom of the neck joint which blends with the binding. It also has a custom serial number embedded in it. I'm now sanding to get the exterior ready for finishing. Right: I'm at the sanding stage now - I'm working to get all surfaces blended together and smooth. Can't wait to get finish on! |

Sanding to prepare for grain filler and finish.
|
|

Shaving the binding flush.
|
Left: I'm cleaning up the binding edges from the last glue-up so that we have a nice smooth transistion between binding and body. Right: Gluing on the bottom end of the lower curve which I had to saw off to just the right length so that the two ends meet correctly. Once set I can do some sanding also. |

Attaching the end of the binding that butts against the little cap.
|
|

Gluing the lower half of the back binding onto the instrument.
|
I have cleaned out the recess for the binding and managed to get everything glued and strapped together with the network of rubber bands. I used more on this side than the upper side mainly because the radii that I was dealing with were slightly smaller. Even although it is a fairly old and non-technical process, the rubber bands are still a great way to apply selective pressure on a glued joint. |
|

Binding for lower half of body has been bent.
|
I'm back on the bending machine again to get the second cocbolo binding strip pre-bent for assembly onto the back of the body. The curves on this lower half are a little tighter than on teh upper half so the bending process was a little more involved. Managed to get everything to fit pretty nicely so binding is ready to attach. I will have to go and clean out some of the areas of the recess to remove glue from last operation first. |
|

Gluing on the lower half of the cocobolo binding.
|
After some careful bending I was able to get set up to add the Cocobolo binding to the lower half of the body. The bending was a tricky process but I was able to get a good match to the profile of the instrument. Fortunately the binding material is fairly thin so the pressure from the rubber bands takes care of any minor discrepancies in the geometry of the mating pieces. Looking good!!! |
|

First of two back binding strips has been bent and is ready to glue on.
|
I got all my bending gear out and worked on the Cocobolo binding. This stuff is a little slow and laborious to bend, it requires just the right amount of heat and even then you have to be really careful about not localizing heat or it will bend unevenly. I was able to get this stuff to conform over a day or two by leaving it in a constrained position after heat bending to minimize the amount of spring-back. This piece is ready to go on! |
|

Binding being bent for the back or the body.
|
I am selecting the best pieces of cocobolo binding I have and bending them to suit the shape of the back of the instrument. Once they are close and can easily be held by hand in position i will get the glue and rubber bands out and get these outer strips permanently glued on. Once that's done I can concentrate on the final sanding of the body and getting it prepped for a few coats of finish. Can't wait to see that!! |
|

End ccap sanded flush - now I need to get the binding on!!!.
|
I filed and sanded until the insert was finally flush with the edges of the body. I have test bent some of my cocobolo binding and it seems like everything should go reasonably well. The hardest part will be the tight bend under the neck on the lower bout, all the other readii on the instrument should be fairly easy to achieve.. I'll get all the bent binding pretty close and then secure it with the rubber bands for a tight fit! |
|

End cap is now on the lower bout.
|
I got the little trim piece for the end of the lower bout trimmed up and after a little work I got it to fit the curve. Once that was established I sawed of much of the excess cocobolo and was able to get it securely glued onto the instrument. Now I can get that cocobolo binding on the rest of the body! I'll be bending that very soon and hope to get that fitted successfully onto the perimeter of the body. |
|

I made caps for the neck heel and point of the lower bout.
|
I have a couple of trim pieces to add to the back of the instrument. As you can see in the photo there is a Cocobolo cover on the bottom of the neck heel. This is about to be glued on but I may drop the serial number in there also. Also the fabricated end piece for the lower bout is ready for fitting and assembly. I am anxious to get the binding done around the back so that everything is cpmplete and sealed up! |
|

Adding veneer to a cocobolo cap for the lower bout.
|
This is a photo of the cap that I will be using tho ccover the end of the lower bout. I was necessary to add 4 strips of veneer to the inside curve of this little component. I cat the veneer strips on the laser and then used my soldering iron to bend the veneer so that I could glue it into this tight space. I also used a rubber tube (see photo) to distribute even pressure on the veneer as the glue dried - worked just fine! |
|

Cocobolo cap for the end of the neck joint.
|
Another addition to the trim of this bass is the Cocobolo cap that will sit on the bottom of the neck. When this piece is fitted and sanded flush I might use it as a nice location to engrave the serial number. It will blend ncely with the Cocobolo binding that will run from either side of this plate. I wanted to have this ready to go on right after the binding is fitted. At the mopment it is a little oversize as I will be doing final shaping. |
|

Trimming the inner binding to fit the end cap.
|
I cleaned up the ends of the inner binding so that they are square and will butt nicely against the matching binding that will be part of the cocbolo insert that I have to fit on the end of the cutaway section. I will shape the piece by hand and also add the inner binding by hand since the bending of the veneers is going to be fairly extreme around this little corner. This will complete the sealing of the back plate. |
|

Cocobolo outer binding ready to be applied.
|
Time to bend the outer section of the binding (Cocobolo) and get the body sealed up. I will pre bend this material close to the profile of the instrument body and then glue it in place. The cocobolo is a little more difficult to bend than the inner binding but with some care it should still allow me to shape the curves pretty close to the body shape without breaking. I am now looking at the finishing process as I want to see this project complete! |
|

Second of four layers of veneer going into the inner radius.
|
I am now carefully applying layers of black and white veneer to build up the binding in the internal radius of the lower bout. I'm working on the second of four laminates. This will complete the inner binding around the back of the body. Once this section is in I will start on the outer binding and add the cap on the point which will connect the two sections. It is detailed work but other than being time-consuming it is going well. |
|

Trimming binding and adding a radius to the lower bout.
|
I realized that I have to allow for a little coocbolo insert which will cap the end of the lower bout just like I did on the front side of the instrument. This means clipping the binding at pre determined points bith sides of the insert area. Once that's done I will creat the cocbolo cap which will bring it all together. I had ti carve and file the radius a little larger at the point so that the binding strips will bend round that tight curve. |
|

preparing to create some binding around the curve by hand.
|
I have cut a few strips of black and white veneer on the laser. Since the inner curve under the neck is too tight for commercial binding to tolerate (it breaks of the bend is too sharp) I have to insert these pieces individually to replicate the binding in that area. I will glue these in one at a time and it will match the binding that runs around the rest of the body. That will then allow me to get the outer binding on! |
|

Gluing 1st side of internal binding to body.
|
It's time to get the bindingattached to the body. Both outer pieces have been carefully pre-bent to suit the profile of the body. I use a network of rubber bands to apply the appropriate pressure to the binding material to hold it in the slot while the glue dries. Not an easy job because you have to work fast! |

2nd piece of internal binding being glued onto body.
|
|

Fitting the binding around the bvack of the bass.
|
I have started on the bending of the first binding strip. Seems to be going predictably well. I want to get this 4-layer strip applied all the way around the back of the instrument so that I can then get the final outer Cocobolo binding on. That will effectively complete the body and I can work on bridge and hardware installation and get this bass making some sound! I will post more photos of that process. |
|

Getting ready to add the binding on the back.
|
This is the binding that will be going around the back of the instrument. The inner piece is a black and white decorative wood combination and the outer piece is Cocobolo to match all the other main features on the instrument. I will glue the two on separately and they will have to be heat-bent as I proceed. It just means being careful and methodical and the results should be fine! It's going to look very nice! |
|

I had to do a little more work on the heel of the neck to get ready for final binding.
|
OK - that turned out to be a little more difficult than I anticipated.I had to lower the area at the heel of the neck to match the depth of the routing around the body - but due to the size and shape of the body, putting the assembly on the CNC was not an option. Therefore I had to remove that material by sanding and filing which was a little more time consuming. Nevertheless, this joint is now ready to accept binding and plate! |
|

Binding channel has been completed.
|
The area into which I will be gluing the two types of binding has now been completed. I had to do some hand shaping in order to align the side cuts with the square end of the body panel. It is now one continuous line and it appears that I can consider this task done. I have to set up the correct tooling and bending apparatus before I can heat bend and attach the binding but I will do that soon. In the meantime Im working on neck and headstock. |
|

Making a finishing plate for the bottom of the heel.
|
I have another interesting objective here - the small surface remaining between the neck heel and the back is an inevitable product of the two parts meeting. My plan is to fabricate a small plate which contains the same stripes of the instrument body, but will also serve as a place for me to put the serial number. I'll use Cocobolo to trim the piece out but I need to start with a mini set of tapered and veneered laminates! Here goes.. |
|

Some final shaping work on the neck heel.
|
My challenge here is to carve the heel of the neck so that it is properly blended with the body and the neck. I'd like to reduce its mass as much as the laws of physics will allow. I have already removed quite a bit, checking as I go. I'll keep removing excess until I know I have found the perfect blend. Once that's done I sand it nice and smooth and work on the back of the neck to finish up the profile and thickness. |
|

Doing some work to the back of the neck.
|
Time to work on two important areas on the bass and get those to the point where I am happy with the shape and profile. One is the back of the neck where I always create a volute between the neck and the headstock for strength. All the material is there and rough shaped, I just have to carve a little and sand until I am happy with the blend. It has to obviously be strong but also feel right in the player's hands. |
|

Routing for binding on the back has been done.
|
After the back was attached I spent some time sanding around the body to nake sure the profile of the bass was nice and even. Having done this it was ready for the routing process which creates a channel around the perimeter of the back of the bass to accommodate the bubinga binding that will run around the back of the body. The routing went very successfully and I am now setting things up to heat bend the binding. |
|

Back of the bass is glued on.
|
I let the adhesive set for a little while and then released all the clamps and bands. I was very pleased to see that the joint was very secure all the way around. Look slike everything came together just right. Next I am going to clean up the edges and sany all the way around the body profile so that when we route the channel for the binding on the back joint, the cut is nice and even. Looking very inpressive already! |
|

Back being glued on.
|
There were several jobs required on the inside of the instrument before the back went on. I had to make sure all surfaces met securely together and that I sanded and properly finished any areas which would no longer be accessible after the body was sealed up. Once all of these dtails were taken care of I was able to apply the adhesive and wrap all the joint areas with rubber bands which collectively hold the parts together. |
|

Preparing back plate for assembly.
|
I am marking out the exact locations where I have to remove material from the bracing and binding in order to make th eback plate and the edge of the body fit perfectly together. I have six locations where back bracing and binding interfere with each other and I have to carve that material away so that the two parts can fit without gaps. When that is achieved I will go ahead and glue the back plate on. |
|

Bridge is now located on the top.
|
The bridge is now located in its position on the top plate. I drilled all 6 pin holes through to establish a good clean location. The bridge will not be attached until we have down some of the surface finishing because it would be very difficult to run a clean finish up to the edges of the bridge. Now that this is doen I can attach the back plate onto the body and consider this instrument body a complete unit! It's going to look awesome! |
|

Positioning the bridge on the instrument top.
|
I am measuring several times in order to be confident to cut only opnce. This is a critical task in that the bridge has to be positioned in exactly the right place for string alignment and for scale length accuracy. It is certainly work taking the time to make sute this is done the the maximum amount of precision. The tape is handy as it allows me to draw on the surface without hurtin the top wood. Looks like we are almost there. |
|

Bridge pins ready to be part of the bridge assembly.
|
I needed some bass bridge pins for the bridge which I eventually located. These will become part of the bridge assembly very soon. I have also been looking at the audio components which I will be incorporating on the underside of the bridge. We'll be able to test that out soon once all these individual pieces are assembled together. Bridge is bring located and secured to the top of the instrument, back is ready to go on! |
|

Bridge has been cleaned up and shaped..
|
This is the bridge for the 6-string after curtting some relief and radii on the edges. I haven't nmachined the slot for the saddle yet - I will do that closer to the point where I attach the bridge onto the body. It looks really nice and should be a nice compliment to the other cocobolo features on the instrument. I am also preparing the joint faces fot the back plate and the body so that I can attach these two pieces together. |
|

Getting the bridge completed.
|
The material for the bridge piece has been machined down to a manageable thickness (not final) so that I can establish the peg hole placement and the outer perimeter. I need to check this blank against the geometry of the instrument to decide what the actual bridge thickness is going to be. My guess is around 3/8". I will then cut to final thickness and also cut the slot for the saddle. Then I will do the final shaping. |
|

Clamping fixture for attaching back to body.
|
This is a piece of tooling I had to manufacture so that we will be able to securely attach the back plate to the rest of the instrument. It allows us to use a network of rubber bands to apply even clamping pressure all the way around the joint area. I am working on the mating pieces right now so that we have a very close and tight fit before we apply the adhesive. I am looking forward to getting this part done! |
|

Cocobolo blank for the bridge.
|
This piece of wood might seem unassuming and unimportant but it is a major part of the last phase of the building of this instrument. I spent some time on my computer designing the ideal bridge geometry for this bass and now it's time to make it happen. It was important for me to maintain the theme on the instrument and use Cocobolo for the bridge which will match other features such as the neck, binding and headstock. |
|

Starting the sanding process.
|
Now that the major component parts (back and soon-to-be bridge) are almost ready to assemble i can start the first stage of the sanding process which takes care of the joint areas to make sure all the surfaces blend perfectly. I also have started the final shaping of the back of the neck so that the instrument will feel "just right" in the player's hands. At this stage it's more of a process of removing material until I am satisfied with the 'feel' |
|

Getting ready to glue the back on.
|
Here I am test fitting the back plate of the bass. This tells me which areas I need to recess and remove in order for the surfaces to meet and the back to fit as seamlessly as possible. That done, I will carefully sand the joint face all around the perimeter until everything fits perfectly. WhenI am happy with that I will clue the back onto the rest of the body. Can't wait - i want to see this instrument as one-piece! |
|

Logo on the Truss Rod cover has now been filled.
|
I have cleaned up the engraved area of the truss rod cover and filled it with a compound that matches the color scheme of the rest of the instrument. This completes the work I have to do on the headstock area and I can concentrate on creating the bridge and fitting that to the body. As soon as that is done I will start work on attaching the back plate to the instrument and adding the binding to complete the body. |
|

Truss Rod cover has been etched with the Watson logo.
|
This is the truss rod cover which we cut from the headstock veneer on the laser. I returned to the laser so that I could engrave the WG logo into the TR cover. I use dthe laser to etch the logo about a millimeter into the material. I then seal it and when that is dry I will fill the recess with a material that will match the color scheme of the rest of the instrument. This cover will be attached with neodymium magnets. |
|

Tuner holes drilled in the headstock.
|
Next job on the list was to mark out the positions of the tuner holes relative to the headstock profile and the nut spacing. I pre drill them for accuracy then run a custom drill through the material which gives me exactly the right diameter hole. I can now do some cleanup on the back of the headstock and make sure the profile is correct. I am also preparing to cut the Watson logo into the truss rod cover. |
|

Remachining headstock to finished thickness.
|
Now that the headstock laminate is attached I have to re-establish the thickness of the headstock which ended up slightly oversize. I needed to machine the thickness down from the back so that I yielded the right amount of material to suit the tuners and so that i didn't have an annecessary amount of wood thickness at the end of the neck. The less weight the better! Now that this is done I can finish shape the neck and add tuner holes. |
|

headstock veneer successfully attached.
|
I spent a little time making sure the top surface of the headstock was nice and flat and ready for the cocobolo plate. Next I carefully angled the back edge of the plate to suit the headstock angle. When I was happy with the fit I applied the glue and carefully aligned it on the headstock. I added a pressure plate and numerous clamps and left the whole thing to cure all day. Once it was ready I unclamped and sanded the edges to fit. |
|

Head plate veneer - Just cut out the truss rod cover.
|
Next job needing done on this bass was the headstock veneer - a plate about .150" thick which will be glued to the top of the headstock so that the headstock will match other features on the instrument. First thing i had to do was cut out the Truss Rod cover from the plate material. I was able to do this on the laser which saved me a little time. I'll glue the plate on first - the cover will be added later in the process. |
|

Fingerboard now on the neck - moving on!.
|
I left the gluing setup below overnight and carefully removed the clamps the following day. I was very pleased with the results and the look of the bass. I did some basic cleanup to remove glue that had built up along the edges and check the assembly out for alignment and staightness. All seems well and I'm ready now to move along to the next stages. I will probably add the faceplate veneer onto the headstock next. |
|

Gluing the fingerboard onto the neck.
|
It seems cruel and abusive to apply so many clamps to an acoustic guitar but it really was necessary. Normally I would glue a fingerboard onto a neck in a vacuum press but the acoustic body would not stand up to that pressure. I made sure i had a good wood-to-wood surface connection and used wood glue rather than epoxy to bond the two together. I think this will result in a very satisfactory joint, we'll see in a few hours. |
|

Cocobolo binding now complete.
|
The cocbolo insert was very successful and after I removed all the clamps i was able to start filing away the excess material. When I got to the point where the filing was too aggressive I finished the job off with various grades of sandpaper. I also cut a straight piece of cocobolo to complete the binding all the way to the neck joint. After some careful sanding this afrea is now declared complete and I can now get the fingerboard glued on! |
|

Gluing in the cocobolo binding section.
|
After having carefully cut the cocbolo insert and sanding the inner edge so that we have a perfect fit with the curve of the body, I also sanded the inner radius so that I reduced the thickness of the material we are going to glue to an absolute minimum. I then applied the lue and added as many clamps as i possibly could to secure this delicate piece to the body of the instrument. The end result was looking really promising! |
|

Cutting a very custom binding insert for the top.
|
Before the fingerboard is glued on i have to complete one complicated area of the binding where the cutout is on the lower bout. The curve is too tight to heat bend cocobolo, so I am custom machining a solid piece which i will glue in place and trim down to fit perfectly. Although this is work intensive it is the only way to achieve the required results. The insert will take care of the curved area - and I will insert standard binding for the remaining straight portion. |
|

Fingerboard rough shaped and ready to glue on!
|
(7/19/13) In this photo I am test-fitting the fingerboard into its final resting place. The bottom of the board had to have a custom insert of Sitka Spruce added to the area of the fingerboard from fret 14 to the soundhole so that there would be adequate support underneath the board on the finished instrument. This seems to have worked out very well and we are almost ready to attache the fingerboard. |
|

Gluing some spruce onto the back of the fingerboard.
|
After measuring the angles involved, I decided to glue a piece of Norwegian Spruce onto the bottom of the fingerboard and when it has set I will cut that filler material to exactly match the body angle between the two pieces. In the photo you can see where I am gluing the extra material onto the back of the fingerboard from the 14tjh fret position up. I'll trim that and machine it to suit my needs when it is unclamped. |
|

Test fitting the fingerboard onto the instrument.
|
Now that the carbon fiber rods are in the neck and have been sanded level with the neck joint surface, I can start getting the fingerboard ready for attachment to the neck. Currently the board is slightly longer that necessary because I want to shape the end of it to match the soundhole. Also, due to the slight neck-to-body angle I will have to find a way to fill the space between the fingerboard and the top surface of the body. |
|

Gluing the two carbon fiber reinforcing rods into the neck.
|
While a couple of other jobs are going on in the background i took the opportunity to fit and unstall the two carbon fiber rods into the neck. I glue these in with aerospace grade epoxy and let the whole thing cure overnight. I know these add a degree of stability to the neck which for a 6-string is under considerable tension - they also mitigate changes in the neck due to moisture variations in the atmosphere. Now I can glue the fingerboard on! |
|

Gluing on the cocobolo arm rest piece.
|
Today's goal was to get the Cocobolo top piece successfully glued onto the body of the guitar. I made the Cocobolo thin enough to match the binding on the rest of the instrument so it was flexible enough to ben around the curve. The trick is to make sure it is extremely well secured while the adhesive cures! |

Final results of the arm rest - looking good.
|
|

First veneer is glued on the arm rest and cleaned up.
|
The internal bracing has been installed and also sanded to a flat and curved surface on the outer side.With that surface fully prepped, it's time to start putting on decorative veneers. The first one is a black veneer to match the binding that is already on. Next will be a white veneer on top of the black. Once that is trimmed flush, I'll take a carefully selected piece of Cocobolo and heat bend it to match the curve. |
|

Custome bracing installed in preparation for finishing the arm-rest.
|
In order to make this arm-rest work it is necessary to add structural re-inforcement to the inside of the body so that the bracing we remove is adequately replaced before the decorative pieces go on. In this situation, I decided to cut a set of bracing pieces on the laser and then glue them into the open area by hand. This is now a very well structured area onto which we can now glue the cocbolo exterior. |
|

Arm rest area has been cut out.
|
I marked out the area I wanted to cut based on my where my own arm fell on the outer edge of the instrument body holding the bass in playing position. The plan here is to add black and white veneer and a heat-bent cocbolo top piece to yield a beautifully continuous arm relief. Not only will it make the instrument very comfortable to play but it will look impressive too! This is all new territory but I am confident of the results! |
|

Getting ready to work on the arm rest area.
|
I am staying busy on this bass. I sawed a nice straight-grained piece of Cocobolo today and its purpose will be a corner break for the player's arm. Typically with a bass like this your arm rests on the curve of the upper body when playing. On high end instruments, it is a nice refinement to have a wider angled area upon which your forearm can comfortably rest. I have marked out an area I am going to remove from the body. |
|

Gluing the 2nd strip of binding onto the upper body half.
|
The glue from the first session has fully cured so I can move on to gluing the second strip of bent binding onto the upper half of the body. The rubber bands do a great job of applying both downward and lateral pressure so thet everything is held tightly in place while the glue dries. I am anxious to see the instrument when the bands come off, but I can see already that the cocobolo binding really looks good on there. |
|

Clamping the Cocobolo binding to the instrument body.
|
I had to make a fixture to allow me to use this method of clamping which tightly holds the binding in the routed slot againsi the body while the glue does its job. I started at the lower bout of the instrument and as soon as that has set I will remove all the rubber bands and repeat the procedure for the upper half of the binding. This will leave a very attractive border of cocobolo all the way around the top of the instrument. |
|

Cocobolo binding has been pre-bent for assembly.
|
Good news! I was able to get the tricky bending done for the cocobolo binding that will run around the outer edge of the top of the instrument. I had a very talented friend of mine, David, assist me with this task. With this out of the way I am going to attach the binding and cut the arm relief in the top of the body. This will complete the top and allow us to glue the back onto the rest of the instrument! |
|

The headstock veneer has been rough cut and sanded.
|
Cocobolo is a tough material to saw, but I cut a nice piece for the headstoc veneer and subsequently sanded it down to the correct thickess for the job. I rough cut it a little closer to the headstock shape and will now clean up the joint edge at the nut. After that I'll add a decorative veneer to the joint face. Once that's done I'll set it up on the CNC and cut out the little cover for the truss rod. It will need a logo inlay also. |
|

Cutting some material for the headstoc veneer.
|
While some of this wood bending of the binding os going on I decided to look out a piece of Cocobolo from which I can cut the headstock veneer. I'm cutting a suitable slice from the parent material on the bandsaw. When that's done I will sand it to the correct thickness and machine out the truss rod cover. I will then cut and inlay the logo and finally attach the piece to the headstock. More photos coming! |
|

Doing some work to the inside of the neck.
|
I have the instrument up on the CNC for some detail work on the neck. I'm putting in a specialized truss rod and some carbon fiber to make sure the neck is well structured for the tension of the 6 strings. This will allow me to start work on fitting the fingerboard which I have already machined. Starting to see the final stages of this bass come together. I also received some special Cocobolo binding which has to be heat-bent and fitted around the body. |
|

Binding added to inner curve.
|
We have been working on the binding of this bass, and we have now attached the binding around the entire top including the tight curve on the lower bout. We now are getting ready to attach the Cocobolo binding around the same area. The Cocobolo binding needs to be heat-bent first and then carefullt attached around the perimeter of the body. Once that is done the top is complete and shoudl look beautiful! |
|

First strip of binding being glued on.
|
Now that we have the end-piece glued onto the lower bout we can move forward and get the binding started. The binding is a 4-ply wood black and white strip which we had to pre-bend before applying to the instrument. Once it is bent to as close to the instrument profile as possible it can be glued and then attached into the routed area. We used pind to create some clamping pressure to hold the binding against the body. |
|

Lines in the Cocobolo fingerboard.
|
There will be several features on this bass made out of Cocobolo - most significant of which will be the fingerboard. here we have the fingerboard with fret lines established, ready to go onto the instrument. The board is actually a little longer than required so that I can trim the large end to suit the soundhole. The bass will also have a Cocobolo bridge, binding, headstock veneer and edge break on the body, all of which will be seen soon! |
|

Binding insert has been added.
|
The end of the lower bout is the only place where the binding needs to become thicker and wider. I had to create a custom binding component for this area because the binding we will use to finish the instrument will not tolerate bing bent to such a tight corner. Now that ths insert has been established the rest of the binding can be applied. I am anxious to get that done because it will really finish the look of the bass! |
|

Detail insert for binding top.
|
One of the tricky jobs we have to do on this bass is to ger everything ready for the binding that runs around the top of the instrument. This comprises if a 4-ply binding which is added all around the top PLUS another cocobolo binding that is applied on top of the first binding to create a clean edge around the perimeter. This is all quite difficult to engineer. The photo shows an insert I have to add to the end of the lower bout. |
|

Slots in and ready for freat lines.
|
The fingerboard is complete and ready for me to insert some veneer as fret "lines" on the surface of the fingerboard. I'm looking at my options to find the best material for this purpose. U i will cut the inlay material on my laser machine and then carefully glue each of the 24 pieces into the fingerboard. When the glue has cured I'll sand everything to a beautiful flat finish. Can't wait to see the end result!! |
|

Fingerboard has been cut and radiused!.
|
The Cocobolo fingerboard has no been cut, radiused and the slots for the lines have been cut. I also cut the slot for the nut at the same time. Next I will clean up the surface and get it ready for the most suitable veneer inlay for the lines. End result will be very pretty. Also have to get the side dots cut into the upper edge of the board and inlay the dots themselves. I have matching material for the Bridge of the bass. |
|

Cocobolo fingerboard ready to be machined.
|
This is the Cocobolo we are using for the fingerboard. We're also incorporating Cocobolo in the binding around the edges of the instrument and for the bridge assembly. My goal is to bring all the woods together in a very elegant fashion. I'll get this fingerboard cut to size and radiused and also establish the fret markers. It will look very nice when it's done. The binding assembly continues - I have some very tricky geometry to bind. |
|

Routed channel for the binding.
|
Before the back plate goes on I have to cut a section of relief on the top surface where the player's arm will contact the body. In order to retain access to the inside of the body - this needs to be done before the back finally goes on. First step is to route around the top plate to create an area for the cocobolo binding. This has now been routed onto the top. Next we will glue in the decorative binding. After that we'll cut the relief. |
|

Getting ready to brace the back plate.
|
Left: I cut three transverse bracing pieces to not only support the back but also to inpart a slight curve to the back plate. These had to be very carefully fitted to the geometry of the back plate. Right: braces have been glued on and tapered on their ends. The back plate is now ready for assembly. |

Braces have now been glued to the back plate.
|
|

Back is cut and ready for assembly.
|
We took the bold step of cutting out the shape of the instrument from the rectangular back plate. This immediately gives us an idea what the finished instrument will look like. It should look amazing as there is a lot of figure in all of these woods we are using! I noew have to carefully mark out where I want the structural bracing to go on the back plate. They have to match up internally with the existing bracing inside the body! |
|

Positioning bracing for back plate.
|
Before the back panel goes onto the body I have to add some structural strength to the assemply. This is done with three crossbeams which not only add rigidity to the assembly but are curved in such a way as to force the back panel into a very slight concave curve. This is done because it makes the back of the instrument more comfortable for the player, it focuses the reflected sound better back to the front surface, and it is stronger. |
|

Back plate needs to be cut to match the body.
|
This is the back plate lined up with the rest of the body of the instrument. I want to malke sute that the braces we are making are placed in just the right positions front-to-back for optimum performance and support. This requires some careful measurement. With that done I will cut and install the three cross braces and we'll have a solid and rigid back plate to fit. There will be some final sanding of the joint faces before assembly. |
|

Getting bracing ready for the back plate.
|
I have cut some material which I am going to be using for the structural bracing across tha back plate. This is more difficult than it sounds because of the geometry of the back plate which is slightly angled/curved outward from edge to center and also slightly curved from back to front. I will be cutting those compound angles into the braces themselves so that the finished assembly will adopt the slightly convex back profile. |
|

Adding material to the lower edge in preparation for the back plate.
|
Now that we have established a good consistent lower edge and the actual working thickness of the body, we can add some material around the joint face of the lower back edge. This gives us more support around the joint area and creates a larger surface upon which we will be gluing the back plate. The clothes pins allow us to apply a nice even pressure on the glued areas all the way around the curved body edges. |
|

Machining the body thickness to a slight taper on the CNC.
|
With all the inner body parts sucessfully glued together we now have to se the instrument up so that we can cut the entire perimeter of the body to one consistent planar surface. This surface also has to be very slightly angled from the front of the body to the back, so the setup on the cnc machine was somewhat critical so that everything would fall into place. We're in the process of taking about 1/4 inch of material off all round. |
|

ready to attach the last side piece!
|
Left: The final piece in theassembly of the sides was a challenge because I had to create a filler piece with decorative veneers that exactly fit into the available space! Fortunately with careful measurement and sanding I was able to do that! Right: The entire body is now ready to be cut to the correct thickness. |

Body is ready to cut to thickness!
|
|

wood blocks added to the joint area to secure top and sides.
|
Left: We have added re-inforcing blocks all the way around the joint perimeter. This creates a very solid structural bond between the top and the sides. Everythuing is very rigid. Right: I added 4 posts which connect the bracing to the sides. These exist to stabilize the sides and keep everything at right angles. |

Side supports are glued in to the body.
|
|

Gluing upper bout to top plate.
|
Here we are gluing the sides to the body and top of the instrument. I did this one side at a time because of the necessity to make sure everything was accurately lined up. Both sides attached really well without having to force any of teh components together. Very happy with the results so far! |

Gluing lower bout to top plate.
|
|

Body ready for gluing to top plate.
|
We are just getting set up to glue the body of the bass onto the pre-assembled top section. This will involve some creative clamping and then we use small blocks to glue the top and sides together. I'll post detailed shots of that process very soon. In the meantime I am getting all the parts lined up, trimming bracing to fit and sanding the joint face so that it the two major pieces will fit together perfectly. |
|

Assembling the cutout area in the lower bout.
|
One of the most difficult areas I have had to work on with this instrument is the cutout area on the lower bout. I originally heat-bent a piece of koa to fill this area but when all the body geometry finally came together I the radius of that bent piece was not small enough to fit the space. It would have been impossible to bend the piece further so i decided to manufacture a curved piece from solid Koa. Looks like it will work just fine!! |
|

Gluing neck and top plate together.
|
(6/8/12) First major assembly task is to glue the top plate onto the neck blank. In preparation for this glue-up - I machined the front edge of the top place on the CNC router to make sure that the bridge ended up on the 34" scale length and that we were able to establish this critical glue joint and guarantee that the neck and top were both on a common center-line. This is very important in making sure that subsequent assembled parts line up. |
|

Pre-assembly - making sure it all will fit.
|
It's time to look at the final assembly process. We have numerous component parts which have been manufactured separately. now we have to look at how we assemble these various pieces in order to create the actual instrument. Firstly, we bring all the parts together to make sure everything is going to fit. I spent some time measuring to make sure the body parts all matched based on the 34" scale length. Everything look sgood! |
|

Gluing part of the trim for the cutaway onto the lopwer bout.
|
Next step is to glue a small block onto the point of the lower cutaway. This is another tricky joint and clamping setup as there are very few opposing surfaces to allow for easy clamping. Nevertheless we were able to hold the two glued pieces together with an assortment of clamps. On more koa side piece and we'll have the entire body perimeter glued together into one piece and ready to attach to the other major components. |
|

Gluing the second side onto the back block.
|
We are now gluing the second piece of the two sides onto the back block. These joints, which are always on a rounded surface, are pretty complicated to clamp. We are currently joining the upper bout to the back block and as soon as that joint cures, we'll add a strip of binding along the joint area to firther re-inforce the area. This thing is finally starting to look like a musical instrument. Koa looks awesome - can't wait to see this think finished! |
|

Gluing the back block onto one of the sides.
|
After the first side was glued onto the back blick I decided to re-inforce the joint by gluing some binding into the right angle of the joint. It's good to add a little strength to these joint areas, especially when doing so adds so little extra weight. When this joing sets we'll proceed to attaching the second side to the ack block. Nice to finally see some of the body of this bass start to take shape. |
|

Getting all the pieces ready to assemble.
|
Here we are gluing one of the two side pieces to the back block. It is a very tricky joint to glue because of its geometry so I had to get a little creative with my clamping method. Before I did this - I had glued two decorative pinstriping veneers to the joint face so that I continued the theme through the entire instrument. I will highlight that feature in a later photograph. We'll soon have completed sides which is very exciting!!! |
|

Getting all the pieces ready to assemble.
|
Next step on this project is to get all the parts collected and make sure they will all fit together. We need to prep the parts so that we can glue the neck piece onto the top plate. In order to do this I have to trim the joint end of the top plate so that the two pieces fit exactly square to each other and also so that the scale length resolves correctly at the bridge. Sounds complicated but it's just basic math at this point! |
|

Neck piece now ready for assembly.
|
We spent a little more time on the neck piece to finish off some of the interior edges. Even if they will not be directly visible on the finished instrument, it's always worth the effort to uphold the workmanship standards even in the hidden areas! This part is now ready to be glued onto the top plate of the instrument. This will require some careful fixturing in order to allow for the very slight angle between the neck and the body. |
|

Weight relief in the neck heel.
|
The neck is getting very close to being ready to attach to the top of the instrument. Before that is done I have to remove as much material as I can for weight relief purposes, while at the same time retaining enough structural strength to keel the neck joint stable and strong. I may end up removing more to achieve that balance but once that's done we'll start assembling the top section to the neck section. |
|

Successful result - back glued up perfectly.
|
The gluing setup for the second panel was left to set completely overnight. After carefully removing all the clamping devices I was very happy to observe that the second joing came out as well as the first one and the back panel is now assembled and ready for shaping and bracing as soon as we establish the final outer perimeter shape (which depends on the the pre-assembly of the neck, sides and back). |
|

Second back panel being glued on.
|
The first back panel glued on very nicely so it's time to attach the second one. This is somewhat more complicated becase the assembly is much larger and the back panels are thin and fragile at this stage so clamping the second piece onto a curved and angled recess is a tricky process. Managed to get everything secured in place and when the glue is set we can check to make sure all went well. Looks good so far! |
|

First of the two koa back halves are bveing assembled.
|
Here we are gluing one of the back pieces of the instrument body to the center core. Since the core piece is curved it makes for a very tricky gluing and clamping challenge. Looks like this will go well and we can get the second half of the back glued on tomorrow. This will be a significant step forward in the assembly of the body. Once the two back pieces are glued on we will have to make several bracing pieces to support the assembly. |
|

Another critical operation - joint face for the top.
|
Next challenge we have is to cut a step into the top of the neck for the top plate of the body. This step has to be machined to exactly the same depth as the tickness of the cedar top plate and in addition, has to be angled so that the strings will meet the bridge at exactly the right height. I had to make several calculations on the computer to make sure this procedure was done correctly but all seems to be well so moving on... |
|

Cutting the slot for the upper side to connect with the neck.
|
Here we are machining a slot into the neck piece at the 14th fret location. The purpose of this slot is to contain the end of the upper side panel of the instrument body. I have to make sure the slot is the exact width of the side material. The neck section is then flipped over and I cut a section out of the back of the neck for the cutaway section of the lower half of the body. The significance of these cuts will become apparent in later entries. |
|

Gluing decorative veneer strips top the edges of the back plates.
|
There are a lot of very small but significant details to take care of in a project like this. Here we have to glue two contrasting veneers onto the edge of each of the Koa back plates so that when the pieces are assembled, we end up with a decorative double contrasting pinstripe effect at each joint. It is a lot of work to make this happen but when the instrument is done you realize that the time spent on these details is well worth it! |
|

Center section has its compund curve machined onto it and has been sanded smooth.
|
This is the critical center section of the back of the instrument. It has been machined on a curved profile from front to back to give the back of the body a curved profile. This will enhance the feel of the instrument. Also a subtle curve on the back looks much better than a completely flat surface. Next I have to clean up the two edges in preparation for gluing the two side pieces onto this center section! |
|

This is the wood combination for the back of the body.
|
Our time on this project was interrupted by our presence at the Winter NAMM show but we are back now to get this body assembled. The photo shows the combination of woods for the back of the body. You can see how beautiful the figure in the various woods is, and that's before any finish is applied! This bass will be truly unique in many ways. We will be gluing these pieces together very soon and building the rest of the body. |
|

Working on the joint between sides and neck.
|
We're at the stage on this bass where we need to calculate how the geometry at the interface between the neck and the body will work. The wood section for the cutaway has to meet the neck section at just the right place and at just the right angle so that we have a clean joint that is not too bulky or inhibits playing the upper notes. These calculations have to be done at this stage so that everything fits down the line! |
|

Beautiful Koa pieces for the back of the bass.
|
After some time on the drum sander I was finally able to sand these two back plates down to the required thickness. It is important to keep them flat during this process. The color on this Koa is amazing and it is evident that when they become part of the assembled body it will be very pretty. Now that these are ready - we can start buiding the body structure and putting all out pieces together! |
|

The tailpiece block which will look amazing when installed.
|
This is a special block I fabricated for the tailpiece section. Once this opiece is machined to size it will serve as a solid endpiece which brings the back and sides of the body together. This will be more apparent as we start to assemble the various pieces of the body together. My objective is to create a functional but artistic blend between the back and the sides of the instrument. So far so goo - watch out for more photos as we begin assembling. |
|

Attaching the reinforcement under the soundhole.
|
Work continues on the back of the top plate. We added one more bracing strip down the centerline of the top below the bridge. This area will be under a lot of tension and we want to maintain as much strength as possible without compromising sound quality. Also - the re-inforcing ring has been glued into place below the soundhole. This piece of matching Cedar servs as a support and allows for shaping in that area. |
|

Bridge support installed.
|
The first set of bracing has been attached to the underside of the top plate. Next we had to mark the exact location of the bridge so that we can add some structural pieces in that area. We caut and shaped a piece of rosewood so that it fitted perfectly between the braces under the spot where the bridge will be. That piece was glued into place as can be seen in the photo. We still have some more bracing pieces to add. |
|

Working on the bracing and reinforcement under the top plate.
|
There is a fairly complex and well thought-out pattern of braces which have to be securely glued to the underside of the top of the bass. These we cut and shape ourselves from a very light and straight-grained wood. They are carefully glued onto the bottom surface to provide strength to certain parts of the instrument which will be under load and also to maintain flatness of the top plate over time. They also assist in the sound projection. |
|

Top plate of the instrument has been cut out.
|
We decided it would help our cause to sut out the top plate prior to trying to fit the bracing pieces. We carefully cut the top just outside of the finish countour line, allowing ourselves a little room for adjustment. We can now more accurately determine the length of the cross braces. I also have to decide what style of bridge I am going to make for this instrument. That decision depends partly on the type of transducer I'll be using. |
|

We have marked out the contour of the body on the top plate.
|
We are ready to start adding the bracing to the underside of the top plate. First step is to mark out the contour of the body shape so that we can determine the length of the individual bracing pieces we need to use. The first two will be close to the soundhole at right angles to the centerline of the instrument. Others will be placed closer to the bridge location to help the body structure support the tension of six bass strings!! |
|

The five pieces that will combine to make the outer rim of the bass body.
|
We have been busy working on the bracing structure of this instrument. This has requires that we manufacture many structural parts which are being glued to the back of the top plate. Pictures to follow. In the meantime, I had to assemble some of the body components to check the outer profile against our template. There are many pieces that will have to come together perfectly so work checking early! |
|

Working on the solid block that creates the point undwer the lower cutaway.
|
Because we opted in this case for a cutaway lower bout - I have to fabricate a piece of Koa to serve as a joint between the bent sections of wood making up the lower bout. The block of Koa in the photo will ultimately be a pointed triangular piece that allows the two bent sections of the sides to come together. I have tried to match the grain as closely as possible so that the insert will be virtually invisible. |
|

Celtic Knot inlay complete - now needs sanding.
|
Finally the Celtic Knot inlay has been completed. I calculated that there are 196 separate pieces in this assembly. All the pieces have now been glued in place and all that remains for the moment is to sand the inlay section carefully to establish a flat surface. We can then start thinking about cutting the top plate more or less to size and adding the vracing strips to the back side of the top plate. More pictures to follow. |
|

Starting on the knot pattern.
|
Work continues with the rosette inlay. I have started to glue the individual pieces into place on the top of the instrument. It's a little laborious because the parts are so small and they have to be positioned very accurately, but I think things are going well so far. I'll continue tomorrow and hopefullyget all the knot pieces in. I will then have to insert the darker wood in the gaps, but that should go more quickly. |
|

Gluing the first few inlay pieces into the rosette.
|
As expected, the inlay procedure is fairly detailed and time-consuming but hopefully the results will justify the effort. I started by cutting the inner and outer rings on the laser and gluing these in place. Once they had set, I cut the outer edges of the celtic knot pattern from a darker wood and glued those in. The pieces are very fragile and have to be handles very carefully. I am now ready to inlay the knot pattern. |
|

Soundhole and recess for rosette have been machined.
|
I have secured the Cedar top on the CNC and plotted the exact position of the soundhole. I then cut through the cedar to establish the finished soundhole diameter. After that, I cut a shallow recess into which I will inlay the rosette pattern of celtic knots. The recess is just deeper than the thickness of the veneer I will be using to create the inlay pattern. I am now ready to cut some inlay pieces and start creating the design. |
|

Laying out plans for the soundhole and rosette.
|
The next task in the project is to design and build the custom rosette which will enhance the soundhole on the bass. The first thing to do was create the design in a vector art program. I then convert that to other files which the CNC or the Laser can read. On the photo to the left, you can see the outline of the top of the instrument with a printout of the rosette in place. The plan is to create a distinctive Celtic Knot pattern around the hole. |
|

The bent piece for the cutaway area.
|
Our sides for the body have all been bent. One of these pieces is the reverse bent cutaway area for the lower bout. This piece needed to be bent to a much smaller radius and it took quite a lot of focused and dedicated bending to achieve that. I am currently holding it in a constrained condition until we are ready to use it incase the wood decides to spring back a little bit. I now have to manufacture a koa piece for the point on the lower bout. |
|

creating an end block to match the center-piece of the back.
|
In order to complete the multi-laminate effect it is necessary to build and end block for the back of the instrument which will match the stripes which will run along the back of the bass. When complete, this block will provide stability at the lower end of the bass and give us a solid block on which we will fasten the sides. This will combine to make a very impressive combination of woods, can't wait to see this when it's done! |
|

Dave working on bending the Koa for the cutaway.
|
We are working on the sides of the acoustic bass, which requires us to bend the Koa material for both pieces of the sides of the body to conform to our template. The larger pieces have already been bent but today we had to face the challenge of bending the short section which will become the cutaway area on the lower half of the body. This piece requires a much tighter radius and proved quite time consuming. Dave did a great job! |
|

Working on shaping the neck.
|
Now that we have all the basic dimensions for the neck established it's time to work on refining the shape. I started carving the back of the neck so that I could get a better feel for how I should shape the heel. Some of the final shaping will be done closer to the assembly stage but it helps to remove as much of the extra material as possible at this stage. I'll proceed to shaping the headstock and we'll start on the fingerboard soon. |
|

Machining the neck blank.
|
One of the engineering issues we are working on at this time is the method we will be suing to anchor the neck to the body. We have a number of choices based on methods typically used in the industry. One factor is that the body of this bass will have a lower bout cutaway to allow the player maximum access to the upper end of the fingerboard. This affects the structure of the neck/body joint area. More about this later. |
|

Some of the support braces for the top.
|
We have a number of revolutionary ideas about the internal structure of this instrument. We are committed to maintaining a lot of strength within the body structure but also want to build the body in such a way that the low end frequency response is as god as it can be. This involves determining which surfaces should be supported and which should be free to resonate. All interesting stuff. |
|

cedar top has been glued together.
|
We cleaned up the joint edges of the cedar top material and glued the two halves together using a special fixture to hole down the material. Once the joint was set the full panel had to be carefully machined to a specified thincknedd. Following that we scraped the material to remove any high spots so that we ended up with one solid piece with a very consistent thickness. This control of the material thickness is important for sound qualities. |
|

This is the Cedar top we are planning to use on this bass.
|
This is the Cedar material we decided we would use for the top of the bass. It is a very consistent and tight-grained set of book-matched material whic we feel will work very well with the frequencies of a six-string acoustic bass. The cedar will provide plenty of strength and will also come out to be a very complimentary color for the Koa back and sides we will be using. We are excited to see this project move along again! |
|

Working on the neck - establishing joint face for fingerboard and headstock angle.
|
Our goal here is to get the neck section cleaned up and machine in the slots for what we decided would be two truss rods. Based on the length and geometry of the neck it seemed to be a good decision to incorporate two truss rods of guitar (rgather than bass ) length. This gives us more dual ction adjustment over the effective area, since the body and neck will join somewhere around the 14th fret. We'll make the neck as slim as possible. |
|

we now have two sides bent to match the profile of our bass.
|
We have spent some time carefully bending the Koa to the final shape of the instrument body. We are now happy with the outcome and ready to move on to the next step of the building process. Some decisions have to be made based on how we want the body and the neck to join. This is a fairly complex decision involving quite a bit of background geometry. We have decided that we will probably set the neck vesrus bolting it on. |
|

Bending the Koa sides of the body.
|
The Koa sides present more than the usual amount of work to bend. We have to be careful not to have the material fail when the figure is particularly curly. Basically it means working more slowly and keeping the material exposed to steam and just the right amout of heat. Also, sonce this is a larger body for a bass, the material is slightly thicker than that of a standars acoustic guitar. Slow and steady wind the race. |
|

This is the material for the Koa sides - it has been resawn into thin pieces which we will now sand down to make them even thinner!.
|
The material we are working with for the sides started off as a 36" long by 5.5" wide board of Koa. We have now successfully sawn the material into two slices which are currently around 3/16" thick. We are going to let this material stabilize under weights for a couple of days before we run the material through our drum sander with the objective of reducing the thickness to well below 1/8". We have to do this carefully in order to keep the wood flat. |
|

This board of Koa will give us the material for the sides of the instrument.
|
We have reached a point where we are able to restart the production of this bass. We put it on hold for a while in order to research the construction of the acoustic body. Now we are ready to finish up this instrument. We'd like to have it on display at the 2010 Winter NAMM show - we'll see. In the photo to the left you can see the Koa wood which we are going to use for the sides of the bass. We also have some nicely figured curly Koa for the back. |
|

The tapered neck laminates have now been glued together. Things are taking shape.
|
Here you can see that we have completed the gluing of the neck section of the instrument. The neck consists of 7 pieces of East Indian Rosewood and Flamed Maple. Next I will glue the extra material onto the headstock and at that point we will be ready to cut the truss rod and carbon fiber slots and start shaping the neck and the heel section. The fingerboard for this bass will be Gabon Ebony and it looks like it will be fretless. |
|

Here we see two of the neck laminates inside the vacuum press where we are gluing veneer to the sides.
|
Back to the neck assembly - in this photo you can see two of the tapered rosewood laminates for the center of the neck assembly. We are in the process of gluing veneer to these two as part of the pinstriping on the finished product. We do this in the vacuum press. Once we apply light and dark veneer to the appropriate laminates and clean them up, we will be ready to start gluing the neck blank together. |
|

All the pieces for the center plate on the back of the body have been glued together. Looks pretty good so far.
|
The assembly pictured in the photo to the left will be the center panel in the back of our acoustic body. We planned the laminates in the neck to match the laminates in the back of the body so that when the two are matched together we will get a beautiful continuous neck-through effect. This will become more obvious as we progress with this bass. We're busy working on the neck section right now - more pictures soon! |
|

This photo shows the rough-cut blanks for the 7-piece laminated neck and heel. Maple and East Indian Rosewood.
|
Today was also significant in that we planned and cut a template for the blanks that are used for the neck section. We then used the template to cut out all the necessary laminates of Maple and East Indian Rosewood required to build the neck. These will be tapered and double-veneered before we start gluing the laminates together. The large piece at the far end of the neck is material that will become the heel of the neck which will be set into the acoustic body. |
|

Here we are gluing the tapered and veneered strips together to create the center back-plate for the acoustic body.
|
Since the last photo was posted we have tapered each of the five center laminates for the back plate of the guitar body on the ornamental mill. They will combine to continue the neck laminates pattern right through the back of the acoustic body. This will not only provide structural strength but will be a very appealing aesthetic feature on the instrument. In the photo to the left you can see that we have started to glue these tapered strips together. |
|

These are pieces of Maple and Rosewood which will combine to become the center panel on the back of the acoustic bass..
|
Work has started on two fronts on this instrument. In the photo to the left you can see the alternating strips of Maple and East Indian Rosewood which we will sand, machine and glue together to create a beautiful tapered center panel for the back of the instrument. The intention is to carry over the laminated woods in the neck through the entire length of the instrument. While this is going on our partner on this project, Van, is busy bending the Maple sides. |