Almost complete - strap buttons on.
|
(12/4/10) Left: In this photo you can see the very pleasing effect of masking off the center core of the instrument so that it stands out against the color of the back of the body. Right: Almost done - pickups are in, and strap buttons and knobs are attached. Apart from a few final adjustments the bass is almost ready to play! |

Finished bass with knobs on!.
|
|

BHeadstock showing matching Truss Rod cover.
|
(12/4/10) As the assembly process continues we are able to fit the various cover plates into their respective pockets. On the left you can see the truss rod cover in place. I attach these with magnets. Tuners are also attached. Right: Bridge has been attached and the pickup cavities have their copper shielding applied. |

Copper shielding now in place in the pickup cavities.
|
|

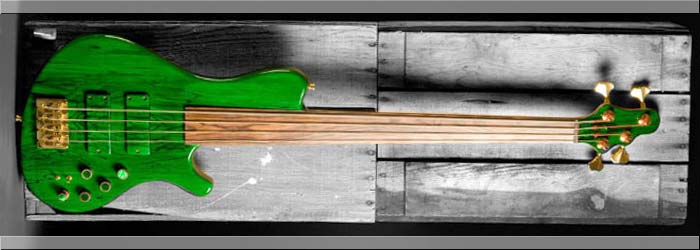
Back from finishing - the green tint is awesome!.
|
(12/4/10) The bass has just been tinted and finished with gloss polyester resin. This is where my cleanup work begins, removing overspray and making all the parts fit together perfectly. I am very happy with the color, and the masking of the center core of the bass - looks great. Sopalted maple grain shows through just right. |

Time to get working on cleanup and assembly!.
|
|

Body with the pickups in place.
|
(11/25/10) Left: Bass is now ready for final finishing. The pickups are fitted, body is sanded, holes for controls have been drilled and counterbored. Right: Back view shows holes for string-trough-body. Cavity cover has been fitted and sanded too. Now it's off to finishing for the green tint and poly-resin coating. |

Back of the bass with cavity covers in place.
|
|

Cavities have been machined - now we have a lot of shaping and sanding to do.
|
(11/20/10) We have machined the cavities for the 18v battery system and the control cavity which will house the preamp and its controls. Also - much of the carving of the neck to body transition has already been done. We still have a lot of hand-shaping to do, followed by a considerable amount of sanding. The instrument is very lightweight due to the materials used. The maple and darker pinstripes in the neck look great and will add a lot of rigidity. |
|

headstock veneer is attached.
|
(10/30/10) The headstock veneer of spalted maple has been added to the headstock. Before it was attached we cut out the little cover for the truss rod cavity. That will re-attach using small magnets. We need to do some careful shaping of the headstock profile and then drill the four holes for the tuners. After that we will be working on final shaping of the instrument and getting it ready for finishing. |
|

Almost ready to attach fingerboard to body/neck.
|
(10/10/10) The kingwood fingerboard has been machined and sanded down smooth, and I have already drilled for the side dots and inserted the side-dot markers. We're now just about ready to do a final fitting and glue the fingerboard onto the neck. As the Kingwood darkens it will be an excellent color match with the green translucent tint which will be on the rest of the instrument. Also working on the pickup covers right now. |
|

The Kingwood fingerboard being machined on the CNC.
|
(10/7/10) We set the fingerboard for this fretless bass up on one of our CNC machines today. First operation was to cut the perimeter of the fingerboard from the blank piece we set up. With that done, we changed cutters to a ball end mill and are now running a program which generates a compound radius over the entire length of the fingerboard. I will remove material from this fingerboard blank until we achieve the correct thickness. |
|

Today we cut the recesses for the two pickups into the top of the instrument.
|
(10/6/10) The next operation on the body of this bass is to cut the two recesses for the two pickups. We carefully measure, plot the bridge location, then mark the positions for the two pickups. Then it's a case of running a program for that particular pickup at the two pre-determined positions. Nice to get one more operation done on this instrument and keep moving it forward. Next up we'll probably be gluing on the fingerboard. |
|

The fingerboard will be Kingwood - very hard stuff
|
(10/4/10) I decided that the best wood I had in stock for a fretless bass was Kingwood. It has been used by some of the top bass manufacturers for fretless because it is a very hard and dense wood. I thought this would be a great opportunity to give it a try. Typically the wood is very colorful when machines but will darken over time to something like the color shown in the photo to the left. Should look good against the green body color of this bass. |
|

It's official - the serial number has been added!
|
(10/1/10) I had an opportunity while running our laser engraver for another job, to also cut and engrave a serial number tag for this bass. In this particular case the instrument has a suffix "C" which identifies it as one of our Classic Series basses. (our Signatures Series now have an "S"). We'll move on with this bass very soon to cutting the two recesses for the two pickups. Also - we're about to start work on the fretless fingerboard. |
|

The control cavity and the battery cavity have now been machined.
|
(9/30/10) Good progress today - we were able to get the control cavity and the battery cavity cut into the back of the bass. Also the recesses for each lid have been established. While we were doing the batterycavity I also cut the slot which will hold the insert for the serial nimber, and drilled the holes for the magnets which will hold the two covers onto the body. The bass also feels a little lighter die to the material we just removed! |
|

Top plate test fitted onto body.
|
(9/26/10) The female joint for the fitting of the top plate has been done and we now have a nice fit between the top plate and the geometry of the neck. Now that I know everything lines up and positions properly, I can clean up the surfaces and get everything ready to glue to top plate onto the body. This will be done in the vacuum press and most likely lefy overnight to make sure the adhesive is completely cured. |
|

Cutting the neck joint in the top plate.
|
(9/26/10) We glued the tow bookmatched halves of the top plate together and it's now time to cut the neck joint so that we can fit it onto the body. On the CNC machine I cut out the exact profile of the end of the neck so that I can tightly fit the top and the body pieces together. Care must be takent to make sute this cut is exactly the right width, is square to the centerline and the correct distance from the end of the body. Measure twice - cut once! |
|

Wiring channels have been cut into the top surface of the body.
|
(9/18/10) Before the top plate will be glued on to the body, I cut the necessary channels for wiring. There is a channel for each pickup wire going from the projected locations of the cavity and the two pickups, and also a channel for the power supply from the battery compartment. Finally - I cut a small channel for the ground wire that will be connected to the bottom of the bridge. We're pretty much ready to glue the top on. |
|

Top has been machined, establishing neck joint.
|
(9/14/10) The body has now been set up on the cnc machine so that we can remove excess material from the top surface. I carefully mill round the perimeter of the neck joint so that we establish the correct depth of cut (and body thickness) Once that is done I machine the entire body top surface to the same level. This will now be the joint face between the instrument body and the top plate. Bass is very light now! |
|

Getting started on carving the back of the instrument.
|
(9/6/10) While I was working on other projects I kept this assembly handy so that when I had a spare few minutes I would be able to do some carving to the body/neck joint area and also remove some excess material from the back of the neck. I am using rough carving tools to simply remove material to get closer to actual finished sizes. It's always good to get a feel for the finished instrument. I will do some more accurate carving once the assembly is complete. |
|

Upper and lower bouts have now been glued on.
|
(8/28/10) Both body halves sucessfully glued to the core of the instrument. Now we can do some clean up and sand round the edges of the body to much closer to the finished size. With the mahogany sider the instrument is expected to be pretty lightweight, it already feels light and there is a lot more material still tp come off the body and the neck. Nice to see this bass in obe piece. next major operation will be cutting the body thickness down to size. |
|

here we are in the process of gluing the second body half onto the core.
|
(7/30/10) We have glued a couple of decorative veneers onto the joint faces and now it's time to assemble the upper and lower bouts of the bass onto the center core. I do these one at a time to control the exact relationshop between each glued part. I clamp them together and at the same time down onto a flat surface so that everything will come out nicely aligned. Each joint is left overnight so that the adhesive is properly cured. |
|

Preparing the joint faces for assembly.
|
(6/15/10) We have already rough sawn the upper and lower bouts out of some nice mahogany stock. This has been drum sanded flat but needs to have a straight and square surface in preparation for the gluing of veneers and assembly onto the core of the bass. The quickest way to to that in my shop is to clamp the pieces onto an angle plate and run a cutter across the surface until it cleans up and removes the required amount of material. |
|

We have a nice piece of spalted maple for the top plate.
|
(5/23/10) The machining of the neck core has been completed and we can now start working on parts for the body of the bass. I had a nice piece of spalted maple in the shop which will work very well for this project so I cut the rough body shape on the scroll saw and we'll split this piece down the center to bookmatch it. This will give us a very nice figured top which will work well with the green tint planned for the finished instrument. |
|

The laminated core section is now being modified on one of our CNC machines.
|
(5/15/10) The core of this bass has now been completely glued up and we now have a very strong and rigid laminated center section for the instrument. Next step is to set the core up on our CNC machine and run several consecutive machining operations to bring it to the next level. We machine the joint face for the fingerboard, the profile of the neck, the head and body angles and the Carbon Fiber and truss rod slots before it comes off the machine. |
|

Laminates for the neck are ready for gluing.
|
(4/9/10) All the individual neck laminates have been veneered and we are now ready to start gluing them all together. We'll be doing this one layer at a time to make sure we get the best alignment and joint integrity possible. This should end up being a nice rigid but lightweight neck with nice tonal qualities for a fretless bass. Once they are all glued together we'll get the core onto the CNC and things should move ahead pretty quickly from there! |
|

Some of the neck laminates being veneered in the vacuum press.
|
(4/5/10) We have cut and sanded all our neck laminate pieces and now have to apply veneers which will apperar on the finished instrument as decorative pinstriping. Once all the pieces have been prepared we'll be able to start gluing the neck/body core together. We are hoping to start gluing that later this week. This bass should come together quite quickly once we have the core glued up. We expect a fairly lightweight bass. |
|

We now have upper and lower body parts for this bass.
|
(4/3/10) We now have the upper and lower body halves prepared for this bass. They are only rough cut at this point but we're not far away from seeing this bass as one complete unit. I have some more sawing to do in order to add som ethickness to the neck, but we will be starting to glue the laminates for the core together over the next couple of days. Tomorrow I hope to be able to glue some veneer onto thes various laminates. |
|

All three neck laminates have been cut and sanded, ready for veneer.
|
(3/24/10) Here are the three components of the center core of the bass. The two outer strips are figured sycamore, and the strip running down the middle of the instrument is curly maple. This combination should yield a nice balanced sound to the finihsed instrument. We are now considering what type of decorative veneer to use for pinstriping between these laminates. We'll glue the veneer in our vacuum press in the next couple of days. |
|

Neck woods will be curly maple and sycamore.
|
(3/12/10) I know it doesn't look like much yet but I did pull wood for this project today and prepare the templates so that I can get started on this bass within the next day or two. I had a nice piece of spare flamed maple for the center section and the outer edges of the neck/body core will be cut from a beautiful piece of sycamore. These should combine to give us good results on this instrument. |
|

This is one of the options we have for a top wood - Spalted Maple.
|
(2/11/10) On our Classic basses we try to use the best possible materials we can within the framework of the price structure. Wherever possible we try to find woods that has some kind of eye-catching figure so that the top of the instrument will still have some character. Our customer requested a green finish, and in order to yield a nice strong translucent color we need to start with a light colored wood. This spalted maple would look nice on the finished bass. |