|

Ready to go!!!.
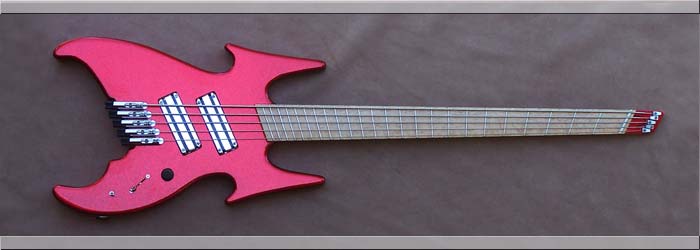
|
(7/3/12) This remarkable bass is now complete and working well. It soulds really nice and it is a very enjoyable experience to play! There is definitely only one of these beauties on the entire planet so we hope our customer will be happy to be seen with this instrument in his hands. The red sparkle has to be seen to be believed! |
|
|

Strandberg tuner hardware.
|
(7/2/12) Left: After some car5eful planning and experiment6ation we found the right formula for the installation of the tuner units. They line up well with our body angle so we seemd to be in good shape! Right: This is the back of this beautiful bass with the cavity cover attached using neodymium magnets. |

The back of the finished instrument.
|
|

4 Strings on - adding grounding wires.
|
(6/22/12) Left: The bass is on the bench for some final adjustments. Since we are the first builder in the US to install Strandberg single string bass tuners we are being careful and documenting our experience. Right: Electronics are going in ane we are wiring things up so that this bass can make some sound. So far so good! |
Jack socket installed and wiring connected in the cavity.
|
|

Selector switch installed in its custom recess.
|
(6/19/12) We're getting this bass through its final stages. I had to recess a little bit so that the 4-way selector switch would clear the cavity cover, but now we are ready to wire the electronics. We have an ingenious system on this one with the selector switch giving us 4 pickup options and the toggle switch giving us a tone control. |
pickups bridge and controls.
|
|

Pickups are installed in the body.
|
(6/14/12) I did a final install of the two Lace Sensor pickups today. Due to their unconventional shape I had to be careful to make sure they went into the cavities in exactly the right position. I discovered that they required special compression springs to keep everything stable but the end result was very pleasing. The pickups look great in the instrument due to their chrome finish which matches all the other hardware on the bass. |
|

Copper shielding being added to the control cavity.
|
(6/12/12) In order to complete the wiring we need to first complete the shielding process in the control cavity. I can use copper shielding in this area and it will ultimately be connected to the two pickup cavities to guarantee electrical continuity for shielding. I will add the magnets for the cavity cover tomorrow and keep things moving foward. We have also created the nut which will allow is to string the instrument up. |
|

Base plates for tuners are securely fastened.
|
(6/9/12) Althought I have already fited the tuner units onto the bass for test purposes - I went ahead and fitted them permanently to the recesses in the instrument body. A few minor adjustments and the base plates fitted the recesses. They are firmly attached with two screws each and the actual tuners are attached to the base plates. |
Tuners now permanently attached.
|
|

Shielding has been applied to the pickup cavities.
|
(6/8/12) here we are lining both pickup cavities with shielding. Normally I use copper shielding but because all the hardware on this bass is chrome I didn't want any copper colored shielding visible behind the chrome pickups. This shielding tape is silver and is a much better match. These two cavities will be indivially grounded to the common cavity ground to create a very well-shielded instrument. Control cavity will be similarly shielded. |
|

String retainers being attached to the end of the neck.
|
(5/30/12) One of the most challenging aspects of attaching the hardware onto this bass was that I had to find a way to configure the Strandberg string retainer components to the headstock in such a way that they were at the correct depth with the correct alignment and spacing to do their job. I had cut recesses for them previously but I had to clean out overspray from the finishing process which took some time to do manually! |
|

Strandberg Tuners have been fitted!!.
|
(5/8/12) I spent some time working on getting the Strandberg tuners to fit perfectly in the five recesses on the back of the bass. The overspray had filled the recesses so I had to clean that out. The tuners now fit beautifully and look great in place. Looks like my calculations on height worked out well too. Now that these are established I can bolt them in and move to the string retainers and get those fitted also. |
|

Added straplocks and fitting covers into cavities.
|
(5/3/12) Here we are working on the two back cavity covers, romoving overspray material so that they fit nicely into their respective recesses. They are not yet in place but we are close. It requires some careful grinding on the inner surfaces of the cavities to make this happen. As you can also see in the photograph, I installed the Dunlop recessed straplock components into the body. Next we will add tuners and string retainers. |
|

Working on the fingerboard.
|
(4/30/12) First order of business here is to clean up any overspray on the fingerboard surface. This is masked during the spraying process but there is always a few small areas where the resin gets below the masking. I protect the body finish close to the fingerboard with masking tape and remove any overspray with files and scrapers. I then add a protective coating of finishing resin to the fingerboard. Now ready for the next step! |
|

Back from finishing and the metal-flake looks awesome!.
|
(4 27/12) I just got this instrument back from the finishing process and I have to say that the overall effect of the red metalflake is stunning. It is impossible to captire the depth of the finish on a photograph. Now that I have the instrument back in my hands the first job is the cleanup of overspray - aprticulatly on the fingerboard and the cavities. I have to re-fit the cavity covers with their build-up of coating. More pics to follow! |
|

Headstock veneer on - looks good.
|
(3/13/12) The headstock veneer has been glued onto the headstock and the edges have been trimmed. I wanted to find a way to incorporate the string retainers and the truss rod adjustment in as compact a space as possible. So far this looks very successful as I did not want to artificially elongate an already long neck (36" scale). Moving on to some of the final machining requirements and final sanding before the finishing process begins. |
|

Attaching the head plate onto the headstock area.
|
(3/10/12) Having cut the headplate, the next task was to make sure it fit well into the angled area of the headstock. It was then glued, carefully aligned and clamped securely to the headstock area. When ths glue has cured it will be trimmed flush with the sides of the neck and cut to length so allow for relatively easy string trimming. There is alose some sculpting behind the headstock still to be donw but I wanted to finish that after the veneer was on. |
|

This is the rough head-plate which will include the string retainers and truss rod access.
|
(3/7/12) Since we now have the Strandberg Hardware on hand we have to create a method of adapting the string retainers to the geometry of our headstock. First task here was to cut recesses for the string retainers into a headstock veneer. At the same time we cut our the small truss rod cover piece. I will carefully shape and fit this cover onto the extra material I left behind the nut and then trim to final size. |
|

Working on creating the radius around the body profile.
|
(3/1/12) These are the Strandberg tuner/bridge pieces for headless bass. They are a brand new product from Sweden and we have the only 5 of these tuners in the USA. They are very lightweight which will help us keep the overall weight of this instrument to a minimum. We'll be outfitting this bass with this hardware after the red sparkle finish is applied. With all the extremely unusual features on this bass it's going to be an amazing instrument! |
|

Working on creating the radius around the body profile.
|
(2/27/12) We're currently in the process of shaping the external radius around the body. At the same time I am refining the profile of the back of the neck so that it feels just right while at the same time retains its strength. Once all the sculpting is done I will start the final sanding process. I have only two more tasks to complete on this bass, the headstock veneer and truss rod cover and the holes for the various controls. |
|

Covers for the back recesses have been machined.
|
(1/10/11) While other operations were going on I took the time to machine the covers for the back cavities. These will fit perfectly into the back of the bass and will use magnets to hold them firmly in place. They are thick enough to remain stable when the finish is applied but not so thick that they use up valuable space inside the cavities. These will have the same red metalflake finish applied as the rest of the instrument. |
|

Fingerboard has been cut and frets installed.
|
(11/30/11) We have glued the fingerboard onto the body. An important step because it allows me as a builder to get a better feel for the thickness of the neck combined with the fngerboard. I can now start shaping the profile of the back of the neck so that it feels just right. Also, now that the board is on - we can establish precise locations for the bridge/tuners pieces and the cavities for the two pickups. |
|

Fingerboard has been cut and frets installed.
|
(11/22/11) We have machined the fingerboard and cut the angled fret slots and nut slot on the CNC, now we can make sure the fingerboard surface is carefully sanded smooth in preparation for the fret installation. The fretwire is pre-bent to match the raduis of the fingerboard and then cut slightly oversize. I install them with special tools which avoid any damage to the fretwire itself and the fret ends are then trimmed and dressed. |
|

Lace Sensor pickups arrived.
|
(11/15/11) We received shipment of the Lace Alumitone pickups. These are very unusual in that they have very little copper winding and therefore weigh very little. They are also not dependent on string spacing so for our fanned fret configuration they should work very well. On top of all thet - they look good and from reports I have heard have an excellent tone. I'm looking forward to hearing what these pickups can do!! |
|

machining the compound radius of the fingerboard.
|
(10/24/11) Time to get to work on the Birds-Eye Maple fingerboard. I attached the fingerboard blank to a block of MDF so that it remains flat through machining and subsequent handling after it's off the machine. We cut the exact shape of the board perimeter and are now cutting the compound radius using a ball-nosed carbide cutter. I'll do some sanding on the board to remove machining marks and we'll be ready to cut the fret slots and the slot for the nut. |
|

Cavities on the back are machined.
|
(10/15/11) We have glued the top onto the body of the bass and doen some of the initial shaping to establish the body contour. The next task is to machine the control cavity and battery caviti from the back of the bass. If we decide to go active we'll have an 18v power supply available. if we stay passive we have a handy compartment and the ability to add active features at any time. Next I will make covers for noth of these cavities. |
|

Wiring channels have been machined.
|
(9/28/11) I have now machined the top surface of the body to a consistent flat surface and in doing so have established the joint area where the neck and the top plate will meet. That done, I machined the channels into the top surface which will accommodate the wiring for the various electronic components and grounding necessary inside the instrument body. I can now focus on fitting the top plate and getting work started on the fingerboard. |
|

Body halves are now part of the instrument.
|
(9/14/11) The two halves of the body have now been veneered on the joint faces and glued to the center core section of the instrument. At this point in time you can start to appreciate how light the net weight of the woods are. The instrument now goes back onto the cnc where I will machine the end profile of the neck and the entire top surface of the instrument. This will give me a flat surface to cut wiring holes and we'll then glue the top plate on. |
|

Body halves have been rough cut on the bandsaw.
|
(8/28/11) We have established the final body profile with our customer and created our template. I used the template the mark out the upper and lower body halves. Next I rough cut them on the bandsaw and the photo on the left was taken just after I completed that operation. next I will clean up the two halves on the spindle sander and they will be almost ready to attach to the body of the instrument. Shape looks kinda cool. |
|

White limba for back body halves..
|
(8/20/11) We are getting ready to create the body of this bass. One of the requirements is to make the instrument as light as we possibly can. To this end I looked through my wood options in the shop and decided that White Limba would be lightweigh enough without compromising other qualities we are seeking in the bass. I'm going to use this material for the back wings and top off the body with a piece of Black Limba. Should be a nice combination. |
|

Applying another pinstripe veneer.
|
(8/13/11) We have just finished machining the two sides of the core of the instrument in preparation for attaching the body parts. Before we do that we are gluing on some more pinstriping veneer since we will be exposing the multi-laminate core section on the back of the instrument. This will result in a very impressive effect. We are also in the process of making the various body parts. I decided to use black and white Limba for the best weight/sound properties. |
|

Slots for truss rod and carbon fiber rods are done.
|
(8/6/11) All the initial work on the CNC has been completed. We cut the channel for the double-acting truss rod and also two slots for the carbon fiber reinforcing rods. The neck to body angle has also been machined. We will now saw off some of the excess material and get ready to clean up the joint faces for the two body halves. We'll start by drawing the body shape to scale and refining the match between the body and the neck. |
|

Cutting the neck profile on the cnc.
|
(8/2/11) The neck/body core section of the instrument is currently set up on the CNC machine. Here we establish the flat joint surface for the fingerboard, the entire finished perimeter of the core, the truss rod slot, carbon fiber slots, headstock angle and neck-to-body angle. The assembly doesn't come off the cnc until all these features have been established. Once that work is complete, we can start thinking about the body and fingerboard. |
|

Neck/body core section complete.
|
(7/20/11) This is the completed core of the instrument. It is comprised of five laminates. The trhee center laminates are tapered so that the combined tapers match the natural taper of the neck itself. Each laminate has a contrasting pinstripe veneer applied to it. When the entire neck is assembled this creates a very impressive effect between the light and dark woods. When this bass is finished, we want the neck to be a feature! |
|

Gluing process underway.
|
(7/10/11) The assembly process has been started. Here we have already glued the first set of laminates and are now gluing the first of the two outer pieces. All these neck laminates combine to create a much stronger and more rigid neck than a comparable one-piece construction. The multi laminate assembly not only looks impressive when complete but it much less susceptible to movement and humidity changes than a one-piece neck. |
|

Ther two bubinga stringers are being veneered.
|
(7/2/11) The two tapered Bubinga laminates are being veneered in the vacuum press. I glue Maple veneer onto these dark woods and I glue Lavoa veneer onto the lighter colored woods. When all the tapered laminates are combined it will look very impressive and will also result in a very strong and rigid neck assembly. Also, the colors will look great together. Next step will be cluing all these separat pieces together. |
|

These are the inner and outer neck components - mow need stringers.
|
(6/26/11) Here we see three of the pieces that I will be using to create the 5-piece laminated neck/core section. In order to bring out the best in the sycamore grain, the center piece was cut at 90 degrees. This will yield a very nice effect on the finished instrument. The two remaining laminates will be cut from curly bubinga which will balance the wood densities nicely to yield a good solid tone. Each laminate will have two contrasting pin-stripes. |
|

First two laminates are cut - figured sycamore.
|
(6/19/11) I made a template for the profile of this bass and cut the first couple of neck/core pieces from a very highly figured piece of sycamore. These two pieces will be the outer edges of the core and neck of the instrument. I am planning to cut other laminates to complete the assembly, possibly some bubinga and maple. This will create a very rigid neck for the bass and contribute to a very well rounded tone. |
|

Customer gave us a rough concept of body style.
|
(6/18/11) This bass was conceived by our customer so we are starting with a rough outline of the intended body shape and moving forward from there. We'll start with the core pieces for the instrument but at the same time we'll be making an accurate scale drawing of the instrument body so that we can make sure we're on the same page with the customer on the final shape and size. The immediate task is to create a template for the core section. |