Getting the mechanics of the bass adjusted. Nut slots need to go deeper and saddles re a little high right now.
|
Left: Playing the bass again to evaluate nut slot depth and bridge height and intonation. The bass is fun to play and looks great too. Right: Truss rod cover needed an internal retaining magnet and another small one on the inside of the cover. One more small pesky job done and closer to shipping !! |

Getting the mechanics of the bass adjusted. Nut slots need to go deeper and saddles re a little high right now.
|
|

Had to adjust seating of piezo saddle number two. Should be ok now.
|
Left: Working on one of the graph tech saddles to optimize its location. Not much room in there to monkey around with tools!. Right: I have been playing it to tweak out the last few adjustments as I want to get this beast shipped out to its customer. Plays great and is has a very strong output and great tone. |

Test driving the bass so that I can get it ready fo its customer.
|
|

Small adjustment to the base below the adjustment screws so that I can get the pickups just a tiny bit higher..
|
Left: strange looking picture but it's simply because I needed to remove the pickups and give then a slight bit more upward travel. Right: Pickups back in - part of the issue was that finishing poly-resin had gotten into the adjustment holes thereby causing friction. Should be fine now - time to retest. |

Got both pickups back in after a little bit of internal adjustment.
|
|

Schaller Locking Strap buttons with the strap unit attached..
|
Left: Oops - forgot to attach the locking strap buttons - that's now done and I'm doing a fret level and final fret dressing. Right: Just polished the body up to get it back to it's shiny clean dust-free look. I want to try to take a few glamour shots of it if at all possible. The bass feels really nice. |
Getting the mechanics of the bass adjusted. Nut slots need to go deeper and saddles re a little high right now.
|
|

Got the pots tightened up and knobs on, general cleaning up. Last task is basically back to nut, frets, truss rod and general playability.
|
Left: Running around like crazy trying to get this monster ready to ship. Got the knobs on, cleaned up covers, shielding on cavity cover, now back to nut adjustment. Right: Just cleaning things up now on this bass. I wish I had a chance to play it and show it off at a gig but that doesn't look likely!! |

Just cleaning things up cosmetically and doing last minute adjustments. I'll check fret dressing and fongerboard, make sure nut slots are where they need to stay - finalizr e truss rod adjustment, fit into case and weigh and measure everything..
|
|

Cavity covers securely attached with their neo-magnets.
|
Left: Cavity covers are now magnetized and fitted in place. So happy to see a complete back on this bass. Now to work on the string adjustment so I can get this wrapped up!. Right: I'm just making final adjustments (truss rod, saddles and nut slots), checking fret leveling and post-wiring cleanup work. |

Getting close to the end here!!!!!.
|
|
Getting the mechanics of the bass adjusted. Nut slots need to go deeper and saddles re a little high right now.
|
Left: The bass is fully connected and piezo blend is doing its job! Very happy about that. I'm now getting the slots in the nut set to depth. Right: Control cavity tidied up and I did some potting on the piezo connector to stabilize the soldered connections. Now adding magnets to the cavity covers. |

Getting the mechanics of the bass adjusted. Nut slots need to go deeper and saddles re a little high right now.
|
|
Getting the mechanics of the bass adjusted. Nut slots need to go deeper and saddles re a little high right now.
|
Left: I am convinced that you need a microscope and 3 arms to work on this kind of stuff! I have 4 out of 7 piezos connected. 3 more to go! Right: OK -after more time than I care to admit I have the piezos working along with the magnetic pickups. I need to consolidate all the wiring but at least THAT's done. |

After a rather large investment in time I was able to get the piezo section of the sound working. That was a big hurdle out of the way - I was playing it today and it soulds really great!.
|
|

Testing one pair of piezo wires to verify signal. Then on to the others..
|
Left: Went to the nearest electronics superstore and got hold of some hardware that will help me isolate the piezo signals so that I can get them working. Right: OK - I pulled all joints apart and started from scratch. Connected one Piezo to system and it worked. Then a 2nd! Will test all 7 and re-assemble. |

I rpiied all my old connections apart and cleaned everything up - startyed from zero. I tested the first two piezos and they work so moving through the remaining 5 and all SHOULD be good!.
|
|
Getting the mechanics of the bass adjusted. Nut slots need to go deeper and saddles re a little high right now.
|
Left: I installed batteries and plugged the bass into a test rig to see what was coming out. Pickups sound great, preamp for magnetic pickups doing its expected excellent job. Not getting a piezo signal, but traced it to a ground or short somewhere! I was able to test that the preamp piezo module is doing its job so I need to double check what's happening between the saddles and the summed piezo wire and get that resolved asap. |
|

Ground wires connected. Needs some tidy-up but going to do testing first!!
|
Left: Got my ground wire installed and securely attached to the cavity common ground. Now it's time to see if Murphy's Law has passed me by with no technical issues! Right: Strings back on and I'm adjusting for intonation and locking down the saddles so that I can test for sound. Crazy busy!!. |

Getting the mechanics of the bass adjusted. Nut slots need to go deeper and saddles re a little high right now.
|
|

I'm in the middle of connecting all the wires - very carefully. It's all correct by the book just taking it one at a time!
|
Left: Grey wire goes to black/white wire, black wire to green/white, black grey to OMG - taking it one at a time and I will get there! Right: This photo shows all wires connected except four grounds. I'll run a separate ground wire to the cavity for that, not sure if that will need to be connected to output ground. |

I'm down to four ground wires and I have to be sure they go to the correct places.
|
|

Damn. A power wire separated from the main board - I'm going to have to remove the piece still soldered inside and get a new wire installed in this very small area.
|
Left: All wires pretty much in and good to go except the one little tiny power wire that separated itself from the circuit board! I'm gathering tooling to fix that and then it's testing time! Right: It was an half day task just to get the end of that old wire out of the circuit board and the new one in! Now sealed and secured. |

OK - after some extended soldering and cleaning time - burnt fingers and harsh language, new wires are in and secured.
|
|

Pots in and hopefully a straight shot to sound from both pickups and piezo feed.
|
Left: Got all four pots secured into their holes and some of the extra wiring cleaned up and tie-wrapped. Now that it's a bit tidier I can get the pickups hooked up to the preamp #1. Right: OK, got the neutrik connected and installed and many of the remaining wires arranged and tidied up. Almost there!! |

Got all the wires attached to the output jack!
|
|

GThat was a long and hard job, soldering microscopic wired with minds of their own onto a board with limited space to work. They are all connected and potted fopr safety. I'm nervous because I cant test this till preamps are all hooked up but had to pot because even gentle handling would have likely damaged connections!
|
Left: Wires are now all connected although it was a very difficult job to do. I potted the incoming wires to help stabilize because they are all so fragile! Right: I got the piezo wires potted and shink wrapped - they are as safe as I can make them. Now I need to hook up the pickups and connect the two preamps together. |

The Neutrik output socket is now connected to its collection of wires!
|
|

I found a circuit board I was able to modify to do the piezo summing job
|
Left: After a couple of test runs I ended up using a small circuit board to do the summing of the piezo wires. They are very small and not easy to see or work with! Right: Getting into the wiring of the little board, wires are ridiculously small and delicate so I will be working under lots of light and magnifying glasses. |

Getting into the wiring and soldering of this little board. Wish me luck!
|
|

OPutting on the Lalium strings so I can do some sound testing on this instrument.
|
Left: Putting some Kalium strings on this beast so that I can test out the electronics system I've been working with. Gonna be a VERY cool bass! Right: Strings on and back on to the wiring - specifically the separation and summing of the seven piezo positive and negative wires which need to be connected. |
Getting through the hard part of the wiring - we're almost all connected now!!
|
|

Ground wires secured and the two preamp modules fitted in nice and solid. On to the rest of the wiring and getting it all tidied up.
|
Left: The pickup ground wires have been soldered to ground and I have installed the two preamp modules in the cavity. Now for the rest of the wiring! Right: Getting the pots for preamp and piezos installed and isolating those wires that can be safely grouped together. Will be hooking up jack too. |

Getting through the hard part of the wiring - we're almost all connected now!!
|
|

I got the two modules of the preamp connected together and I can now start fixing components inside the cavity.
|
Left: Good - I managed to get that microsurgery done on the boards so next thing is fitting them both in so that they are not in the way of other stuff! Right: I bonded the two curcuit modules together and I will be positioning them as shown. First I need to solder all the cavity ground wires to copper. |

Control cavity coming together - getting the modules located and ground wired soldered to cavity shielding!
|
|

I had no clue how to do this but got the answers from Audere. It's very tight and small in that area but I think I can do it!!
|
Left: OK - I got my answer from Audere - break the bridge between terminals 2 & 3 and connect piezo module according to colors! Right: In this photo I am separating all the wires so I can heat shrink the piezo and grounding ones. That makes it easier for me to install the two boards and secure them in there. |

Pre electronics installation cleaning - grouping wires so that they don't get in the way.
|
|

I have a 4-band preamp for the mag pickups plus a supplemental module designed to allow me to blend the piezo signal in with a separate volume control. Lots of wires but they will look nice and neat when done.
|
Left: Test fitting the electronic components. I'm hoping I can figure out all these connections. Right: I have a 4-band preamp to install and also a supplemental processor for the piezo feed through a separate control. Making a diagram so that I have all the connections correctly set up. |

Wiring two preamp circuit boards together is a daunting task for me. I am hoping my chart will end up making it simpler for an electronics cave-man!
|
|

All the tuner units are on loaded with piezos and all their assicoated grounding wires. Just going to tighten them all down in place and test for grounding continuity.
|
Left: I got them all on plus all the associated wiring although I think one of the piezos might be compromised in its wiring - ordering a spare. Right: These are the Kalium strings I have been holding on to like Gollum until I get a chance to install them on the bass. Looks like that will be coming soon!. |

My customer selected the Kalium strings for his bass and I am getting things ready to put them on.
|
|

Working on getting all the hardware, piezo saddles, piezo wires and ground wires to co-operate in constricted space!
|
Left: All the ABM hardware going back on in place with the piezo saddles inserted and the piezo and ground wires threaded through to the control cavity.. Right: Threading multiple wires through the body to complete the piezo feed from the seven saddles to the control cavity. Not an easy job by the way! |

Getting the tuners, piezo wires and grounding wires through those damn holes between tuners and control cavity!
|
|

I drilled through the seven saddles to allow for the passage of the little piezo wires.
|
Left: Drilling holes through the ABM saddles to allow me to drop in the piezo saddles. I have to watch for obstructions and sharp edges as the wires are very thin! Right: Audere electronics with new potted board for piezo signals ready to go in the cavity. Lots of wires but everything should connect up OK. |

These are the boards I have from Audere to provide preamp for the magneting pickups and a blended mix from the piezo saddles!
|
|

Getting the string retainer fitted and testing function
|
Left: I'm testing out the string retainer assembly so that everything at this end of the bass is ready for strings. Right: I had to extend the machined slot in the bottoms of the ABM bridge units a little to maximize the space to let the piezo wires run through the assembly and into the body of the bass. |

Machining a larger slot of piezo wores to give them max room to allow for bridge saddle movement!
|
|

I cut a spacing template on the laser.
|
Left: Getting the nut and nut slots established so that I can get strings on this beast. I have a set of Kalium strings right here ready to go on!Right: Got the string retainer sleeves in. Very hard to get black ones but I did find these and was very happy about that! Working on some of the final details right now. |
both pickups in and now getting the tuners connected to their ground wires and getting the last of the retaining screw holes done. You can't rush this stuff if you want it to come out right!
|
|

Very impressive looking bass and TRULY one of a kind!!!
|
Left: This bass has been admired so many times - some of it has to do with the awesome color it radiates! It really came out well!! Right: I have the nut installed and also have locked in the seven string guides at the end of the headstock. These protect the finish on the headstock from the pressure of the strings. |

Nut installed and the seven string retainers are now in place.
|
|
both pickups in and now getting the tuners connected to their ground wires and getting the last of the retaining screw holes done. You can't rush this stuff if you want it to come out right!
|
Left: I'm now in the process of installing the preamp and pots in the control cavity. Enlarging holes to fit pot shafts and getting everything related locked in. Right: I've run cabling from the battery compartment through to the control cavity and I'm in the process of fitting the jack socket assembly. |
both pickups in and now getting the tuners connected to their ground wires and getting the last of the retaining screw holes done. You can't rush this stuff if you want it to come out right!
|
|

First of the two pickups is in the bass. Looks awesome.
|
Left: First pickup installed successfully and it looks really good in place. Takes a little bit of work to get them in just the right place and height. Right: Second pickup in and I am also re-attaching all the tuners so that I can mark and drill out the pairs of holes at the back of each so that I can install the screws. |

both pickups in and now getting the tuners connected to their ground wires and getting the last of the retaining screw holes done. You can't rush this stuff if you want it to come out right!
|
|

This bass has some very unique construction features you are unlikely to see on any other musical instrument!
|
Left: Just adding a quick photo of the very interesting geometry in the construction of this bass. It's pretty unique! Right: I am now installing the pickups which involves getting centered and creating holes for the height adjustment screws. While doing so, I also need to create the right support under each screw. |

Pickups are being installed in the body - it will look really nice with this done
|
|

Pickup bobbings are being installed in their continuous grain covers. Top of the bass will look awesome!
|
Left: Pickups are being installed into their respective covers. I will be installing these into the body and we'll have a complete instrument. Right: I decided to do a little more fingerboard work before I dropped the pickups in since it requires a lot of handling of the instrument. Board is looking nice! |

Fingerboard getting some final TLC before all the other parts start going together.
|
|

Working on the details of the neck and fret ends!
|
Left: I'm working on the edges of the fingerboard and cleaning up the fingerboard surface . Also final dressing the fret ends. Right: Grounding wires threaded through to the control cavity! This is always a pain to do but it's done, so we move on. Next tasks will be nut attachment and strings will be on soon! |

Got all seven grounding wires run from top of instrument through to control cavity.
|
|

Adding tuners. GREAT care needed to not compromise surface finish. If you don;t counterbore enough the screw itself puts lateral pressure on the finish and can cause it to crack or delaminate. Will be glad when this is complete!
|
Left: Fitting all seven of the ABM bridge/tuners onto the body. The spacing between the middle five is dependent on the final positioning of the outer two. Right: This photo shows theprocess of getting the center 5 tuners evenly spaces between the outer 2. I space them front and back then mark for all the holes. |

Marking the location holes for the remaining five tuners.
|
|

Marking out for ground wire holes. I marked the extent of the inner channel and as soon as I mark tuner spacing I will drill the seven holes through.
|
Left: Drilling holes for the grounding wires that will run from each of the tuners into the control cavity. Getting them threaded all the way though is a pain! Right: Another shot of the tuner installations and alignment. I have to consider outer string placement and scale length in order to correctly locate tuners. |

The outer two tuners are the most important as all remaining five have to be aligned between these two.
|
|

The back of the bass looks great with the cavity covers fitted
|
Left: After some delicate work cleaning out overspray I got both the cavity covers to fit - they look great. Right: Copper shielding the control cavity so that I can get busy installing the electronics into the bass. I will also be connecting the pickup cavity shielding to the control cavity. Hope to be playing it soon! |

Getting the copper shielding into the instrument!
|
|

Getting the two outer tuners located so that I can fit the remaining 5 in place.
|
Left: Adding outer tuner assemblies located in exactly the right positions so that I can get all 7 installed and add grounding wires from each. Right: I am now in the process of adding copper shielding to both the control cavity and the two pickup cavities just to make sure our shielding is the best it can possibly be! |

Getting the copper shielding into the instrument!
|
|

Very impressive back of the bass. I'm working on the battery and control cavities to get them nice and clean.
|
Left: My initial tasks are to clean up overspray in the cavities so that I have a good even surface upon which to apply my copper shielding. Right: I have been working on the fingerboard. It had a special protective coating applied and I'm busy right now cleaning up the fingerboard edges where the two finishes meet. |

Cleaning up along the fingerboard edges. I had a hard coat protective coating put on to provide good protection for all that inlay!
|
|

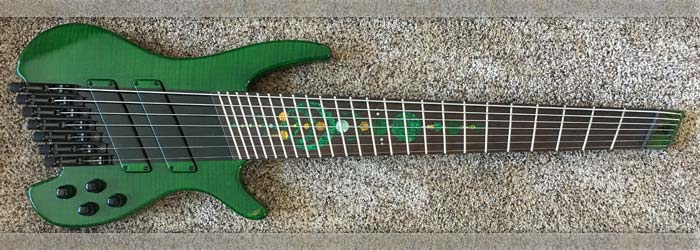
This is the front view - rocking the green although hard to capture it in a photo.
|
Left: This is the bass body as it came out of the finishing shop - I haven't even done any cleanup on it but it looks really nice! Right: Here's the back of the instrument which again looks awesome. The tint brings everything together. I will post more detail photos as I start the cleanup and construction work! |

The back has some beautiful detail which I think has been enhanced by the tint.
|
|

I now have the instrument back in my hands - will be talking a few glamor shots.
|
Left: Not a great photo quality-wise but you can tell this is a pretty classy set of pickup covers! Stay tuned for photos of the rest of this monster. Right: Everything is going to be pretty green from now on! I like the color and the way the grain looks under this beautiful finish. Good match to the inlay too!! |

Color on the instrument is perfect - looks and feels awesome. Will post more pics of entire instrument.
|
|

Covers fitted on the back of the bass
|
Left: Instrument is at the finisher and instructions were to make the bass as green as possible using the larger areas of Crop Circle green as a reference. Should be AWESOME! Right: I was able to coax an in process shot of the bass from my finisher - look great and that maple grain ic coming out looking beautiful!!! |

This is a shot my finisher took at my request - I really like it and it should blend really well with the inlay!
|
|

Pickup covers ready for finishing.
|
Left: The pickup covers have been drilled and counterbored and then sanded all the way down to 400 grit so they are very ready to go to finishing with the rest of the bass. Right: The covers look good on the back of the instrument - even better with the green tint I can imagine. Looking forward to that! |

Covers fitted on the back of the bass
|
|

Battery and control cavity covers have been thicknessed and sanded.
|
Left: Cavity covers have been prepped for finishing. They are continuous grain and will be as green as the rest of the bass. Should all look great together! Right: Just about to do the last operation on this bass which is to establish adjustment holes and counterbores on the two pickup covers. |

Making sure everything fits prior to finishing.
|
|

Nameplate insert on the back of the headstock.
|
Left: Quick shot of the nameplate on the back of the headstock. I think it will look nice in the green! Right: Doing some final shaping and sanding on the back of the neck - I want it to feel really comfortable at both the lower and the upper extremes of the neck as I know my customer uses it all! |
Got the holes and recesses for the knbos done!
|
|

WG nameplate will be insterted in the back of the headstock!
|
Left: Since I needed to add the Watson logo to the instrument I decided to do that on a special insert on the back of the headstock. I'll insert a maple plaque that will also be green! Right: I spent some time on the neck and general sanding since I want to bring this bass with me to the upcoming NAMM show! |

Got the holes and recesses for the knbos done!
|
|

The final sanding is keeping me pretty busy!
|
Left: Sanding this bass from one end to the other so that it's 100% ready for its finishing process. Need it to be done to at least 320 grit. Right: Establishing radii around some critical parts of the body - making sure the pickups and the cavity covers are properly fitted. Maybe some final neck work coming up |
Got the holes and recesses for the knbos done!
|
|

Pretty much done with the headstock until this bass comes back from finishing!
|
Left: OK - headplate on and drilled and deburred and sanded. I'll do a little finishing on the back and continue with body sanding to prep for finishing. Right: Getting the control holes and recesses cut into the front of the instrument. That's about it for machining operations, just need to finish sanding! |

Got the holes and recesses for the knbos done!
|
|

Headstock assembly almost complete.
|
Left: Headpplate complete and shaped to match the angles of the headstock. Now to get the remaining holes drilled through the top. Right: I finally got the string retainer fitted back into the hole (had to remove adhesive) and that allowed me to then drill the seven string holes through the top plate! |

Headstock essentially complete now. Back to the body for final shaping and sanding!
|
|

Gluing the headplate onto the headstock.
|
Left: In this photo I am clamping and gluing the headplate onto the headstock. I decided to use an epoxy rather than wood glue for strength. Right: This is the headplate now firmly attached to the headstock. I have trimmed down the sides flush but need to do the same to the angled front face. |

Headplate succfessfully attached and partly trimmed down.
|
|

Have a great pair of pickups made for this bass that should give it an awesome voice.
|
Left: Since I had the photo handy I thought I would just post it - I have a set of really nice pickups for this bass and they should be in their covers soon! Right: In this photo I am cutting out th etruss rod access cover from the headplate. I can then glue the headplate onto the headstock. |

Just about to cut out the truss rod cover on CNC.
|
|

Machining out the inside material in the continuous grain pickup covers.
|
Left: In this photo I am busy machining out the recesses in the two pickup covers so that the bobbins will fit inside. Right: Both pickups have now been machined out to suit the geometry of their respective pickup assembly - each one is different. I still have adjustment screw holes to drill but hard stuff is done. |

The underside of each pickup cover has been machined.
|
|

More very important work has been done to the headplate and headstock.
|
Left: This is the current condition of the headstock. The two support strips are in place and I have just machined matching recesses on the beck of the head plate. Right: This is the top plate ready for two operations, one will be to add decorative veneers, and when done I will permanently attach it to headstock. |

Top plate ready to be attached.
|
|

Working on the headtock assembly - and yes there is a cat in the photo.
|
Left: I've been doing some planning - these two sturdy strips are going to get bolted into the headstock assembly and I will relieve the bottom of the headplate. Right: Holes are drilled through back of headstock and I have center punched the locations for the retaining screws for the support bars. |

Getting things drilled for the addition of the string retainer support bars.
|
|

String retainer all tapped and ready.
|
Left: The string retainer is now drilled and tapped and ready for installation. My next task is to add a couple of support bars above the assembly. Right: I am going to add two very sturdy brass strips to the headstock assembly to provide a solid base upon which the upward tension of the strings can safely bear. |

Two brass strips under the head plate for added strength.
|
|

Matching Curly Maple for the head plate.
|
I located a piece of maple from the same top plate raw material that we started with on this bass. I rough cut a piece with the grain and figure running in just the right direction and I will now get this sanded to the correct thickness and add a couple of decorative veneers to the bottom face. When that's done I will machine out a cover piece top act as the truss rod cover. Once that is removed I'll attach the head plate and finish shape it. |
|

String retainer block being drilled at an angle.
|
Left: This is the retainer block being drilled at the correct angle for the string retainer threaded holes for the set screws. Right: In this photo I have set up to tap the threads in the holes on the drill press. I'm going carefully because I want all these threads to come out just right, I'd hate to start this little part again! |

Tapping threaded holes into the string retainer.
|
|

Getting the string retainer fitted in the headstock.
|
Got the retainer block machined to just the right size and shape to fit into the recess. It has to be done pretty accurately as I can't afford the fit to be too loose. Feels just right to me now so the neck step is to get this thing drilled (14 different holes initially) and get seven of them tapped for heir set screws. I have also selected a nive piele of curly maple for the headplat that will accept our green tint very nicely! |
|

String retainer recess is now in.
|
The recess for the string retainer is now established and I can turn my attention to finishing up the retainer block (now that I have the right shape for it to fit into) and getting the headplate top cover fitted and attached. There are numerous little tasks to get done to yield the finished headstock but something is getting done every day! I am also workingf on pickup covers and cavity covers to get them closer to fnished condition. |
|

Machining on the htop of the headstock has been successfully completed!.
|
Machining on the top of the headstock area has now been completed. I wanted to not only get this feature machined and ready for the headplate but also make sure I cut the end so that the net length of the instrument fitted into one of my guitar (not bass) cases! Now I can do some cleanup, prepare the headplate and flip the instrument over to do some machining on the back side for the string retainer. |
|

A little additional machining is required to the headstock area.
|
I have to do a little machining to both sides of the headstock area for the string retainer assembly. On the top I am going to cut a nice flat face for the headstock veneer material. when that is done I will create another setup where I will machine the recess for the brass string retainer insert. This insert will be slightly different than former designs in that I plan to make it a part of the headstock rather than a seated component. |
|

The black tuners will blend into the very dark Wenge center stripe of the bass. I'm going to try to capitalize on this and get this very unige bass completed!
|
I have spent a lot of time drawing out some of the concepts I was planning for the tuner assembly. Since we were unable to get the original hardware we wanted I was planning to reconfigure the ABM tuners to expose more top space. I do not think I have enough room to do that, based on the necessity of maintaining the critical bridge locations, so I am going to add some other features to the tuner end instead. More on that soon. |
|

We are down to final width and profile on the back of the neck.
|
I have now ground and sanded the bacl of the neck just about to final thickness. It has to feel right when it's held in a playing position so I remove material, sand it flat and smooth, check it again and repeat a great number of times until I feel that it is not onlt the optimum thickness from end to end but that the profile from end to end feels right from a playing perspective. There will be more final adjustments but we are withing a few percent now! |
|

Getting ready to machine headstock area.
|
I have had the bass set up on the CNC for the purpose of machining out all the geometry that will be needed for the headstock and string retaining components. With seven strings pulling on the retainer I want to make sure the whole system has enough inherent strength to do its job so I may incorporate a retaining method that will apply that load to back of the headstock rather than the front. Just more engineering but worth consideration. |
|

Back of headstock - roughed our just needs filing/sanding.
|
This is the back of the headstock after I have done some carving and shaping to get it pretty close to finished geometry. I have to do this along with the shaping and thicknessing of the neck as the two sets of geometries are so inter-dependent. Also the curves and transition between the neck and the body has been refined pretty much to its final geometry. My big goal now is to do the upcoming machining that is required for the tuners. |
|

Working on the beck of the neck.
|
I have been back working on the back of the neck of the bass since the fingerboard is now part of the assembly. I typically leave the final neck thickness and contour work intil after the fingerboard goes on because it's much easier to get a feel for the correct thickness and profile of the neck. While I am doing this I am also resolving the geometry at the intersection of the neck and the headstock area so that we have a nice blend there too. |
|

Fingerbopard gluing was successful - now onto other stuff.
|
This is a post gluing picture with the fingerboard securely fastened to the neck of the bass. The gluing process, because of bleed under clamping pressure, can be a slightly messy process so I have spent a little time getting things cleaned up around the edges. Anyway - happy to report that we have a good fingerboard joint and now moving on to other tasks. I'll be doing some machining at the headstock end and planning out tuner mechanics. |
|

Fingerbopard being glued onto the rest of the bass.
|
This is the bass getting its fingerboard attached using the awesome power of rubber bands. I could have used the vacuum press but this process allows memore of a hands-on approach where I can monitor and adjust the placement of the fingerboard more accurately. It took quite a bit of setup to get everything ready. I will probably leave this assembly overnight to make sure that the adhesive is completely cured before unclamping. |
|

Getting all the surfaces and the truss rod ready for gluing the fingetboard onto the neck.
|
I'm now fitting the truss rod and preparing the two joint surfaces for gluing together. I want to make sure everything fits tightly together and thatthere's no interference with the function of the truss rod. I have already cleaned up any previous glue deposits from the back of the fingerboard so we are pretty much ready to get this part of the assembly done. I'm going to do some final checking on the linear position relative to scale length. |
|

Fingerboard looks really good on the bass itself.
|
I trimmed all the frets down closer to the edges of the fingerboard and then filed them completely flush with the sides. I also did some cleanup on the back of the board to remove the glue marks that had been there since the board was attached to the mdf support. I am now test-fitting it to the neck of the bass to see if there are any small adjustments I need to do before setting things up to glue the fingerboard on. Looks good so far. |
|

All the frets are in on this somewhat tricky fingerboard. Nothing bad happened and it's in good shape.
|
All the frets are in the fingerboard and they look really good against the inlay. I have a feeling this bass will generate a lot of attention! Now I have to get all these fret ends trimmed flush with the sides of the fingerboard. Once that is done it should be in a condition where it's safe to attach it to the neck of the instrument. I have also been working on the hardware and body shaping that is related to the reversed tuning arrangement - more to come! |
|

Almost got all of the frets in now.
|
Just about done with these frets. I have to be super-careful to make sure the slots are clean and that I don't damage any inlay when I am installing them. Most of the work was in the fret slot preparation, they went in pretty well though and they look good with the inlay which definitely makes me happy! I will get the last few in and then clean up all the overhanging ends flush with the board itself. I can then set up to attach it to the neck. |
|
Frets are installed - phew!.
|
Back to the other features on this bass. This is the string retainer which will serve a very important purpose in the finished product. I make these myself since there isn't an equivalent system in the marketplace. Each one is manufactures to suit its own instrument. In this case it's a 7-string configuration and has to match the geometry of the headstoock area it will be fitting into. I'll be machining the headstock soon too! |
|

Getting started on the fret work.
|
This is the fingerboard with some frets installed. Previous to installing the frets I added more sealer to the wenge as that is always harder to do after frets go in. I now have to clean up all the ends which currently are about 1/16 inch oversize at each end. When that's done I will dress all the fret ends for a nice smooth and clean feel. I want to test everything after that to make sure all is OK to attach the fingerboard to the neck of the instrument. |
|

Some final coatings on the fingerboard before I add the frets.
|
I wated to get a few more coats of sealer onto the fingertboard before I installed the frets since it helps blend the materials together even more. Wenge has natural voids which I am planning to minimize rather than remove so that the wood still has a very natural look. Just want to make sure it looks its best at this atage because working on the surface is much harder once frets are in there! A few more coats and I will get these frest installed. |
|

Cutting fret wire so that I can get the frets installed.
Shell has been installed but and I'm now hard at work sealling everything up.
|
I'm now working on getting the frets into the fingerboard and thereafter attached to the rest of the body of the instrument. The fretwire is cut to length and I have to carefully break the sharp edges where I added shell so that we have complete fret slots on the board where all the inlay exists. I took the frets into consideration when designing the layout of the crop circle art so I'm anticipating that it will look really nice when fretting is complete. |
|

I managed to get all the slots re-cut through the inlay - not an easy job though.
|
This is the fingerboard with the board sealed to a point where it is now OK to add the frets. I have also re-cut all the fret slots through the shell inlay so that the frets can now be insterted - that was a difficult task!! It went ok on the smaller inlay areas but it required some patience on the larger inlay areas to get the slots cleanly re-established. All good though, and I'm already cutting the frets in preparation for the fret job. Looking good. |
|

Everything on the board has been leveled, not to recust fret slots.
|
I have not leveled the sprotectant filler on all the inlay features and everything looks good - I now want to add a couple of coats pf sealer before I moe further on with cutting fret slots and frets. Once the sealer is on I will give everything a polish to bring out all the color in the inlay shell. I need to spend some time recutting across the inlay that crosses the fret lines and that has to be done pretty carefully. Then frets can be cut! |
|

Shell has been installed but and I'm now hard at work sealing everything up.
|
Inlay features on fingerboard are now officially complete. I got the remaining recesses cut out and cleaned up. Next I cut the shell shapes to fit - these ones were small and a little tricky. Have not yet sealed the new inlay and I have to say that this photo does NOT do it justice - the colors are much more impressive. I'm now going to seal the new inlay and when that's done I have to re-saw the fret slots through the inlay in prep for fretting! |
|

Last few inlay features being machined into the fingerboard.
|
I'm now busy with the last (fifth) phase of the inlay. I have a few small fearures to inlay to complete the artwork. First job is to cut the required recesses based on my computer layout. I then clean uo the edges so the fingerboard is ready. Next I load the vector artwork into the laser and carefully cut out the required inlay pieces. I have to be relatively careful to get the inlay fitted perfectly, then rub down to finish. I will polish to finish. |
|

Shell has been installed but and I'm now hard at work sealling everything up.
|
While I was working on other parts of the bass body and getting the final programming details done for the fingerboard I thought i would take the fingerboard and add a few coats of grain filler/sealer so that i could better show off the final effect of the shell inlay against the Wenge grain of the fingerboard material. The contrast and colors show up much better this way and give a better impression of what the finished product will look like! |
|

Shell has been installed but and I'm now hard at work sealling everything up.
|
I shouldn't really post a picture like this that shows a process in its worst condition. It bears no reference to the beautiful outcome we will enjoy on the finished bass. I just inlaid some of the shell and I am in the process of sealing it with a finishing epoxy. It looks ugly but it will turn out to be a spectacular display of green shell and geometry. I have to apply a few coats because the curved surface doesn't permit even distribution. |
|

Some of the shell being fitted into the fingerboard.
|
I'm in the process of cutting and fitting the shell into the fingerboard. It's a delicate process as I have to be careful about ,aking each piece fit nice and snugly into the repective recess. The shell you see in the picture will be set into the fingerboard and I will use a special filler to add a very thing protective clear cpat on top. You won't see all the colors pop until it's all done and I can polish up the surface and bring out all the color. |
|

Setting up for the 4th set of inlays on the fingerboard.
|
The fingerboard is now set up for machining the larger inlay components. I'm starting with some of the dots and will finish by creating recesses for the big features. Positionong of the elements is very critical but I have the fingerboard squared up to the machine axes and everything should work out fine. I'm looking forward to getting this done so that I can get the frets installed and we'll see what the fingerboard really looks like! |
|

This is the vector file of the new inlay features (in red).
|
Phase 4a of the inlay process about to be machined and inlaid. First pass will be the dots in darker red and when they are established I will do the larger features shown in lighter red. Obviously actual inlay will be various shades of green but I need to keep the new and old inlay shapes clearly separate so I don't overlook anything. I'll be using very select cuts of shell for these features so that everything looks as amazing as possible! |
|

Bass shot right before I start on the new round of inlay.
|
While I was working on some of the various parts of this bass I thought I would take a snapshot of the body and fingerboard together. I am just about to run the phase 4 inlay on the cnc so there will be a lot more green inlay on the fingerboard very soon but this shot puts some of it in perspective. I'm also working on a string tensioning system that will be discrete enough to give me more room to do more green stuff on the front face! |
|

Ready to get started on phase 4 of the inlay process shown in red.
|
Time for phase 4 of the inlay process. This time around I am going to cut and inlay the areas shown in red. I will need to be careful as these larger inlay features cover a lot of the fingerboard width and consequently I have to compensate for the curve of the fingerboard's compound radius in the process. Fortunately I have a proven system that will allow me to make this happen and as always it's a little more work but results will be awesome! |
|

Past the half way mark with the inlay - now for the big stuff!
|
A little more inlay has gone into the fingerboard. I now have some of the medium sized features in the mix and I will now go ahead and program what should be the last phase which will add some of the larger inlay features into the fingerboard. I think this will be the last pass so I'm looking forward to seeing the completed artwork!! I'm also working on some areas of the instrument body so there will be more photos on that very soon!. |
|

Third phase of the inlay process is under way.
|
I have now machined "phase three" of the crop circle inlay and will be cutting suitable pieces of shell stock to continue the inlay process. I think there will only be one more phase for cutting and doing inlay before this task is complete. We won't really see the full effect of all of this work until it's completed, inlay is polished, a protective coat has been applied to the wenge and the frets go in. At that point it should look awesome! |
|

Some more of the various shells being inlaid into the neck.
|
Some more of the green circles are in. The shell really looks awesome and catches a lot of light. There will be even more contrast when we're done due to the fact that the wenge will be much darker after it is treated and finished. I have a couple more machining operations to get recesses cut and drop the shell into all the other features but I'm excited to see this artwork take shape and it will definitely end up looking impressive! |
|

Moving on to some of the larger circles in the inlay pattern.
|
I am now moving on to some of the larger circles in the layout. Because these need to adopt the natural radius of the top of the fingerboard I have to handle these in a slightly more elaborate way. I am making plugs which fit into the recesses I cut. These in turn will have shell attached to them and the will then be installed in the fingerboard surface. Because of the scope of this inlay I do need to be careful, just takes time and good eyesight! |
|

Getting some of the inlay embedded in the smaller features.
|
Part of phase two of the inlay process. There are a lot of little different sized dots along the centerline and I want to get those taken care of before I move to the larger features. I just cut these pieces of shell and glued them into the recesses on the board. Once the adhesive is set I will level the surface off with a special clear filler and scrape and sand flat. Then I will be ready to move ahead with some of the larger features! |
|

Phase 2 of the inlay process, cutting several recesses for shell inlay.
|
Back to the fingerboard and the crop-circle inlay. Because many of the features on the artwork overlap each other I have to build the inlay in a specific order so that those features that appear at the front of the artwork are cut last. In this photo I am cutting the first layer of holes. I will add the inlay to each of these features and then return to the CNC to cut the next batch. I also have to choose my colors carefully for the best effect! |
|

Preparting for fitting fingerboard and also sanding of the body.
|
While the process of creating the inlay is under way I needed to establish some critical measurements based on the relationship between the fingerboard and the body itself. This allows me to keep the final shaping of the body going while the fingerboard is going through several machining and inlay operations to complete a fairly complex artwork assembly! IThe body should be ready by the time the inlay and frets are all done. |
|

First of the green shell in the fingerboard.
|
This is the first stage of the inlay - I'm setting the center line of the artwork in the areas where it will be visible. It's a slightly lighter green shell so that this finer detail will pop out on the wenge fingerboard. Hard to see on the photograph but the green color is really nice. I'm already programming the features to follow - hope to have them all done in maybe five different operations. Should look awesome. |
|

Starting the inlay work by cutting the first set of recesses in the fingerboard.
|
I will be doing this fairly complex inlay in stages or "levels" by doing the features that appear behind other artwork first and working my way forward until everything is cut and set in the fingerboard. The first operation was to cut a set of centerlines in the fingerboard where the center line of the crop circle artwork is exposed. I'm going to go ahead and cut shell and get this feature complete with inlay first then move on to thers elements. |
|

New fixture ready for inlay work
|
In this photo I have just created a fixture that will allow me to set up quickly for several successive CNC machining operations in order to achieve the desired results on the inlay. I will have to do the inlay in sections in order to get the right results with the four different colored shells. Also I m dealing with laminate shell and a radiused fingerboard so I need to employ some special techniques to make this all work. |
|

Crop circle reference for the inlay features.
|
After looking al a lot of crop circle images I have a better idea of the inlay options. I'm going to use the format we have that my customer gave to me (the top section of the image) and in order to highlight the 12th fret for the player's orientation I will add a feature similar to the 3 little bars each side of the center line illustrated in the bottom image. The inlay process is very likely to be pretty complicated and work-intensive! |
|

I adjusted the inlay geometry to fit within the framework of fanned frets!.
|
We have some very interesting crop circle inlay which has to be fitted onto a fanned fretboard. It's helpful from an inlay perspective to try and keep features and fretwire as separated as possible so this version has had a little linear compensiation so that the circles look more aligned with the fretboard geometry and so that there are no critical joins or edges conflicting with frets. So far so good. |
|

Cleaning up fingerboard details in preparation for inlay work.
|
I put the fingerboard back up on the CNC for a quick cleanup on the two ends and to establish the nut slot. I want to have all this stuff done before I set things up to machine out the fairly extensive recess that will accommodate the crop circle inlay materials. The goal is to gety that inlay completed, re-establish where necessary the fret slots, and install the frets. Oce the frets are in the fingerboard can go on the instrument itself. |
|

Cleaned up pickups covers in anticipation of adding some artowrk using the green shell.
|
I grabbed the two pickup cover assemblies today and cleaned up all their machined surfaces. I decided that there must be a way to bleed the crop circle artwork over to the top surfaces of these two covers also. I'm working on some small designs that will fit on these two angled faces and then repeat again on the bottom end of the bass. Once I have this drawn up in Illustrator I will add a photo on here. |
|

Not cheap stuff - got 3 more green shell colors so that the inlay will look awesome.
|
A quick update to the inlay situation. I bought more green shell so I now have five different inlay options that fall into the "green" department. This will allow me to get more depth and definition to the inlay work on the fingerboard and possibly other areas on the instrument. I have the vector drawings so the next step for me is to get back to work on the fingerboard and get the artwork going! |
|

Two of three shell colors for the inlay - I'm waiting on the third one.
|
These are two of three shell colors I am going to be using for the Crop Circles inlay on the fingerboard. The third color is in between these two and I believe the three will work really well together and create a head-turning result!! More on this very soon. I have artwork and programs ready so I'm looking forward to seeing this become a reality! I will also use these greens on other inlay areas on the instrument. |
|

Machining the recess for the jack socket.
|
Before I finish the body contouring I figured it was a good idea to machine in the recess for the Neutrik jack socket. Having this feature machined allows me to know how much edge break I can afford to have around the jack socket area. Now that this feature is established I can get the rest of the body edges cleaned up. I was just noticing how light this bass feels, and hopefully hardware won't add to much so it'll feel light! |
|

Basic Crop Circles artwork has been drawn up.
|
I took my customer's inlay concept and re-drew it as a vector file (I would have had to anyway for creating cutter paths). This is a very accurate copy of the artwork I received. My next challenge is to decide whather this will be all one color of inlay of perhape 3 or 4 complimantary colors so that the individual shapes stand out. Either way it would look beautiful on the wenge fingerboard, I just want it to be as amazing as possible. |
|

Some of the shell I will be using in the neck inlay.
|
This is some of the awesome green shell inlay material I will be using to create the fairly complicated inly on the neck of the instrument. I have been working on a custom crop-circle vector file so that I can better control the way the inlay material is used. No doubt it will look jaw-dropping since this stuff really reflects a lot of light. This will also allow me to control the color of the final translucent tint we put on the instrumen body. |
|

New concept to maximize the green color of the bass.
|
We had planned on using Aluminum tuning hardware and anodizing that green to accent the overall 'green' effect of this instrument. Unfortunately my source for such tuners is not yet in production so I am planning to use what i do have at my disposal to create and even more "outside the box" solution. I will make the tuners live on the underside of the body thereby allowing the top to be as green as we want it to be. May even introduce custom artwork.... |
|

Crop Circles artwork for inlay on the fingerboard!.
|
my customer and I discussed the fingerboard inlay and the new goal is to incorporate this Crop Circles imagery onto the fingerboard. I haven't seen anything like this before so it's something I am happy to incorporate. I was asked it of could be illuminated, but by virtue of its surface area and the fact that there is so little depth available under the fingerboard that is unlikely. I do have some awesome green shells and may use that instead. |
|

Machining brass bar for the string retainer.
|
Here, I am machining some of my brass stock to create the string retainer that will be inserted at the end of the neck. I cut enough to do a couple more of these as I am building other headless instruments at the same time. It's a little laborious to machine the brass bar because it's quite a bit oversize but I have yet to find a source for rectangulat bar closer to the size I need for the retainer. |
|

Th slot for the serial number has been machined into battery cavity.
|
I took the opportunity to pop the bass onto the CNC machine today to cut the slot for the serial number insert.I will cut and engrave the serial in the laser so that it fits perfectly into this little recess and then the bass will have an identity! In the meantime I have been doing more carving and have also been working on the brass string retainer. I have some rough sanding to do around the perimeter and some shaping of headstock. |
|

Battery cavity established and complete.
|
Battery cavity now established and ready for action. I will probably spend a little time on the body at this point in order to smooth some of the features together - perhaps refine that belly cut. The headstock area will have to be carved and machined also so that I have a more complete neck and I can work on fitting the string retainer unit. Nice to see all the features of this bass come together. So far so good. |
|

Setting up to cut battery cavity.
|
I'm now setting up the CNC so that I can machine out the cavity for the three 9v batteries that will power the onboard preamp and probably also some custom lighting which we may need. (Always a good idea to have more power than you think you may need!) As with the control cavity - when I remove this material it will expose the internal wiring channels I machine before the top plate was glued on. |
|

My brass raw material for the string retainer.
|
I dug out my trusty bar of 360 brass. I need to make a headstock string retainer for this 7-string monster and since no such hardware is commercially available I have been making these myself. They work great so I'm getting this material cut up so that I can start the machining process. I usually do this job around the same time that I am machining and shaping the actual headstock on the instrument so that I can get the best fit. |
|

Working on cavity covers for the back of the bass.
|
These are the two covers for the back of the bass. They have been cut from the parent material on the back of the bass so when they are in place the grain will match perfectly. Right now I am cutting off excess material from the back and drum sanding them to the finished thickness so that I can shape them and probably install the noedymium magnet recesses. These plates will be an awesome green tint like the rest of the instrument! |
|

Control cavity is now machined into the instrument.
|
We now have a control cavity machined into our bass. I will now clean the area up and get the instrument ready for machining the battery compartment as soon as my machine is free! Bass is feeling really nice - I know this one is going to look awesome once it has its tint and finish applied! I will be moving on to more neck shaping and the shaping of the headstock area. Also starting to work on a string retainer. |
|

Working on cavity covers for the back of the bass.
|
The bass is on its second operation of cavity cutting, and this will create a full depth recess for onboard electronics. When the material is removed it will expose the wiring channels that were added to the top of the body. Another plus will be that the material removed will also yield a lighter instrument - at least by a little. Once this cavity is complete I will reset and cut the cavity for the batteries on the upper body half. |
|

getting ready to cut the two cavities on the back of the bass.
|
The bass in in the process of being set up to cut the control and battery cavities. The battery cavity will accommodate two 9v batteries for our EQ system which will be fitted in the control cavity. I have a network of channels already machined inside the body to connect these areas together and also for wiring channels from each of the pickups. Once this is done I will do some machining to the headstock area. |
|

Pickup work in progress - want to get them done so I can fit pickups.
|
I cut the extra material off the pickups and also ran each one through the bandsaw to get the height closer to finished size. Next step will be to sand off more of the excess material until I am close to flush with the top pieces. Once the sides are flush and clean I'll flip them over and machine the back surface and cut out the material from the inside to make room for the pickups. That way I can also test fit the pickup flatwork! |
|

Working on putting the pickup assemblies together.
|
I'm in the process of designing the pickups for this bass so I thought it might be a good idea to get the pickup bodies assembled. First step in that process is to glue the harvested tops onto material which will become the bottom sections of the pickup covers. In this case i decided to use padouk rather than Wenge since the covers will end up with a thin wall thickness and padouk can handle that better than wenge. |
|

More sanding and shaping to get all the geometry to work happily together.
|
Much more shaping and sanding now - working on the tricky transition between the body and the neck so that it really feels comfortable for the player. Also getting the neck closer to actual size (al though I'll only finish that profile after the fingerboard goes on). Started sanding the belly cut area which i think is finished now. I need to get the two cavities machined out which i hope to do very soon. Bass feels pretty good! |
|

Back of neck as I work on shaping all the features.
|
I have been working on the intermediate shaping of the back of the neck, bringing it closer to a working thickness and a profile radius that is closer to we will end up with. It also helps a lot to have the neck closer to finished profile before the fingerboard goes on. Ultimate goal at this stage is to make all these surfaces and curves blend beautifully with each other. I will wait till the fingerboard is attached to do the final shaping. |
|

Doing more carving on the back of the isntrument.
|
The carving continues - I want the back of this bass to not only look beautiful but be a perfect ergonomic fit for the player. I'm grinding away at the different features on the back of the instrument until I find the perfect combination. I still have to radius the outer edges but I want to remove most of the excess material first and be as close as possible to the completed shape. Feels good to hold but still some more refinements! |
|

Body, pickup covers and fingerboard all in one photo!.
|
Just a quick snapshot of the instrument. I thought it was nice to see the way the fingerboard, body and pickups all blended into the "whole instrument" since they were all cut from the same raw material. Next task I have is to build the pickup blanks into solid blocks so that I can clean them up and machine them from the underside to accept the pre-assembled pickup hardware that will be built into them. |
|

Pickup cavities being cut to final depth.
|
This photo shows the bass up on the CNC machine and I am cutting out the recesses for the two pickups to full depth. In doing so I expose the internal slots for the pickup wiring. Have to be careful that the program and the geometry of the pickups match accurately since these multi-scale pickups are slanted and slightly different sizes. Nevertheless everything went well and I now have the recesses completed and looking very clean. |
|

ready to cut the pickup recesses.
|
After doing some measuring and programming I am now able and ready to get the two pickup recesses cut into the top of the bass. I have to be really careful to set the instrument up exactly on the centerline of the machine axis since my program assumes that is the case! I will generate the cavities using a 1/4 inch end mill since I need to keep the corner radii as small as possible. |
|

Slightly revise pickup geometry - ready to cut recesses in the top of the instrument.
|
This is my geometry for the pickups, slightly revised and now I am going to use that geometry to program the CNC to cut out the two pickup recesses from the body. I will also take the harvested pickup tops and glue them to base material so that I can manufacture the continuous grain pickups that will drop into these two recesses. It will be nice to see the instrument with its pickup covers in place. |
|

Working on rough shaping of the neck area.
|
I attacked the neck today with some shaping tools to get the extra mass removed and bring the neck profile a little bit closer to its actual size and shape. I have some profiling to get done in the area where the body meets the neck but it feels good to see this get a little further on. I also did some more rough carving to the belly cut which now shows off the internal laminates nicely. I will post more photos of that soon! |
|

Doing some carving on the body area - belly cut will expose a very cool looking center area.
|
Top is on and body profile has been worked on. Today I was doing some preliminary carving of the belly cut at the back of the instrument. In the photo it is still very rough and I will cut quite a bit deeper to expose the laminated center core. Right now I am removing material to get a feel for the finished shape and I have a good amount of carving here and in other areas before it will be close to complete. Feels good already though! |
|

Gluing the top plate onto the body.
|
I spent some time doing additional shaping and fitting before I was ready to commit to gluing the top onto the body. I decided that in this case the vacuum press was the best approach to securing the top down with an even distribution of pressure. This assembly will allow me to move forward with more precise body shaping and get the cavities machined into the back surface. We will start to see the detail that thw mlaminated core will reveal! |
|

Machining various channels in the top of the body for the wiring that will run through the inside of the instrument.
|
First thing I need to do to get the top plate onto the body is to cut channels for the internal wiring/cabling. I need two slots from each pickup cavity to the control cavity, a long channel from the battery compartment to the control cavity and a slot to accommodate the piezo wiring and the common ground wires that come from the individual bridge units. I may alos install a brass grounding plate under the top to facilitate that. |
|

Prepping the instrument to plot out where the wiring channels need to be.
|
The fingerboard is cut, radiused and slotted ready for frets. My next goal is to get the inside of the body ready for wiring which means marking out and machining the various channels I will need inside the completed bass to thread pickup wires, battery power, bridge wires and grounding to the control cavity. I'm checking the location of the pickups and battery cavity, and then I will machine the channels I need. |
|

Side dot material has been glued in.
|
Now that the side dot holes are drilled I can glue in the side dot material. By design this is a pretty tight fit and I glue them in securely. I will need to wait till the adhesive is cured at which point I will snip off the excess material and dress the ends flush with the fingerboard. This will put me in a place where I can add the fingerboard inlay. We have a tentative plan fopr alien heads on the main fret positions! |
|

Drilling the holes for the side dots.
|
The next task is to get the holes drilled for the side dots along the edge of the fingerboard. These have to be accurately positioned and machined cleanly so that the dots are well defined. I will be inserting an off-white dot material which will provide plenty of contrast against the wenge material. It will also match the color scheme of the bass. I want to get all these details done so that I can get the fingerboard and top attached. |
|

Fret slots have been cut into fingerboard.
|
I managed to get some time on the CNC to run the fret slots on this fingerboard. Wenge is actually one of the more difficult woods for me to machine with a micro end mill - possibly because I cross the grain with each cut. Broke one end mill early on so i took my time with the rest of the job and it went fine! More haste lest speed! Now back to work on the body. I need to do some weight relief and machine channels for internal wiring. |
|

Compound radius machined into fingerboard.
|
The fingerboard has now been machined to its finished thickness and I have established the compound radius between the two ends. Looks great so far. This is a very tight grained piece of Wenge perfect for as fingerboard. I now have to remove the minimal machining marks from the tool and then I will be ready go back onto the CNC and machine the fret slots. In the meantime I have some work to do to the body parts. |
|

Perimeter of fingerboard has been cut to size.
|
The fingerboard is now on the CNC and I have already machined the outer perimeter to its finished size. This gives me a nice clean and accurate platform to work on for the compound radius and the fret slots that will need to be cut. I will generate the compond radius first so I will program and set that up very soon. When that's done we'll do all the fret slots and the recess for the nut. Last will be the inlay details. |
|

Calculating fret slot locations before machining.
|
Right now I am checking geometry for the fingerboard profile and the fret slot layout. This is all a product of the relative scale lengths, string spacing and a few other factors but the bottom line is that the fret slots have to be mathematically in the right place for each string so I take a little time to verify my calculations before setting up a program to run. So far so good, I am anxious to get the chips flying!! |
|

Wenge fingerboard ready for further machining.
|
Here's our beautiful piece of wenge for the fingerboard. It has beenrough cut and sanded flat and mounted on a substrate so that it will stay stable during the machining operations to come. I want to get this up on my CNC machine soon and cut the geometry, fret slots and inlay details. This board will look great and work very well tonally in the completed instrument. Grain wise - it came from the same board as the wenge used on the top! |
|

Pickup covers cut out of top.
|
The process of harvesting the continuous grain pickup covers from an instrument top is fairly detailed. Because of the thickness of the top and the need to use a very small diameter end mill to cut - I need to first cut the outlines of the covers from the top side, flip the top plate over and finish the cuts from the underside. This requires a very exact system of alignment so that the cutting paths from each side line up exactly. |
|

Ready To cut pickup covers out of the top.
|
Now that we have established the geometry of the pickups we can establish the outer dimensions of the pickup covers and translate that to the top of the instrument. I want to carefully harvest out the two pickup tops so that when the pickup covers are assembled and cut - they will exactly match the wood grain of the top and blend in beautifully. I'm in the process of setting up the CNC to remove the pickup cover material. |
|

Pickup geometry established.
|
This bass will be equipped with dual coil pickups so that we have three circuitry options built into each. This will allow for additional tonal qualities unique to each pickup which can be mixed and matched using 3-way switches. The pickup geometry is fairly complex but these have now been calculated and drawn out so that they can provide vector drawings for both cutting the pickup flatwork and for the recesses in the wooden covers. |
|

First step of assembling the top plate.
|
In order to move ahead I need to assemble the top plate of the bass and get it ready for fitting onto the rest of the body. The top plate consists of three sections and needs to be very carefully glued together to assure that everything fits perfectly together since tolerances in this area are very tight. I'll go ahead and glue the third piece as soon as this joint is ready and at that point I will be ready to harvest out the pickup covers. |
|

Starting to machine the top surface and the joint end of the neck.
|
The end of the neck and the cutout of the top plate have to match each other perfectly. At the same time I need a flat surface for the top plate at the correct depth so that everything ends up working together. This is all now complete and I can get thigs ready to put the top plate on the assembled instrument. |

Top of body core machined and neck ready for top plate.
|
|

Upper body half being glued onto the center core of the bass.
|
The upper body half is now bing securely attached to the core section of the bass. It's a demanding setup because not only is the linear alignment between the two pieces important but the parts have to be clamped securely against a reliable flat surface to make sure they are on exactly the same plane, and at the same time the joint face has to be compressed tightly together. Everything looks good for this first half! |
|

Marking out all the important geometry before committing to gluing the sides onto the body.
|
Here I am carefully aligning the body parts with the center core. There are a lot of factors to consider in making sure these body halves are placed relatively accurately. It is a combination of scale length, tuner geometry and body profile. All is well and it looks like everything is now marked out so that I can start gluing things together. I'll start by gluing the upper half and attach the lower when the adhesive has cured. |
|

Gluing veneer onto the body half joint faces.
|
The pieces I machined below to remove and replace material for cavity covers are now glued onto the center sectiond of the body halves. Before these two body halves can be attached to the body I have to add a dark and light veneer tp maintain the pinstriping theme that will be seen throughout the instrument. The lower bout is done and ready - and I'm just finishing up the upper bout here so that we can assemble! |
|

Clamping the back plate onto the material in the center of the body.
|
Left: Part of the process of harvesting the parent material from the upper back plate in order to yield a continuous grain battery compatment lid! Right: I cut down to meet a smaller diameter cut I made earlier, and the cover drops out and I automatically have a counterbore into which I will install a filler plug. |

Clamping the back plate onto the material in the center of the body.
|
|

Clamping the back plate onto the material in the center of the body.
|
This cluster of clamps hides the gluing of the back plate onto the material I am using for the center core. I want to have both the upper and lower bouts in this contition as soon as possible so that I can assemble those parts onto the body core. Then we will have something that resembles a 7-string bass. I will have to repeat some of the operations below to create a battery compartment with a continuous wood cover. |
|

Filler material cut to replace material removed behind the cavity cover.
|
Next I cut a separate piece of material to the exact size of the backcut I did below. This piece is designed to very neatly press into the larger step cut on the back of the plate. I will then glue this insert in place and the result will be a cleanly harvested cavity cover plus a perfectly matched recess on the instrument! |

Final result of removing cavity cover material - we have a recess built in.
|
|

Machining out the cavity cover from the back side of the plate.
|
Back on the CNC, I have set up the back plate this time upside down so that I can use a different cutter to remove the material from the back and at the same time create a step for an insert to be dropped in. I cut only to the depth of the original cut on the opposite side so that the two meet and the cover can be separated. |

Cavity cover material successfully removed.
|
|

Cutting the control cavity cover from the back plate parent material.
|
It's time to harvest out the material which will be the cover to the control cavity. I carefully machine a slot defining the control cavity cover using a very small cutter. The tiny slot is cut to a depth that equates to the thickness of the cavity cover. Once this is done I will flip the maple back plate over and machine the cover profile from the opposite side. This will allow the cover plate to break free and I will save it for later use. |
|
|

Cutting the center panel for the top plate to size.
|
The top of this bass is a combination of two outer pieces of Curly Maple and one central piece of Wenge which will also match the fingerboard. Here I am machining the outer edges of the Wenge center piece to exactly match the taper of the core of the instrument. This has to be done within a few thousandths of an inch in order for everything to fit correctly when the parts are assembled. So far so good. |
|

All the parts for the top and back are having veneers glued on.
|
All the component parts for the top and the back plate have to have their various veneers glued onto the parent material. This will continue the double pinstriping throughout the instrument body and create a very nicely finished look. It's always best, and saves time, to do this operation before any machining is necessary. Next we will machine some joint faces for reference and cut cavity covers and assemble the top. |
|

Calculating cavities and covers for the back.
|
Working right now on the geometry of the control and battery cavities. Based on the possible power requirements I decided it was wise to have three 9v batteries on board, just in case we need them. We may get away with two but no harm in having a spare. The control cavity should be adequate for the electronics. I'm using the largest cavity space possible without encroaching on pickup real estate! |
|

All the component parts for the body have now been sanded.
|
Today was sanding day. I sanded the fingerboard both sides to close to its final thickness. I also sanded the two core pieces of the body both sides so they are ready for pre-assembly. I then sanded the Curly maple front and back plates to consisitent thicknesses, which in turn allows me to assemble the top and machine cavity features into the back plates. Next up I'll probably harvest out the two cavity cover plates. |
|

Center piece for the top plate and the fingerboard material have now been cut ready fpr machining.
|
I spent some time marking out the areas we needed for the top section and fingerboard and went ahead and cut out the blank pieces for each. They will now both require some drum sanding to establish flat surfaces but we will be moving right along getting both these pieces machined and prepped for assembly. The top piece will be matched with our curly maple top pieces, the fingerboard will be prepared for the CNC. |
|

Gutting Wenge for the top and the fingerboard.
|
Just about to cut out both the body top and the fingerboard from this Wenge. I tool one board and resawed so that I had one piece at the correct thickness for the top and one at the correct thickness for the fingerboard. This assured me that these two pieces, which will be used together, have beautifully matching woodgrain. It's slightly inefficient in wood use but I really wanted these two pieces to be a nice match. |
|

Getting the body parts ready for assembly.
|
This interesting and unique option will become clearer as we move forward in the building process. The goal here is not only to creat a very unique core section, but the maple parts of this will inherit the trans green tint and blend beautifully with the rest of teh instrument. Also - when we cut out the belly cut section on the back - this core will be exposed and it will look very impressive on the finished product! |
|

We have a very interesting formula for the core of the body.
|
One of the unique features we are going to incorporate on this bass is a beautiful green tinted corly maple front and back, and between these unique surfaces we are going to have this Maple and Wenge core section. We are busy right now pre-fabricating it so that it will be ready soon for assembly with the rest of teh body parts. Each one of these strips is separated by two veneers - we have a vision for the end result so stay tuned!!!! |
|

Preparing the sides of the core for the body halves.
|
Now that the machining work has been done on the top section of the core we need to move on to preparing the sides of the assembly for the body halves. To do this it is necessary to set the core up so that the machined sides of the neck are parallel and ssquare with the table surface, then machine off the excess material on the body end so that we have a perfectly flat and square joint surface to work from. |
|

Machining the back of the instrument.
|
I cut the neck to body angle earlier on the core of the instrument and now I am able to locate off that surface in order to machine the back of the instrument. Not only do I clean up the surface but I remove material so that I achieve my target body thickness. This will now effectively be the surface that defines the back of the bass and I will use it to locate the two side pieces when I am ready to attech them. Looking good so far! |
|

Creating a custom body core.
|
Since this bass is going to be highly unusual anyway - we decided to take a liberty with the core material on the body section. The top and back plate of the bass will be curly maple, so we decided to incorporate that maple and wenge in a custom layered core. We'll fabricate core sectiopns for the body halves using alternate layers of wenge and maple - and also between each layer we'll add two contrasting veneers. It'll look amazing! |
|

Machining the head angle.
|
Here we are machining the angle for the head of the bass. This also creates the correct angle for the end of the fingerboard and also a plane upon which we will glue the headstock material - in this case most likely either the fingerboard material or the curly maple we're using for the top and back. When that is done we will then machine a slot for the truss rod and two other slots which will accommodate the two carbon fiber re-inforcing rods. |
|

Neck/body core up on the CNC.
|
The core of this bass is now set up on the CNC and we will be doing a number of operations to it. We start by cleaning up the top of the core to create a flat surface which will be our datum for all other fatures on the instrument. When that is done we machine the perimeter of the neck to its finished dimensions. After that - we calculate the appropriate neck-to-body angle and generate that surface at the body end of the core. |
|

Last laminate being glued on.
|
Just for the record I thought I would post another photo of the last laminate to be attached to the neck/core section. When this glus cures and I unclamp everything we'll have one of the major stages of this instument completed and that will allow me to start not only machining surfaces on the core, but getting started also on the body parts and the fingerboard. It always feels good to get a new instrument to this stage! |
|

Almost done with neck laminates.
|
The gluing is going fairly steadily, in this photo you can see we are gluing the 6th of 7 laminates together, one more to go and we can start machining the combined parts on the CNC. So far everything is going very well. We'll have a very strong neck that will not bee to heavy, and it will look very impressive one the finish is applied! When the gluing is done here we'll machine the neck contour and fingerboard joint surface. |
|

getting the neck and core flued together.
|
Moving along here. Already have two pairs of laminated glued together. The white wood is maple, which I decided to add for aesthetic reasons. The instrument will have an intense green tinted lacquer all over - but it will show most noticeably on lighter woods such as the flamed maple top and maple back. The white stringers will serve to extend the full green all the way down the neck. I promise this will look awesome! |
|

Getting started on gluing up the core section.
|
Now the gluing starts. Most of the neck laminates have been tapered and veneered so I am able to get started on the assembly process. The first joint to glue is one of the sections close to the center. I usually build from the center out to maintain control of how the glued assembly progresses. Also - I am careful to leave these glued joints securely clamped long enough to make sure the glue has completely cured. |
|

Laminates in the vacuum press - gluing on decorative veneer.
|
We have been machining both sides of the tapered stringers to get them ready for assembly. So far I have the center wenge strip and the two adjacent padouk strips machined so I am able to get these components into the vacuum press and glue on some of the decorative veneers which will make the back if this instrument look so impressive! More work on these pieces to come but we'll soon be able to start assembling the core section! |
|

Machining tapers on the laminates.
|
I was able to create a new system for machining the tapers on the multilaminate necks that gives me very good results. It's a two-step process which allows the parent material to be cut in a free state removing all stress in the finished assembly. Here we are in the middle of machining the padouk laminates. This bass will have a 7-piece assembly which is quite a bit of work. Results will be nice though. |
|

Wenge and Padouk are cut for the core of the bass.
|
We have cut all the neck core material. The Wenge and Padouk will not only look great together but these woods are always a great formula for tone. I have to sand the side surfaces of each of these pieces and machine them to their pre-determined tapers. Once that is done I apply pinstriping veneers to all the joint surfaces and start gettingh the core of the instrument assembled. So far so good... |
|

Creating a scale vector drawing of this beast.
|
This is my first version of this particular bass in 7-string configuration so I have to re-calculate many of the basic dimensions so that I know exactly how all the geometry of this bass inter-relates. It's always good to get this work done as early as possible because dimensions on this drawing affect everything right through the entire build process. Once everything is down and checked - I can proceed with confidence! |
|

Getting ready to cut some Padouk for the core section.
|
The core of this bass is going to be Wenge with Padouk stringers. This is a nice combo for sound as both woods have great sound qualities, and the final assembly will look impressive too. Right now I am marking out the section to saw using my template. I'll get the individual pieces for the core cut so that I can get some of the initial assembly rolling. I am also creating a full size vector drawing of the bass for reference. |
|

Super curly maple for the top plates.
|
We are in the process of collecting all the various woods we are going to use to create this bass. Since the instrument will be predominantly green, we chose some of my old stock curly maple which I have been saving for a job like this. The curly maple will look beautiful with the translucent green finish. I also recently purchased Wenge and Padouk for other parts of this instrument. Looking forward to seeing it develop! |