|

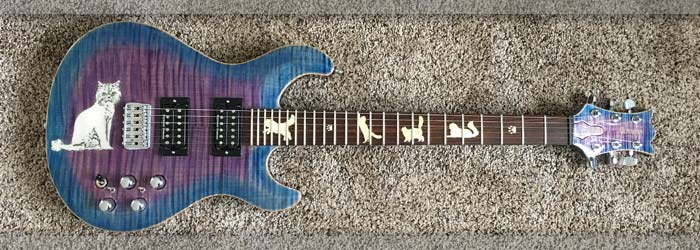
Strings on so that I can test the nut slots and bridge adjustments.
|
Left: This is the guitar with the strings on. I needed to add them so that I could work on the nut slots and get them all set to the optimum depth. Right: Text and picture coming! |

Connected the guitar up to an amp and yes! All the switched and pits worked according to plan!.
|
|

Getting the fingerboard all cleaned up and polished.
|
Left: Right before I put the strings on I wanted to do some final cleanup to the fret ends, a quick fret leveling and polishing. May also add wood conditioner. Right: I tested the electronics with strings on and everything works! Very happy that is now taken care of. I need to get the nut finished now. |

Connected the guitar up to an amp and yes! All the switched and pits worked according to plan!.
|
|

Switched have been wired up.
|
Left: The two way switches for coil tapping have all been connected up. It's a tricky job because everything that has to fit on the selector swich has to cooupy such a small space! Right: Wiring just about done except for 4 connections to toggle switch. Next I secure Neutrik and test! |

Almost done with wiring - phew!.
|
|

Almost ready to get this guitar strung up.
|
Left: I'm getting ready to add strings so that I can test out the electronics when it's all hooked up. I'm anxious to get this all completed! Right: I'm filing in the string slots in the nut in order to get a set of strings on the guitar. With strings on I can set pickups and bridge etc. and test sound. |

I'm busy filing in thje string slots. Spacing is important as it getting the correct depth for each string.
|
|

Everything fits neatly in the control cavity. Now to get it wired for sound.
|
Left: This is the contol cavity with the switches and pots all installed. I'm warming up the soldering iron and will be hooking all these together. Right: Got my wiring diagrams and my soldering kit and I'm busy getting all these internal wires connected up so that we give this guitar a voice. So far so good. |

Getting everything ready to connect wires.
|
|

Added the nut and I am now filing it and adding string slots.
|
Left: I glued the nut into the neck and I will need to file its top profile and the six string slots so I have some taped protection around that area. Right: I got the two coil tap switched successfully installed. This involved some extra shielding too but they are now set up and look nice and discrete. |

I got the two selector switches installed in the cavity thanks to the recesses I machined to make them fit correctly!
|
|

Last chapter is doing all the wiring in the guitar. I am installing the jack socket assembly first then will install two coil tap switches..
|
Left: Pretty much the last thing I need to do is wiring up the electronics. I'm installing the Neutrik jack socket first, then the coil-tap switches. Right: The thread length of the coil tap switches was shorter than thickness of the top plate so had to set up the guitar to machine recesses for switches inside cavity! |

The guitar is looking beautiful!.
|
|

Looks much more like a real guitar with its pickups installed. Almost done here~!
|
Left: Got both the pickups installed and both strap locks on, also fitted the truss rod cover on the headstock. Right: Pickups in, bridge components re-assembled, pots and pickup selector switch installed. Several other things have been done also, I'm starting on the wiring process and string er her up! |

The guitar is looking beautiful!.
|
|

Bridge is going on after I run a grounding wire. Pickups are in the proceess of being installed.
|
Left: I'm adding magnets onto the truss rod seat and cover to secure the area, then I need to add a nut and get that set up for strings! Right: Now installing the bridge and running the bridge grounding wire through from the bridge to the control cavity. Now I can get the two pickups permanently installed. |

Slightly tricky job getting the copper grounding wire from under the bridge, through the body and into the control cavity..
|
|

Tuners on - they look really nice on the instrument.
|
Left: Tuners are on and they look great on the instrument. Trying to get everything done asap so that tjis guitar is ready to ship. Right: One of the pickups has been fitted and I'm in the process of locking that in, bridge has also been drilled so just have to add a grounding wire through to the cavity. |

Bridge is going on after I run a grounding wire. Pickups are in the proceess of being installed.
|
|

Copper shielding being added to the control cavity.
|
Left: Copper shielding going into the cavity on the back, sides and upper surface. Once this shielding is in I can get the pots and switches installed. Right: Couple more things getting done here - the cavity cover is secured with its neo magnets and the string retainer ferrules are installed. |

Back on the guitar is completed. Need to get electronics installed now..
|
|

Working on the headstock area - I got the tuners fitted and things are looking good.
|
Left: Got the tuners fitted and installed and now I have to add magnets to the truss rod cover and install a nut in the nut slot. Right: I'm opening up holes to suit potentiometers and selector switch. Jonesy is looking at me saying "C'mon dude, lets get this finished" and I am doing my best to get that done. |

Getting control holes sized so that I can insstalll pots and selector switch.
|
|

I put Jonesy's name on the headstock.
|
Left: I am carefully opening out the holes for controls, switches and tuners where spray lacquer got in. The I will be assembling a lot of the hardware. Right: This is the procedulre for cleaning out the tuner holes - its amazing how much seeps in there since the tuners fitted before finishing. Almost done though. |

Cleaning out the tuner holes - being careful not to damage the surreounding finish as it is very hard lacquer.
|
|

Keeping things going here - pickup recess shielding and fitting the bridge.
|
Left: Electronic shielding in the pickup cavities and I'm working on getting the bridge fitten in place. Photo dark becaause it was late at night. Right: Getting all the component parts ready for assembly - wll be filling holes for the potentiometers, getting the tuners installed, also the string ferrules. |

Cavity cover fitted and cavity interior prepped for shielding.
|
|

Working on getting the cavity cover re-fitted as some of the poly-resin gets inside the cavity.
|
Left: First thing post-finishing I need to do is get the cavity cover and the truss rod cover fitted since there is always some lacquer inside from finishing process. Right: Cavity now cleaned up so that cover fits nicely and interior surfaces have been prepped for the copper shielding to go in. Now to deal with the holes... |

Cavity cover fitted and cavity interior prepped for shielding.
|
|

Guitar is now in the capable hands of my finisher.
|
Left: The instrument is now ready and about to be delivered to my finishing expert so I will be driving it up to his shop today so that he can get started on the tint/finish. Right: I was able to go and pick up the instrument from my finisher this morning and I really like both the look and feel of the instrument! Really nice! |

Just picked up the guitar from finishing - it looks really impressive front and back, it geels really nice too. Now I have to get busy!.
|
|

Sone additional features for my customer. I will fill this with white - should look good on the final tinted area.
|
Left: My customer had a special request for this number to be added to the upper horn. I ran it in a fairly complicated setup on the laser today - looks good. Right: This is the guitar with the control and selector switch holes established. I will drill the two holes for the coil splitting after it returns from finishing. |

Just about done with all the sanding!.
|
|
| Right: I'm machining some recesses for the control knobs which always makes them look better in place. Also including a slightly smaller recess for the selector switch. I'm also running a couple of programs on the back side of the instrumentr on the CNC to establish the counter-bored recesses for the string retainers behine the bridge so that the strings are threaded through the back of the body. Will look classy that way. |

FMachining recesses for the control knobs.
|
|
| Holes now drilled in the headstock for the tuners. I'm sanding the entire instrument right now to get it ready for the finishing process. I have engraved the Watson logo into the truss rod cover amd also engraved Jonesy's name in the headstock. Based on color choices these should look good - can't wait to see it finished. |
|

So far Jonesy looks great on the instrument - moving on.
|
Left: After a couple of leveling operations the inlay area is now completely flush with the to surface of the guitar. Now on to tuner holes. Right: I marked out the headstock very carefully for the locations of the six tuners. They have been center punched and now I have to set up drill press and get these holes drilled. |

Tuner holes marked out and ready for drilling.
|
|

Inlay is now set and glued into the body of the guitar. It will look great with the final finish.
|
Left: Jonesy is now a part of the guitar and I'm going to add a thin leveling coat of sealer to protect the shell surface. Control holes are next. Right: I have added a clear protective layer and am now leveling the surface to the instrument top. Once that's done I'll put the tuner holes in and sdtart sanding! |

Final finishing on the inlay area prior to sanding the body.
|
|

Busy with headstock shaping to finsh this part off.
|
Left: I have been shaping the end of the headstock to get it close to finished dimensions. Need to get holes drilled now. Right: I now have Jonesy cut out and his shape will be glued onto the substrate piece. Once that's done he goes back into the laser to get the detail added. I will then install into guitar. |

3rd to last stage of inlay - shape gets glued onto base material then I will add details on laser.
|
|

This is my first test on the complete Jonesey shell inlay. May adjust a couple of things.
|
Left: I'm doing some testing on the Jonesy inlay to see what changes I may need to make. I think this would look nice but I have a couple of modifications to do first. Right: I'm doing a second test on the inlay just to compare results so that I can choose the best looking one. This one is all in white shell. |

Oh boy - I think I actually like this one better - time to consult with my customer I think!!!.
|
|

CNC being set up to cut out the two recesses for the Duncan pickups.
|
Left: A lot going on all at the same time right now. Just set up on CNC to start cutting out pickup cavities. Want to make sure I get a good fit for the pickup dimensions. Right: Both pickup recesses are now machined into the body and cleaned up and off my list. Looks a lot more like a real guitar now!. |

Glad to get the two pickup cavities cut into the body.
|
|

Seymour Duncan pickups for this guitar. Had to unpack them to make sure I cut the recesses to the right dimensions!.
|
Left: I now have the seymour Duncan pickups on hand and will be cutting the pickup recesses. These pickups have 4-core wiring so I can split the coils. Right: I ran the shell cut using thick paper to see how things would inter-connect. I'm going to do a couple of small edits first and then run the actual shell! |

Test run using paper to see if the components have enough integrity for assembly together.
|
|

Serial number tag installed and magnet holes drilled.
|
Left: This photo shows the addition of the serial number (machined slot and tag created on laser) and also the holes that will house the neo-magnets for holding the lid in place. Right: This is our very high quality Hipshot bridge that we will be using. One of the best out there. It will look great on the finished instrument! |

Locating the hipshot bridge on scale length. It's a very nice piece of hardware!.
|
|

Got the control cavity and related recess machined into the back of the body.
|
Left: I spent part of the day getting this control cavity machined to the preferred depth. The bosses are to house neodymium magnets that will hold the cover in place. Right: I added a slot for the instrument's serial number into the body of the instrument so that it soon will have its own unique identity. |

Slot cut for serial insert.
|
|
This is the shape of the inlat after some adjustments to get the most out of the space available.
|
Left: Headplate has been cleaned up and assembly looking good. I'm using the template top get the shape of the headstock finalized. Right: Guitar is now set up on the CNC for the cutting of the control cavity and the recess for the lid. I will run the lid recess first and then cut the cavity to full depth. |

CNC is set up with guitar to cut control cavity. I will run most of this today.
|
|

I'm writing the program to machine the control cavity and related lid recess. Will be running that soon.
|
Left: I have some upcoming work on the back of the body where I need to cut the control cavity and the recess for the lid. I'm busy programming that right now. Right: I got the headplate joint cleaned up and tested and then carefully clamped it onto the headstock. As soon as it's set I will sand and shape the profile. |

Getting the headplate attache dto the headstock of the guitar. One more task out of the way!.
|
|

Breaking down the light and dark on the Jonesy image so I can custom cut the shell.
This is the shape of the inlat after some adjustments to get the most out of the space available.
|
Left: Next step on the inlay is to choose he areas for the different shell colors. I will cut these separately and see what works best. Right: I have now created a vector file of the shell areas to be cut and I will use that to get a test sample that I will assemble. If it works out I will use or recut for the final version. |

I now have a two-coloe vector file based on the light and dark areas of the Jonesy photo. I'm going to cut these on the laser and assemble them..
|
|

cleaning up the end of the fingerboard so I can get a good fit for the headplate.
|
Left: Doing some machining to the headstock end of the fingerboard to optimize the joint between that and the headplate. Right: I'm doing some testing on the laser engraver on spare shell to set up the right conditions for adding the facial detail to the cat inlay. Once that's set I'll start cutting the shell pieces. |

I
m running a couple of tests on th shell to see if I cen get Jonesy's face engraved in the surface.
|
|

There is a lot of sanding in any instrument so I'm getting some of it done now.
|
Left: Between working on other features of the instrument and inlay, whenerver time permits I do more of the necessary sanding. It has to be really smooth before finishing! Right: Back of the headstock has now been sanded to a much smoother finish and aside from some filing and final sanding the shaping has been done. |

Refining the back of the headstock - more work required once neck profile is completed but it's much closer now.
|
|

These Schaller tuners should be a really good fit for the headstock.
|
Left: I'm putting a very nice set of German Schaller tuners on this guitar. I think they will be a very good fit for the headstock. Right: This is Jonesy as I prepare him for the upcoming creative work. I will be doing shell inlay first to establish the general color distribution based on photo. Then details on laser. |

I'm manuipulating my inage file to get a couple of options I can use on the fnished inlay to establish a really good likeness to our featyured kitty.
|
|

Roughing out more material from the back of the neck.
|
Left: Back working on the back of the guitar. Neck and joint with body need to be refined so that I can get started on the sanding process. Right: Time to get working on the belly-cut which not only is essential for the comfort of the guitar on the player but it does reduce a little mass and weight at the same time. |

Starting on the belly cut on the back of the guitar. Rough right now but I'll get it finished after testing it by sitting down with the instrument and getting it to frrl right.
|
|

Vut the truss rod cover out of the headplate on the CNC.
|
Left: Headplate now cleaned up with its veneer on the bottom. I just finished cutting out the truss rod cover on the CNC machine. Right: This is the headplate with the separated truss rod cover and I have also cut the headstock shape a little closer so that it will make gluing easier. Should have this attached soon! |

Kust about ready to get this headplate glued on!.
|
|

Headplate being worked on - I will be able to machine it and get it fitted soon.
|
Left: Headplate now one piece and I'm sanding to establish the correct thickness and then shaping it pretty close to the headstock profile shape. Right: To match the body - the headplate needs a decorative veneer on the lower surface so I'm attaching that in the vacuum press before machining. |

Using the vacuum press to add a decorative veneer onto the bottom of the headplate.
|
|

This is the shape of the inlat after some adjustments to get the most out of the space available.
|
Left: This is the shell that I am going to be using for the larger cat inlay on teh top of the guitar. It gives me three really nice shell shades so that I can get the best representation. Right: This is the headplate being glued together as a bookmatched piece. Once this is done I will shape and thickness it. |

slightly fuzzy photo of the pieces for the headplate being glued together.
|
|

I'm using Maple from the same material as the top plate to create the matching headplate on the guitar.
|
Left: I got some of the same maple I used for the top plate and sanded that down to create a matching headstock faceplate for the guitar. It will get the same blue/purple tint treatment. Right: Substrate for inlay has been thicknessed and cut out on the laser. I will be sanding this material to emulate the curve of the top. |

This is the very important bas material for the cat inlay. It has been cut and fitted into the instrument so that I can shape it and when that's done I will fit it into the body recess.
|
|

A messy but necessary job thicknessing the inlay substrate material.
|
Left: I'm drum sanding this hard substrate material down to the same thickness as the depth of the inlay recess. I will then cut it on the laser engraver. Right: I'm making sure that the back curve of the body is finished as I don't want to remove any more material from this area because of the inlay. |

doing some final filing and sanding on the back of the body.
|
|

After some careful setup I ran the recess for the inlay on the top of the guitar. Next will be the cutting of a substrate piece.
|
Left: I ran all three cutting tools to create the recess for the inlay. It has to be a certain depth due to the curve of the top - inlay will be a separate assembly. Right: This is the substrate material which I have to cut on the laser - it will serve as a solid base for the inlay and allow the inlay to follow the curve of the top. |

This is a special high density material that is very stable. I am going to sand it to the required thickness and cut the cat inlay shape and it will become the base of the veneer.
|
|

This is the shape of the inlat after some adjustments to get the most out of the space available.
|
Left: I made a few refinements to the outer profile of the inlay area to get the best out of the available space. Right: I have my programming where I want it. I can rough out most of it with a larger cutting tool but I will need to use a couple of very small tools to achiece the llevel of detail around the edges. |

Programming done for the inlay recess.
|
|

Getting started on the recess in the body for the cat inlay.
|
Left: I'm now set up on the CNC to create the recess that will contain the cat inlay. When that's done I will also cut some substrate pieces on the laser. Right: This is Jonesy, the subject of my upcomng inlay. I'm working on a new process I have not yet done but feel certain it will yield best results! |

Jonesy the cat - eargery anticipating how his likeness will come out on the guitar.
|
|

Getting the artwork for the inlay located and fitted between bridge and body contour.
|
Left: I'm now establishing bridge location and placing artwork for inlay relative to body contours and bridge footprint. Right: In preparation for machining the inlay block I did a lot of sanding on the body contour. It has to be a pretty much finished surface in order to get the inlay to work with the curved surface. |

Working on the radius at the beck of the body - has to be pretty much complete for me to add the inlay so that everything will align properly.
|
|

Getting the fingerboard glued onto the neck of the guitar.
|
Left: The fingerboard is now being attached to the neck of the instrument. I'm usding the combined power of dozends of strong rubber bands to apply even clamping pressure. Right: The fingerboard has now been successfully attached to the neck and is being cleaned up. This now allows me to position bridge and body inlay. |

Fingerboard on and now I'm cleaning up edges and the back of the neck and will then work on positioning the bridge.
|
|

Al little work around the neck/body joint right before gluing fingerboard.
|
Left: I'm doing some sanding around the neck joint area so that I don't have to do it after fingerboard is on - it's a little less work! Right: This is the setup for attaching fingerboard. As soon as I get the adhesive mixed it's action time and I will be adding countless rubber bands to secure the board while gluing. |
I thought twice about establsihing a contour on the top of the body because it would make the inlay tricky in that it has to follow the top curve. I decided to do it anyway!.
|
|

A little closer here to finished top profile dimensions. Everything has to be even or it will show up after finishing.
|
Left: I have now filed much of the top profile very close to finished size - I want to make sure depth is consistent all around - then I sand everything smooth. Right: Making preparations for the fairly big job of gluing the fingerboard onto the neck. Need to get all my tools together ahad of time for this job! |

Preparations for gluing fingerboard onto neck!.
|
|

Ready to do some top carving!.
|
Left: This is the top of the guitar with the markings that will help define the curved portion of the top without interfering with the inlay. Right: This is the body after I have rough profiled the the top to create a domed effect. The cat inlay will overlap with this body profile making the inlay process an interesting challenge! |

Not a very glamorous photo but it shows the top of the guitar after I roughed in the top domed profile.
|
|

Preparing to attach fingerboard.
|
Left: Fingerboard being fitted for assembly onto the neck of the guitar. This will also allow me to place the bridge on scale length. Right: I'm placing everything on the instrument so establish a few critical things. Marking body's slight contour - cat inlay needs to be placed relative to bridge (which will be chrome). |

I thought twice about establsihing a contour on the top of the body because it would make the inlay tricky in that it has to follow the top curve. I decided to do it anyway!.
|
|

I'm in the middle of carving the back of the headstock to leave a volute to strengthen that area.
|
Left: Now that the headstock is thicknessed I need to carve the volute and transition to the neck. It will look elegant and will be strong! Right: Just a quick picture of the fingerboard with all the frets in and the edges trimmed back to close to the fingerboard edges. I now need to separate the board from the substrate. |

Frets in the fingerboard.
|
|

Doing some work refining body edges.
|
Left: Back to working on the body - just want to get all the edges trimmed and sanded to the finished profile before I cut the recess for the cat inlay. Right: I needed to get the headstock thicknessed accurately and this strange setup has proved to be the best way to get that done. Will veneer the front. |

An awkward setup to create a finished thickness for the headstock. Will carve the details to final shape after this - then the front of the headstock gets a matching Maple plate.
|
|

Getting the fret wire bent and cut.
|
Left: My fret wire after pre-bending in preparation for installation. I will cut each one slightly oversize and get them all carefully installed. Right: Frets are now going into in the fingerboard and I will dress all the ends flush with the sides of the board. I'll do a formal fret dressing on all the ends after it's on. |

Frets are going in.
|
|

Fingerboard looks great with the inlay completed.
|
Left: This is the fingerboard with the cat inlay completed and the fret slots re-established. The board is now ready for fret installation. Right: This is the fingerboard after the inlay was installed and leveled flush to he compound radius of the fingerboard. Looks really good and I have recut the fret slots ready for fret install. |

Fingerboard pretty much ready for frets.
|
|

I am putting in the curved bas pieces onto which I will set the shell. All done with a magnifying glass and steady hands.
|
Left: I have been back to work on the other features of the guitar - specificlly on the back of the neck and body to get closer to finished dimensions. Right: I'm selecting a matching piece of curly maple material to apply to the headstock so that the amazing color on body will also appear on the headstock! |
Curly maple headstock.
|
|

Final artwork for the fingerboard inlay.
|
Left: My customer and I were able to decide on the preferred option for cat image and placement on the instrument. It will be done in shell! Right: After looking at several color options we decided on a very unusual blue-to-purple sunburst! This will certainly make the whole unique instrument stand out!! |

Final artwork for the fingerboard inlay.
|
|

First Working on the cat inlay on fingerboard.
|
Left: Here you can see some of the shell I cut for the cat inlay which is being test-fitted in their respective recesses. When everything fits I will start gluing the pieces in. Right: Paws are inlaid and now working on the remaining four cats. Doing one at a time because it is very delicate work. Will look nice! |

I am putting in the curved bas pieces onto which I will set the shell. All done with a magnifying glass and steady hands.
|
|

Getting started on fingerboard inlay - step one is getting a special material cut to support my shell pieces.
|
Left: This is the first of four steps I need to take to get the cat inlay into the fingerboard. I'm inserting a substrate for the shell. Right: I'm installing shell in the fingerboard so I started with the cat's paw prints since they were the easiest. Once these are sealed in I will move on to the larger cat profiles. |

First of the inlay features going in!.
|
|

First pass on the fingerboard inlay.
|
Left: This is the first pass which I decided to do with the 2nd tool of the three so that I can make sure the artowrk is correctly positioned. Right: After a lot of very careful work I was able to get all the inlay recesses cut into the fingerboard. I had to do it in four different operations but so far it's looking good. |

All the inlay features are cut into the fingerboard Now I have to cut some shell and some other tricky parts to make this all work beautifully!.
|
|

Setting up for all the inlay on the fingerboard.
|
Left: I now have the fingerboard up on the CNC for the machining of the various inlay shapes on the surface. Positioning is critical! Right: I have the cat inlay drawn, positioned, programmed and converted to g-code to I am ready to get the recesses cut. I will be runing three different cutters to yiels all the detail. |

Programming has been done for the cat inlay.
|
|

Gluing the carbon fibers into the slots in the neck .
|
Left: I am now getting the two carbon fiber rods glued into the slots in the neck. Once they are set in there I will clean up the glue on the top surface. Right: This is the neck after the rods have been secured in with aerospace-grade epoxy. Makes for a very strong and stable neck construction! Some sanding coming up! |

Carbon fiber rods in and the surface has been leveled.
|
|

Final artwork for the fingerboard inlay.
|
This image shows the final artwork for the fingerboard which I just recently used to create a couple of programs for machining. These should look really nice on the fingerboard and will definitely make this guitar one of the most unique I have ever made. I will be using some of the same shell product to do this inlay and the big inlay on the top of the guitar so they will match well also. There's a lot of detail involved so I will need to be careful! |
|

Fingerboard set up on CNC to cust out inlay shapes.
|
This is the fingerboard set up on the CNC where I am about to start the inlay process. I have the cat shapes programmed and my main task will be to make sure I get very accurate alignment between the artwork and the existing fret slots. I'll be cutting recesses in the board using a couple of different milling cutters. The final cut will be iwth a very small cutter so that I can trace all the detail possible in the shapes I am going to inlay. |
|

Setting up to add the artwork to the fingerboard.
|
I am using my raster file that I used as a proof to now creat a vector file of the inlay elements in the fingerboard at 100% scale. Once this is done I will export the artwork in a language that my CNC program software understands and use that top write the code for the machine. I will then cut the shapes into the fingerboard using a few very small end mills. I will cut the inlay shell separately and get that into the fingerboard after that. |
|

Looking at various concepts for the cat inlay.
|
We have explored some possibilities of the cat inlay on the top of the guitar. Some images work better for the guitar-shaped space than others. I want to get firm concedpt of what the artowrk will be and how it fits with the rest of the features on the guitar (specifically pickups and bridge) so I am trying out different layouts to see which might be best. I want to reduce the image to manageable areas for shell inlay - a bit like a jigsaw puzzle! |
|

Top Plate has been sucessfully glued on.
|
This is the instrument after I spent some time bringing the top plate profile down to match that of the body and then cleaning up all the way around the outer profile to establish a finished shape for the body for both the upper and lower halves. I needed this to happen so that I could configure the artwork for the top plate inlay knowing that the outer perimeter of the body was finalized. Now to lay out the cat art and make it all fit!!! |
|

Top Plate has been sucessfully glued on.
|
We now have a complete body - the top has been successfully glued on to the rest of the instrument. I will spend a little time sanding around the body perimeter so that I can bring the profile of the body right down to our profile shape. Next operation will probably be to machine the headstock to a prescribed thickness and manufacture a curly maple headstock plate to match the body wood. I'm anxious to get started on the inlay!! |
|

Top Plate being glued onto body.
|
This is the top in the process of being securely glued onto the rest of the body. It's quite a significant building step since the resulting complete body will allow me to tackle two important tasks. One will be to finalize the body shape so that I have a fixed and known canvas to work on, the other is that I can get started on the inlay work itself. The inlay will be relatively complex based on its size but my goal is to make it look amazing! |
|

removing excess material from top plate.
|
I have just trimmed off the excess material from the perimeter of the top plate so that I can achieve a better pressure fit on the top as it is being attached to the rest of the body. I haven't decided yet whether I want to use traditional mechanical clamping methods or put the assembly into the vacuum press. Either way we will get the top glued on so that we can proceed with the cutting of pickup recesses and thereafter the inlay process. |
|

Top plate fits very nicely on body so we will be gluing it on soon.
|
The top of the instrument can now be fitted onto the body and you can see where the area I recently cut out dovetails nicely with the end of the neck portion of the instrument. The top is still a little oversize so I am going to trim it back closer to the body size before I set things up to glue the top on permanently. Once the top is fixed on I will trim everything flush to the sides. It will be nice to have this all in one piece and to get started on inlay! |
|

Top Plate ready for further operations.
|
Based on the help of some feedback from my customer I am getting everything ready to do the inlay on the fingerboard. We were trying to establish a cat theme to compliment the inlay that is going to exist on the top plate. I have opredered more inlay material so that combined with teh material I have we can ensure the right continuity between the bosy top and fingerboard. I think this will look really nice with teh right shell content. |
|

Cutting out the area for the neck from the top plate assembly.
|
The top of the instruments needs one machining operation before the top goes on. Now that I have machined out the end of the neck on the assembly I need to machine out a corresponding piece on the top plate that will provide a very accurate joint between the two pieces. I will then used this machined out joint area to help glue the top in place and ensure that evenrything is a good fit and on center-line. |
|

Getting into the carving of the neck of the guitar - mostly material removal right now.
|
I'm working now on the back of the instrument, especially the rough carving of the neck itself so that I can get that entire length much closer to a finished size. I won't do the final sizing until the fingerboard is attached but this helps a lot to bring the back of the instrument to a condition where I can see and feel it as one piece. I need to now machine the back surface of the headstock so I can continue this process. |
|

Top Plate ready for further operations.
|
I am getting everything ready to get the top plate of the guitar glued onto the body. This means having everything I could possibly need on hand before I start as there is only a certain amount of time to get the glue applied and then clamp before the glue gets too tacky. It's like a small military operation, so I like to have all the hardware, cleanup materials, shims etc in one place before gettin started. Should work out fine! |
|

Text Coming Soon.
|
I had these images on my computer and I wanted to share them on this page since we will be using some of this artwork and theme on the fingerboard I am working on. These cat shapes will be arranged and cut into the surface of the fingerboard and then filled witha couple of different paua shell colors to create a theme to match the cat artowrk on the top of the instrument. The will look really nice with the shell grain! |
|

We now have a nice flat machined bodt top ready for top plate.
|
I did some machining around the base of the neck, firstly to bring that feature down to the correct length, and secondly to establish the finished surface for the top of the body. I had to remove enough material to place the upper surface of the maple top plate to the correct height based on the thickness of the top. Slightly complicated but you only have to do it once! I will now remove the extra material where the clamps were. |
|

Wiring holes cut in top of instrument body.
|
This is the top of the guitar with all the necessary wiring holes machined into the top surface. I wanted to get this done so that I could get the top glued onto the body. This in turn will allow me to get the cavities machined in the back, the pickup recesses cut in the top and also guarantee that I have a nice flat surface upon which to get started on my cat inlay. The fingerboard will also have feline characters on it - awesome! |
|

Top Plate ready for further operations.
|
The top is now one piece and I have sanded the top surface to remove any glue residue and to prepare the turface for the next steps ahead. I have a large and complex inlay to position and align on this top surface and I will post an illustration of the proposed inlay on this page soon. I am now working on establishing areas for wiring channels on the top face of the body and may also cut some small weight relief chambering where possible. |
|

Top plates being assembled into one bookmatched piece.
|
This is the clamping assembly to glue the two top plates together. I glue the two pieces on a non-stick surface and both plates are clamped down on that surface so that i can guarantee that they align perfectly on the same plane. At the same time i have to apply suitable lateral pressure to yield a nice clean joint between the two parts. I will typically leave an assembly like this overnight to ensure that the adhesive is fully cured. |
|

Fingerboard has had the fret slots and the nut slot cut.
|
The fingerboard for this guitar has now been machined. Firstly I cut the outer perimeter of the board to its finished widths and length. When that was completed I used a special cutter to generate the compound radius between the two ends. I then cut all the fret slots with a miniature end mill and finished up by cutting the slot that will house the nut. The resulting machined fingerboard has had some light sanding to remove machine marks. |
|

Ready to machine joint faces on the two top plates.
|
The two halves of the top plate are on my CNC so that I can machine very straight and square edges as a preparation for gluing the two pieces together. I have tried many ways in the past to do this but the CNC guarantees me the best results. As soon as I have done this and cleaned up the edges I will get my gluing materials collected together and get this set up for gluing into one piece. This maple is going to look nice! |
|

Working on the various wiring holes inside the body.
|
This is the top of the instrument body with the wiring holes for pickups and ground wiring marked out and then machined into the upper surface. I always cut these slots before the top gets glued on because it is much easier than trying to drill holes through the body after the top is attached. I will wait until the top is on before cutting the pickup holes out of the top plate anf the control cavity on the back of the body. |
|

First veneer (dark) going on the backs of the top plates.
|
I am now using the vacuum press to apply some dcorative veneer onto the backs of both top plate pieces. Firstly I am adding some dark veneer that will contrast nicely with the maple. The second veneer will be light (probably maple) and that will contrast with the mahogany of the body wings. Should look really nice weh we are done with this. Next job for the top is to machine joint faces and assemble the two parts. |
|

Two halves of the bookmatched top have been rough sawn.
|
The two top plates have been surfaced and I decided on the best bookmatching orientation. I then rough cut the top and bottom halves to match the body profile. This gives less material to have to work with as I proceed to adding decorative veneers onto the underside of each of the plates. I will add contrasting veneers so that we maintain the double pinstripe effect of the woods on the neck and body assembly. |
|

Curly Maple top plates being sanded nice and flat.
|
This is a photo of the top plates which have been sanded to a smooth flat surface and are now prepared for cutting to the body shape. I now need to machine glue joint surfaces along the inner edges so that I can clamp and glue the two plates together and create a beautiful bookmatched one-piece top. I will also have some decorative veneer added to the bottom surface of each between the top and the body. |
|

Sanding the back of the guitar nice and flat and smooth.
|
I have machined the body thickness down to its finished size and removed the areas I had used for clamping. I have also sanded this surface smooth so that it can be used as a reference surface for upcoming machining work. I did a little rough carving on the neck joint area just to get that started and I'm now going to do a some work on the headstock area to get that closer to our target thickness and shape. final shaping on the back of the neck will happen after the finguerboard is attached. |
|

Machning the back surface of the guitar.
|
I have the body of the instrument up on the CNC right now to do some machining on the back surface. This will give me a finished surface for the back and establish the body thickness and its relationship to other features on the instrument. It will also allow me to get back to finishing the outside ciontour of the body since I need to cut up the maple that will become the bookmatched top of the instrument. |
|

Body halves are now assembled onto the guitar.
|
The second body half is attached to the core and we now have something that looks like a complete guitar! Next up on the task list is some sanding around the outer profile to get us a little closer to the final body shape. After that, I will machine the back and the top surface of the body so that it is ready for the assembly of the curly maple top plate. I am also getting the fingerboard ready for cutting of the fret slots. |
|

Getting the upper body bout ready for assembly.
|
This photo shows the second body half as I am fitting it to the center core of the guitar. I trimmed it up a little bit to save myself some spindle sanding after the body is assembled. I always have to make sure that the joint faces match nicely and are perfectly square to each other. I check with the body template to make sure the relative positioning is right and that the pieces are snug on the non-stick surface I clamp them onto. |
|

First body half is now attached and I'm getting ready to get the second one glued on.
|
The first of the two body halves is now securely attached to the core section. I did some minor cleanup around the body and the glue joint so that the assembly is now ready to have the second body half attached. I will get the second half attached as soon as possible! I have two beutiful pieces of curly maple that I am hoping to use for the top plates and I will be starting work on those pieces to create the top of the instrument. |
|

Getting the first of the body halves glued onto the core.
|
I am now gluing the first of the two body halves onto the core section of the guitar. I'm leaving a little extra on both sides so that I can clean everything up on the cnc once the gluing is done. It will be nice to see this instrument looking like a real guitar once these two body halves are attached. I will then refine the outer perimeter of the guitar body and start working on the top plates. PLand for inlay are underway too. |
|

Gluing decorative veneers onto the mahogany body halves.
|
In this photo I am gluing a maple veneer onto the joint face of one of the body halves. I will do this to both parts and then repeat the process by gluing darker veneer onto the two machined joint faces on the core section. At that point I will be able to glue the sides on and in the process create a very attractive double pinstripe that will match the construction of the core section. Should look really nice when that is done. |
|

Cutting flat surfaces on the core section to prepare for assembly of body halves.
|
The core section of the guitar is now up on the CNC for some machining. I am carefully aligning the previous machined surfaces to the axes of the machine and then cutting a flat and level joint surface on each side. These new surfaces will then be ready for me to attach the body pieces. I will be applying some decorative veneer to each before I do the final gluing. Will be nice to see something that looks like and instrument! |
|

Machining joint faces on the body halves.
|
In this operation I am squaring up the body half pieces to themachine table so that I can cut a nice flat and square joint face on each piece that will prepare them for assembly onto the core section of the guitar. In order to yield a really clean joint I have found this to be the most predictable method of joint prep. Using planers etc just dont give me thr drgree of accuracy that is required for guitar building. Next I will add veneers to the faces. |
|

Getting ready for more machining to all the components.
|
I have my body halves, my core section and my fingerboard all ready for more operations. I also have some really nice curly maple which will be the top plates. I am just about to do some machining on the body halves so that I can get them prepped to glue onto the core. Once that is done it will definitely look more like a guitar! Woods look very nice together and I'll probably do a double veneer between body and core sections. |
|

Fingerboard set up on the CNC for some machining work.
|
Time to get the fingerboard machined. I want to get the first few operations done so that the board will be close to ready to go on the neck. Right now I will be cutting the outside profile of the board, generating the compount radius on the top, cutting the nut slot and all of the fret slots. That will move things ahead significantly. We have had some discussions about inlay which will be finalized by the time I need to do that. |
|

Machining the back surface of the core section.
|
I am now cutting the back of the center core to make that surface square and parallel to the angled surface I machined at the front of the core. This will actually be the final back surface and when I glue the body halves on they will be parallel to this surface. I am now going to thickness the two mahogany body halves and get tose machined in preparation for assembly onto this core section.At that point we'll have something that looks like a guitar!! |
|

Fingerboard ready for CNC machining.
|
This is the Cocobolo fingerboard attached to an MDF support and ready for machining on the CNC. The board had been drum sanded flat and glued onto the support. It will not be removed until the board is cut and shaped, fret slots, side dots, inlay and frets are all complete and installed. I will get this process started as soon as my CNC machine is free. While that is going on we are looking closely at the inlay artwork for the top. |
|

Mahogany body halves in the process of being cut and sanded.
|
The body parts have been sanded flat to facilitate further work and the outline of the shape of the instrument has been rough sawn from the material. I had an option to use either Alder or Mahogany so I had prepared some of each material. This is the mahogany material which we eventually decided was a better option based on several factors including the overall tone qualities we want to yield from the finished instrument. |
|

Fingerboard finally cut and rough sawn to size. Ready for some machining.
|
This is the fingerboard now that I have split the board and rough sawn the piece slightly oversize for the neck. Next task is to sand the top and bottom faces in the drum sander nice and flat and then the board will be attached to a substrate which will support it all the way through machining, inlay, side dot and fret installation. I'm also working on the body pieces and the material which will be used for the control cavity cover. |
|

resawing the raw material for the fingerboard.
|
Working on getting the fingerboard materialsawn up so that I can get the plate sanded and ready for machining. This material is pretty hard so it took quite a long time to saw through the board. Now that I have it split I can get it on the drum sander and have it preppes for machining on the CNC. I will select the best part of the grain and rough-saw the fingerboard to get the very best looking effect. This will make a beautiful fingerboard! |
|

First class piece of bocote for the fingerboard.
|
Made the final choice on the fingerboard wood. It's still Bocote but it's a piece I got from a So-Cal wood vendor that was unique and somewhat special because of its straight linear grain. This is definitely one of my favorite fingerboard woods and this piece is particularly good because it has nice contrast, great color, straight grain and since we are planning to add inlay to the fingerboard, it's not too curly to detract from the inlay artwork! |
|

Gluing extra headstock material onto the neck section.
|
Certainly not one of the most pivotal steps in the building of a guitar but worthy of mentioning anyway. I'm gluing extra curly maple onto both sides of our neck blank so that I have sufficient real estate for the geomertry of the headstock. When this is done I will clean up the upper surface and then at least rough cut the headstock shape so that I don't have a lot of excess material to deal with. probably machine back surface too. |
|

Curly (tiger) Maple for the top plate of the guitar.
|
I purchased the is very highly figured bookmatched set of curly maple for this guitar because the grain will look amazing with the color tint applied, but also because. Also, the lighter the grain, the better the color and inllay we apply will look. As soon as the body parts are close to finished size I will cut out the shape and bookmatch these pieces together for the top. I will also be able to use the same material for the headstock. |
|

Some top quality Mahogany which will look really nice on the instrument.
|
I looked at Alder and Ash as possible candidates for the back body halves but in terms of the tone we are looking for and the overall aesthetics of the instrument we ended up opting a for piece of Mahogany. This is a very good grade of Mahogany and will help us yield more of a classic Les Paul tone. It's also a really nice color and should look beautiful on the finished instrument. It has now been sawn so I will get some more photos posted very shortly. |
|

Nice piece of figured Bocote as a candidate for fingerboard on this guitar.
|
I'm tempted to use this piece of Bocote for the fingerboard since it it is such a nice and unusual grain. It does go a little darker over time but in a good way as the grain will still look really impressive. While I am working on material and blanks for the body halves I will discuss this and a couple of other wood options with my customer. For my custom builds I tend to look for woods that you would not see on even high end production guitars. |
|

Machining operations on the core have now been completed.
|
All the machining on this core section has now been completed. I have cut the contour of the neck and body core, established the truss rod slot and machined the two slots that will house the carbon fiber rods. The assembly can now come off this machine for some manual grinding, carving, sanding and cleanup and we will then start working on getting the body halves ready for assembly onto the core. |
|

Cutting body angle.
|
In this photo I am generating the body angle on the top surface of the core section. I have also machined the top of the neck area, cut the slot geometry for the truss rod and generated a headstock angle which will come into play later. Next I will machine the blank to suit the actual size of the fingerboard and cut the two slots for the carbon fiber re-enforcing rods. Oce all that is done the assembly can come off the machine. |
|

Core us up on CNC for several machining operations.
|
The core section has now been set up on the CNC for several upcoming machining operations which will establish many datum and joint surfaces as well as the final neck and core perimeter and slots for truss rod and carbon fiber rods. I will start by machining a flat suface on the top of the neck which will be our fingerboard joint surface. I will then generate the headstoch and neck-to-body angles. |
|

This is the completed core ready for machining!.
|
I have finished all the gluing of the various laminates to complete the core section of the guitar. I have also cleaned up the various surfaces on he assembly so that it is ready for setup on my CNC machine where I will start establishing finished surfaces. Now that we have a complete core the rest of the instrument will come together quite quickly. As soon as my machine is free I will start that work. Very resonant neck by the way!! |
|

Gluing the first of the two outer laminates onto the core section.
|
In this photo I am gluing the first of two outer laminates onto the pre-assembled center section of the core. When this and the second outer piece are attached we'll have a complete tapered core that will become the heart of the guitar. Once the core is complete i will be able to start machining things to size. I'm also collecting materials for top and back of the instrument and will have photos of these parts very soon. |
|

Laminates ready for gluing in the vacuum press.
|
The two side laminates are now sanded and ready for gluing to veneers. I have cut the veneer pieces slightly oversize and this time I am going to use the vacuum press to do the clamping diring the gluing process. I will be able to leave the pieces in this setup for a few hours and have both pieces ready for trimming and cleanup. As soon as that is done I'll start the assembly process with the rest of the core section. |
|

Drum sanding the two sides of the outer laminates.
|
I'm in the process of sanding both sides of the two outer laminates flat and parallel. I like to sand the surfaces as a pair because I want the thicknesses of each piece to be identical. This helps me while machining to make sure all the features established on the instrument are on centerline. Now that this is done I will get the dark veneer material attached to the inside face of each piece and glue everything together. |
|

Three center laminates are now one piece. Getting ready to attach the final two sides.
|
This photo shows the fove components of the core of the guitar. The three tapered center pieces have been assembled together. The double veneer transition between the laminates already looks really nice! I have the two outer curly maple pieces rough cut and I now need to get them sanded and veneered so that I can get all five laminates of the core section into one solid piece that I can start machining! |
|

Clamping more veneers to wenge laminates.
|
I am now gluing two of the three center laminates together. Once these have fully cured I will clean the assembly up and then glue on the second wenge laminate to create a set of three tapered laminates. While that is going on I will be drum sanding the two Curly Maple outer pieces and applying a dark veneer to the inner edge of each. When that is done the two outer pieces will be glued to this center sub-assembly and we'll have a core! |
|

Veneers have been applied to the center laminates.
|
Here, we have two of the core taper laminates. The wenge one has maple veneer glued onto it and the maple one has lavoa veneer glued to it. These veneers will add contrasting highlights when the core section laminates are glued together. I have to do this to both sides of all the laminates but the effect looks great on the finished product! I will be getting to the assembly stage of the core very soon . |
|

Now ready to start machining on the two Wenge tapered nack laminates.
|
While I am busy veneering the center piece I am also working on the CNC where I am milling the two matching wenge laminates to achieve their thickness and common tapers. As soon as these are machined they will be prepared for maple veneer which I will glue onto both sides of each piece. I will then be ready to glue the threecentral laminates together and we will have the beginnings of a real guitar! |
|

Center Maple laminate is now completely machined to its tapered dimensions.
|
This is the center laminate for the core of the guitar. It has been machined both to the correct thickness and taper that I calculated for this component. I will clean up the surfaces in case there are witness machining marks and at that point I can start gluing veneer onto the sides so that the assembly process can begin. My next step will be to cut and glue veneer to both sides and trim to clean up. |
|

Center maple laminate now on CNC for machining.
|
I spent a little time sanding the core laminates and I now have the center core laminate up on the CNC ready to be machined both to finished thickness and to the required taper measurements. Once I get a couple of these machined I will be able to ceneer and start building the core of the instrument from the center outwards. I have material for the other parts of the instrument ready also. More pictures coming. |
|

Two Wenge laminates ready to be combined in the neck assembly.
|
I have now cut two center pieces of Wenge which I will sand and machine to become part of the 5-piece core assembly of the guitar. Since we will be using color tint on the instrument I wanted to keep these additional laminates as dark as possible so that we didn't end up with color conflicts regardless of the tint we use. The neck will look really nice after the color is applied based on this contrast! |
|

Have all three maple laminates cut - two more to go.
|
These are the three maple components of the neck/core section. We have planned it so that the core of the guitar will be mostly maple to match the top. I will however, introduce a couple of dark laminates (probably wenge for sound and color reasons) to enhance the appearance and also stabilize the structure of the neck section. All the center laminates will be tapered so that their combination will match the taper of the neck itself. |
|

First two core laminates have been rough cut.
|
These are the two outer neck/core laminates that I will be using on this guitar. I will also cut another maple laminate for the center of the instrument and also will start cutting the darker wood (I'm thinking Wenge for tone and weight factors) so that I have all the components ready for the core of the guitar. They will then need to be sanded and machined to ore-determined taper sizes on the CNC. |
|

Template ready to mark out rough cutting of maple neck components. We'll combine a darker wood to add a couple of tapered stringers.
|
I am using a template for a neck through guitar to plan out which pieces of curly maple I will use for the outer laminates. I try to get the best possible yield of curly grain for these pieces so that the neck on the guitar will have a lot of figure all along its length. Having decided how to arrange these I have now marked them out on the material and can procees to rough cut them from the board on the bandsaw. |
|

Got hold of some nice Curly Maple for part of the core of the instrument.
|
I know that the neck and body core of this guitar will comprise of a good amount of curly maple. It's beautiful wood, it produces a good bright tone and it takes color tint really well - three considerations that were important for this guitar. I'm considering asian ebony or rosewood or similar density for the other laminates as this would balance out midrange and sustain. I will be discussing this with my customer. |